Archive
Performing Bulk Operations in OpenIDM
OpenIDM does not support bulk operations out of the box. One way to to do this, however, is to obtain a list of IDs that you want to perform an operation on and then loop through the list performing the desired operation on each ID.
Yes this is a hack, but let’s be honest, isn’t life just one big set of hacks when you think about it?
Here are the steps.
Suppose for instance that you want to delete all managed users in OpenIDM that have a last name of “Nelson”. The first step is to obtain a list of those users; which you can easily do using a cURL command and an OpenIDM filter as follows:
curl -u openidm-admin:openidm-admin 'http://localhost:8080/openidm/managed/user?_queryFilter=(sn+eq+"Nelson")&_fields=_id&_prettyPrint=true'
This returns a listing of all managed objects that match the filter as follows.
{
  "result" : [ {
    "_id" : "ed979deb-2da2-4fe1-a309-2b7e9677d931",
    "_rev" : "5"
  },
  {
    "_id" : "581c2e13-d7c4-4fff-95b8-2d1686ef5b9c",
    "_rev" : "1"
  },
  {
    "_id" : "1295d5db-c6f8-4108-9842-06c4cde0d4eb",
    "_rev" : "3"
  } ],
  "resultCount" : 3,
  "pagedResultsCookie" : null,
  "totalPagedResultsPolicy" : "NONE",
  "totalPagedResults" : -1,
  "remainingPagedResults" : -1
}
But most of the data returned is extraneous for the purposes of this exercise; we only want the “_id” values for these users and to obtain this information, you can pipe the output into a grep command and redirect the output to a file as follows:
curl -u openidm-admin:openidm-admin 'http://localhost:8080/openidm/managed/user?_queryFilter=(sn+eq+"Nelson")&_fields=_id&_prettyPrint=true' | grep "_id" >> bulkOperationIDs.txt
This will produce a file that looks like this:
     "_id": "ed979deb-2da2-4fe1-a309-2b7e9677d931",
     "_id": "581c2e13-d7c4-4fff-95b8-2d1686ef5b9c",
     "_id": "1295d5db-c6f8-4108-9842-06c4cde0d4eb"
(yes, there are leading spaces in that output).
You are still not done yet as you need to strip off all the extraneous stuff and get it down to just the values of the “_id” attribute. You can probably devise a cool sed script, or find an awesome regular expression for the grep command, but it is just as easy to simply edit the file with and perform a couple global search/replace operations:
:1,$ s/      "_id": "//g

:1,$ s/",//g
The above example demonstrates a global search/replace operation in the “vi” editor – the best damn editor on God’s green earth!
However you approach it, the goal is to get the file to consist of only the IDs as follows:
ed979deb-2da2-4fe1-a309-2b7e9677d931
581c2e13-d7c4-4fff-95b8-2d1686ef5b9c
1295d5db-c6f8-4108-9842-06c4cde0d4eb
Now that you have this file, you can perform any operation you would like on it using a simple command line script tied into the appropriate cURL command. For instance, the following would perform a GET operation on all entries in the file (it is HIGHLY recommended that you do this before jumping right into a DELETE operation):
for i in `cat bulkOperationIDs.txt`; do curl -u openidm-admin:openidm-admin -X GET "http://localhost:8080/openidm/managed/user/$i?_prettyPrint=true"; done
Once you feel comfortable with the response, you can change the GET operation to a DELETE and kick the Nelsons to the proverbial curb.
Configuring OpenIDM on a Read Only File System in 10 Easy Steps
During the normal course of events, OpenIDM writes or updates various files on the file system to which it is installed. This includes log files, audit files, process IDs, configuration files, or even cached information. There are times, however when you find yourself needing to deploy OpenIDM to a read only file system – one to which you cannot write typical data.
 Fortunately, OpenIDM is flexible enough to allow such an installation, you just need to make some adjustments to various settings to accommodate this.
The following information provides details on how to configure OpenIDM on a read only file system. It includes the types of information that OpenIDM writes by default, where it writes the information, and how you can alter the default behavior – and it does it in just 10 EASY Steps (and not all of them are even required!).
Note: The following steps assume that you have a shared (mounted) folder at /idm, that you are using OpenIDM 4.0, it is running as the frock user, and that the frock user has write access to the /idm folder.
1. Create external folder structure for logging, auditing, and internal repository information.
$ sudo mkdir -p /idm/log/openidm/audit

$ sudo mkdir /idm/log/openidm/logs

$ sudo mkdir -p /idm/cache/openidm/felix-cache

$ sudo mkdir /idm/run/openidm
2. Change ownership of the external folders to the “idm” user.
$ sudo chown -R frock:frock /idm/log/openidm

$ sudo chown -R frock:frock /idm/cache/openidm

$ sudo chown -R frock:frock /idm/run/openidm
Note: OpenIDM writes its audit data (recon, activity, access, etc.) to two locations by default: the filesystem and the repo. This is configured in the conf/audit.json file.
3. Open the conf/audit.json file and verify that OpenIDM is writing its audit data to the repo as follows (note: this is the default setting):
"handlerForQueries" : "repo",
4. Open the conf/audit.json file and redirect the audit data to the external folder as follows:
"config" : {

  "logDirectory" : "/idm/log/openidm/audit"

},
After making these changes, this section of the audit.json will appear as follows (see items in bold font):
{

  "auditServiceConfig" : {

    "handlerForQueries" : "repo",

    "availableAuditEventHandlers" : [

      "org.forgerock.audit.events.handlers.csv.CsvAuditEventHandler",

      "org.forgerock.openidm.audit.impl.RepositoryAuditEventHandler",

      "org.forgerock.openidm.audit.impl.RouterAuditEventHandler"

    ]

},

"eventHandlers" : [

  {

    "name" : "csv",

    "class" : "org.forgerock.audit.events.handlers.csv.CsvAuditEventHandler",

    "config" : {

      "logDirectory" : "/idm/log/openidm/audit"

    },

    "topics" : [ "access", "activity", "recon", "sync", "authentication", "config" ]

},
As an alternate option you can disable the writing of audit data altogether by setting the enabled flag to false for the appropriate event handler(s). The following snippet from the audit.json demonstrates how to disable file-based auditing.
"eventHandlers" : [

  {

    "name" : "csv",

    "enabled" : false,

    "class" : "org.forgerock.audit.events.handlers.csv.CsvAuditEventHandler",

    "config" : {

      "logDirectory" : "/audit",

    },

    "topics" : [ "access", "activity", "recon", "sync", "authentication", "config" ]
Note: OpenIDM writes its logging data to the local filesystem by default. This is configured in the conf/logging.properties file.
5. Open the conf/logging.properties file and redirect OpenIDM logging data to the external folder as follows:
java.util.logging.FileHandler.pattern = /idm/log/openidm/logs/openidm%u.log
Note: OpenIDM caches its Felix files in the felix-cache folder beneath the local installation. This is configured in the conf/config.properties file.
6. Open the conf/config.properties file and perform the following steps:
a. Redirect OpenIDM Felix Cache to the external folder as follows:
# If this value is not absolute, then the felix.cache.rootdir controls

# how the absolute location is calculated. (See buildNext property)

org.osgi.framework.storage=${felix.cache.rootdir}/felix-cache
b. Define the relative path to the Felix Cache as follows:
# The following property is used to convert a relative bundle cache

# location into an absolute one by specifying the root to prepend to

# the relative cache path. The default for this property is the

# current working directory.

felix.cache.rootdir=/idm/cache/openidm
After making these changes, this section of the config.properties will appear as follows (see items in bold font):
# If this value is not absolute, then the felix.cache.rootdir controls

# how the absolute location is calculated. (See buildNext property)

org.osgi.framework.storage=${felix.cache.rootdir}/felix-cache
# The following property is used to convert a relative bundle cache
# location into an absolute one by specifying the root to prepend to
# the relative cache path. The default for this property is the
# current working directory.
felix.cache.rootdir=/idm/cache/openidm
Note: During initial startup, OpenIDM generates a self-signed certificate and stores its security information in the keystore and truststore files as appropriate. This is not possible in a read-only file system, however. As such, you should generate a certificate ahead of time and make it part of your own deployment.
7. Update keystore and truststore files with certificate information and an updated password file as appropriate. The process you choose to follow will depend on whether you use a self-signed certificate or obtain one from a certificate authority.
Note: On Linux systems, OpenIDM creates a process ID file (PID file) on startup and removes the file during shutdown. The location of the PID File is defined in both the start script (startup.sh) and the shutdown script (shutdown.sh). The default location of the process ID is $OPENIDM_HOME folder.
8. Open the startup.sh script and update the location of the process ID file by adding the following line immediately after the comments section of the file:
OPENIDM_PID_FILE="/idm/run/openidm/.openidm.pid"
9. Repeat Step 7 with the shutdown.sh script.
Note: OpenIDM reads configuration file changes from the file system by default. If your environment allows you to update these files during the deployment process of a new release, then no additional changes are necessary. However, if you truly have a read only file system (i.e. no changes even to configuration files) then you can disable the monitoring of these configuration files in the next step. Keep in mind, however, that this requires that all configuration changes must then be performed over REST.
10. Open the conf/system.properties file and disable monitoring of JSON and subsequent loading of configuration file changes by uncommenting the following line:
#openidm.fileinstall.enabled=false
OpenIDM Property Value Substitution
Property value substitution can be a useful technique for customizing OpenIDM deployments across multiple environments.
Assume, for instance, that you have three environments (Development, Test, and Production). Your OpenIDM deployment has been configured for one OpenDJ system resource, but the configuration properties for that resource is different across each environment. The following diagram demonstrates the different host names for the OpenDJ instance in each environment.


In order to accommodate this you would need to maintain three separate provisioner files – one for each environment you are operating in and you would need to manage each file separately under source control.

An alternative, however, is to create OpenIDM variables that customize the OpenDJ configuration parameters based on the environment. The customizations are then centralized in a common file and selected based on settings contained in OpenIDM’s environment variables.
Here are the steps necessary to configure OpenIDM property values.
- Stop the OpenIDM instance.
- Edit the conf/boot.properties file and add environment specific variables as follows:
DEV.odjhost=dev.opendj.example.com
TEST.odjhost=test.opendj.example.com
PROD.odjhost=opendj.example.com
[Where DEV, TEST, and PROD are the OpenIDM environment variables set in OPENIDM_OPTS, odjhost is the name of the property used across the three environments, and the values (i.e. dev.opendj.example.com, test.opendj.example.com, and opendj.example.com) are the environment specific values.]
3. Edit the provisioner file (provisioner.openicf-ODJ.json) and replace the value of the host property as follows:
“configurationProperties” : {
“host” : “&{&{environment}.odjhost}”,
“port” : “1389”,
Properties are referenced in OpenIDM with the construct, &{property}. When OpenIDM sees these references, it replaces them with the appropriate property value as defined in the boot.properties file. The example shown above demonstrates nesting of property values and assuming that the environment variable is set to a value of TEST in OPENIDM_OPTS, then the substitution occurs from the innermost to the outermost brackets as follows:

You now have a consistent set of configuration files (i.e. boot.properties and provisioner.openicf-ODJ.json) that can be deployed to all three environments (Development, Test, and Production), the only step remaining is to configure OPENIDM_OPTS in each environment. This can be accomplished by setting the environment variable in your /etc/init.d/openidm or openidm/startup.sh scripts as follows:
OPENIDM_OPTS=”-Xmx1024m -Xms1024m -Dfile.encoding=UTF-8 –Denvironment=TEST“
4. Start the OpenIDM instance and look for any errors in the openidm0.log.0 log file.
Assuming that everything started without any problems, you can now see that your environment specific parameters have been set correctly by querying the configuration object for OpenDJ, or simply by looking at the connector configuration in the OpenIDM Admin Console as follows.

Configuring OpenIDM Password Reset
ForgeRock OpenIDM is a powerful account management and data synchronization tool that provides many robust features out of the box. Some of these features must be enabled, however, before they can be used. Once such feature allows a user to reset their password in the OpenIDM Web UI by responding to challenge questions.
The OpenIDM Web UI provides an out of the box experience for resetting an OpenIDM user’s password based on a user’s response to challenge questions. This functionality is disabled by default and must be enabled in the ui-configuration.json file before attempting to perform this operation in the WebUI.
The following instructions describe how to enable this functionality and test the password reset flow and have been tested with OpenIDM version 3.1.0.
Configure Password Reset
1. In a terminal window, change to the OpenIDM configuration folder
$ cd openidm/conf
2. Edit the ui-configuration.json file
3. Modify the value of the “securityQuestions” attribute from “false” to “true” as follows:
{
 "configuration" : {
 "selfRegistration" : false,
 "securityQuestions" : true,
 "siteIdentification" : false,
 "lang" : "en",
4. (OPTIONAL) The minimum length for responses to security questions is 16 characters. This is defined by the securityAnswer policy in the openidm/conf/policy.json file. You can modify the minimum number of characters associated with this policy by editing the minLength parameter in the minimum-length policyID as follows:
"name" : "securityAnswer",
 "policies" : [
    {
              "policyId" : "required-if-configured",
              "params" : {
                     "configBase" : "ui/configuration",
                     "baseKey" : "configuration.securityQuestions",
                    "exceptRoles" : [
                             "system",
                             "openidm-admin"
                    ]
             }
 },
 {
              "policyId" : "minimum-length",
              "params" : {
                      "minLength" : 4
               }
 },
Note: Modifications to files in the conf folder are hot swappable; this means that your changes are now in effect without the need to restart OpenIDM. Assuming you have not made any errors in configuring either of these two files (you can confirm by looking for errors in the openidm/logs/openidm0.log.0 file), then you have now enabled password reset for the WebUI. Before this feature can be used, however, a user must first enter responses to challenge questions.
Enter Responses to Challenge Questions
4. Go to OpenIDM user interface (http://openidm.example.com:8080/openidmui/index.html#login/). You will now see a “Reset your password” link available in the login form.

5. Log in as an existing user (i.e. bill.nelson@example.com).
6. Select the “Change Security Data” link.
7. Enter your current password in the form provided and select the “Continue” button.

8. Enter and confirm your password in the fields provided.
9. Select a security question and provide an answer in the space provided.

10. Select the “Update” button and then log out of the user interface.
Note: You can now test the password reset functionality.
Test Password Reset Functionality
11. Return to OpenIDM user interface (http://openidm.example.com:8080/openidmui/index.html#login/).
12. Select the “Reset your password link”.
13. Enter your username (i.e. bill.nelson@example.com) and click the “Submit” button.

14. You should see the security question that you selected in step 9 appear. Provide the response that you entered in step 9 and click the “Submit” button.
Note: Case matters!
15. If you responded to your security question properly, then you will now see form elements appear allowing you to enter and confirm a new password.
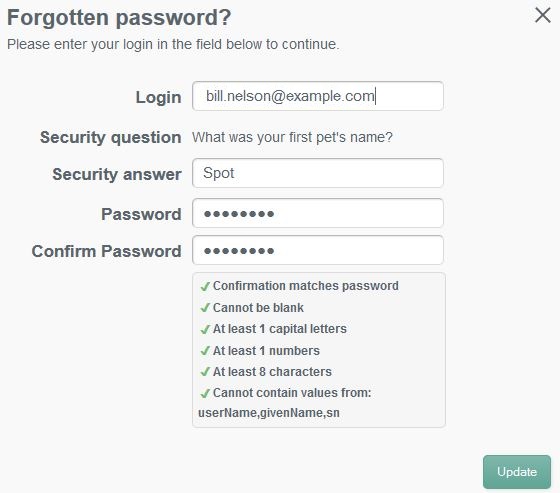
16. When you click the “Update” button, the new password will be applied to your OpenIDM object and you will be automatically logged in to the end user interface.
OpenIDM 3.1: A Wake Up Call for Other Identity Vendors
Having implemented Sun, Novell, and Oracle provisioning solutions in the past, the one thing that I found to be lacking in ForgeRock’s OpenIDM solution was an easy to use administrative interface for connecting to and configuring target resources.
Sure, you could configure JSON objects at the file level, but who wants to do that when “point and click” and “drag and drop” is the way to go.
With OpenIDM 3.1 my main objection has been eliminated as the the new resource configuration interfaces have arrived – and boy have they arrived!
 See the OpenIDM Integrator’s Guide for more information.
The latest release now places OpenIDM directly in line as a viable alternative to the big boys and will make our deployments much quicker and less prone to error. Way to go ForgeRock, thanks for listening (and responding).
 |
