Archive
OpenDJ Attribute Uniqueness (and the Effects on OpenAM)
In real life we tend to value those traits that make us unique from others; but in an identity management deployment uniqueness is essential to the authentication process and should not be taken for granted.

Case in point, attributes in OpenDJ may share values that you may or may not want (or need) to be unique. For instance the following two (different) entries are both configured with the same value for the email address:
dn: uid=bnelson,ou=people,dc=example,dc=com
uid: bnelson
mail: bill.nelson@identityfusion.com
[LDIF Stuff Snipped]
dn: uid=scarter,ou=people,dc=example,dc=com
uid: scarter
mail: bill.nelson@identityfusion.com
[LDIF Stuff Snipped]
In some cases this may be fine, but in others this may not be the desired effect as you may need to enforce uniqueness for attributes such as uid, guid, email address, or simply credit cards. To ensure that attribute values are unique across directory server entries you need to configure attribute uniqueness.
UID Uniqueness Plug-In
OpenDJ has an existing plug-in that can be used to configure unique values for the uid attribute, but this plug-in is disabled by default. You can find this entry in OpenDJ’s main configuration file (config.ldif) or by searching the cn=config tree in OpenDJ (assuming you have the correct permissions to do so).
dn: cn=UID Unique Attribute,cn=Plugins,cn=config
objectClass: ds-cfg-unique-attribute-plugin
objectClass: ds-cfg-plugin
objectClass: top
ds-cfg-enabled: false
ds-cfg-java-class: org.opends.server.plugins.UniqueAttributePlugin
ds-cfg-plugin-type: preOperationAdd
ds-cfg-plugin-type: preOperationModify
ds-cfg-plugin-type: preOperationModifyDN
ds-cfg-plugin-type: postOperationAdd
ds-cfg-plugin-type: postOperationModify
ds-cfg-plugin-type: postOperationModifyDN
ds-cfg-plugin-type: postSynchronizationAdd
ds-cfg-plugin-type: postSynchronizationModify
ds-cfg-plugin-type: postSynchronizationModifyDN
ds-cfg-invoke-for-internal-operations: true
ds-cfg-type: uid
cn: UID Unique Attribute
Leaving this plug-in disabled can cause problems with OpenAM, however, if OpenAM has been configured to authenticate using the uid attribute (and you ‘accidentally’ create entries with the same uid value). In such cases you will see an authentication error during the login process as OpenAM cannot determine which account you are trying to use for authentication.
Configuring Uniqueness
To fix this problem in OpenAM, you can use the OpenDJ dsconfig command to enable the UID Unique Attribute plug-in as follows:
./dsconfig set-plugin-prop --hostname localhost --port 4444  \
--bindDN "cn=Directory Manager" --bindPassword password \
--plugin-name "UID Unique Attribute" \
--set base-dn:ou=people,dc=example,dc=com --set enabled:true \
--trustAll --no-prompt
This will prevent entries from being added to OpenDJ where the value of any existing uids conflicts with the incoming entry’s uid. This will address the situation where you are using the uid attribute for authentication in OpenAM, but what if you want to use a different attribute (such as mail) to authenticate? In such cases, you need to create your own uniqueness plug-in as follows:
./dsconfig create-plugin --hostname localhost --port 4444  \
--bindDN "cn=Directory Manager" --bindPassword password \
--plugin-name "Unique Email Address Plugin" \
--type unique-attribute --set type:mail --set enabled:true \
--set base-dn:ou=people,dc=example,dc=com --trustAll \
--no-prompt
In both cases the base-dn parameter defines the scope where the the uniqueness applies. This is useful in multitenant environments where you may want to define uniqueness within a particular subtree but not necessarily across the entire server.
Prerequisites
The uniqueness plug-in requires that you have an existing equality index configured for the attribute where you would like to enforce uniqueness. The index is necessary so that OpenDJ can search for other entries (within the scope of the base-dn) where the attribute may already have a particular value set.
The following dscconfig command can be used to create an equality index for the mail attribute:
./dsconfig  create-local-db-index  --hostname localhost --port 4444  \
--bindDN "cn=Directory Manager" --bindPassword password --backend-name userRoot  \
--index-name mail  --set index-type:equality --trustAll --no-prompt
Summary
OpenAM’s default settings (Data Store, LDAP authentication module, etc) uses the uid attribute to authenticate and uniquely identify a user. OpenDJ typically uses uid as the unique naming attribute in a user’s distinguished name. When combined together, it is almost assumed that you will be using the uid attribute in this manner, but that is not always the case. You can easily run into issues when you start coloring outside of the lines and begin using other attributes (i.e. mail) for this purpose. Armed with the information contained in this post, however, you should easily be able to configure OpenDJ to enforce uniqueness for any attribute.
Understanding OpenAM and OpenDJ Account Lockout Behaviors
The OpenAM Authentication Service can be configured to lock a user’s account after a defined number of log in attempts has failed. Account Lockout is disabled by default, but when configured properly, this feature can be useful in fending off brute force attacks against OpenAM login screens.
If your OpenAM environment includes an LDAP server (such as OpenDJ) as an authentication database, then you have options on how (and where) you can configure Account Lockout settings. This can be performed in either OpenAM (as mentioned above) or in the LDAP server, itself. But the behavior is different based on where this is configured. There are benefits and drawbacks towards configuring Account Lockout in either product and knowing the difference is essential.
Note: Configuring Account Lockout simultaneously in both products can lead to confusing results and should be avoided unless you have a firm understanding of how each product works. See the scenario at the end of this article for a deeper dive on Account Lockout from an attribute perspective.
The OpenAM Approach
You can configure Account Lockout in OpenAM either globally or for a particular realm. To access the Account Lockout settings for the global configuration,
- Log in to OpenAM Console
- Navigate to: Configuration > Authentication > Core
- Scroll down to Account Lockout section
To access Account Lockout settings for a particular realm,
- Log in to OpenAM Console
- Navigate to: Access Control > realm > Authentication > All Core Settings
- Scroll down to Account Lockout section
In either location you will see various parameters for controlling Account Lockout as follows:

Configuring Account Lockout in OpenAM
Account Lockout is disabled by default; you need to select the “Login Failure Lockout Mode” checkbox to enable this feature. Once it is enabled, you configure the number of attempts before an account is locked and even if a warning message is displayed to the user before their account is locked. You can configure how long the account is locked and even the duration between successive lockouts (which can increase if you set the duration multiplier). You can configure the attributes to use to store the account lockout information in addition to the default attributes configured in the Data Store.
Enabling Account Lockout affects the following Data Store attributes: inetUserStatus and sunAMAuthInvalidAttemptsData. By default, the value of the inetUserStatus attribute is either Active or Inactive, but this can be configured to use another attribute and another attribute value. This can be configured in the User Configuration section of the Data Store configuration as follows:

Data Store Account Lockout Attributes
These attributes are updated in the Data Store configuration for the realm. A benefit of implementing Account Lockout in OpenAM is that you can use any LDAPv3 directory, Active Directory, or even a relational database – but you do need to have a Data Store configured to provide OpenAM with somewhere to write these values. An additional benefit is that OpenAM is already configured with error messages that can be easily displayed when a user’s account is about to be locked or has become locked. Configuring Account Lockout within OpenAM, however, may not provide the level of granularity that you might need and as such, you may need to configure it in the authentication database (such as OpenDJ).
The OpenDJ Approach
OpenDJ can be configured to lock accounts as well. This is defined in a password policy and can be configured globally (the entire OpenDJ instance) or it may be applied to a subentry (a group of users or a specific user). Similar to OpenAM, a user’s account can be locked after a number of invalid authentication attempts have been made. And similar to OpenAM, you have several additional settings that can be configured to control the lockout period, whether warnings should be sent, and even who to notify when the account has been locked.
But while configuring Account Lockout in OpenAM may recognize invalid password attempts in your SSO environment, configuring it in OpenDJ will recognize invalid attempts for any application that is using OpenDJ as an authentication database. This is more of a centralized approach and can recognize attacks from several vectors.
Configuring Account Lockout in OpenDJ affects the following OpenDJ attributes: pwdFailureTime (a multivalued attribute consisting of the timestamp of each invalid password attempt) and pwdAccountLockedTime (a timestamp indicating when the account was locked).
Another benefit of implementing Account Lockout in OpenDJ is the ability to configure Account Lockout for different types of users. This is helpful when you want to have different password policies for users, administrators, or even service accounts. This is accomplished by assigning different password polices directly to those users or indirectly through groups or virtual attributes. A drawback to this approach, however, is that OpenAM doesn’t necessarily recognize the circumstances behind error messages returned from OpenDJ when a user is unable to log in. A scrambled password in OpenDJ, for instance, simply displays as an Authentication failed error message in the OpenAM login screen.
By default, all users in OpenDJ are automatically assigned a generic (rather lenient) password policy that is aptly named: Default Password Policy. The definition of this policy can be seen as follows:
dn: cn=Default Password Policy,cn=Password Policies,cn=config
objectClass: ds-cfg-password-policy
objectClass: top
objectClass: ds-cfg-authentication-policy
ds-cfg-skip-validation-for-administrators: false
ds-cfg-force-change-on-add: false
ds-cfg-state-update-failure-policy: reactive
ds-cfg-password-history-count: 0
ds-cfg-password-history-duration: 0 seconds
ds-cfg-allow-multiple-password-values: false
ds-cfg-lockout-failure-expiration-interval: 0 seconds
ds-cfg-lockout-failure-count: 0
ds-cfg-max-password-reset-age: 0 seconds
ds-cfg-max-password-age: 0 seconds
ds-cfg-idle-lockout-interval: 0 seconds
ds-cfg-java-class: org.opends.server.core.PasswordPolicyFactory
ds-cfg-lockout-duration: 0 seconds
ds-cfg-grace-login-count: 0
ds-cfg-force-change-on-reset: false
ds-cfg-default-password-storage-scheme: cn=Salted SHA-1,cn=Password Storage
  Schemes,cn=config
ds-cfg-allow-user-password-changes: true
ds-cfg-allow-pre-encoded-passwords: false
ds-cfg-require-secure-password-changes: false
cn: Default Password Policy
ds-cfg-require-secure-authentication: false
ds-cfg-expire-passwords-without-warning: false
ds-cfg-password-change-requires-current-password: false
ds-cfg-password-generator: cn=Random Password Generator,cn=Password Generators,
  cn=config
ds-cfg-password-expiration-warning-interval: 5 days
ds-cfg-allow-expired-password-changes: false
ds-cfg-password-attribute: userPassword
ds-cfg-min-password-age: 0 seconds
The value of the ds-cfg-lockout-failure-count attribute is 0; which means that user accounts are not locked by default – no matter how many incorrect attempts are made. This is one of the many security settings that you can configure in a password policy and while many of these mimic what is available in OpenAM, others go quite deeper.
You can use the OpenDJ dsconfig command to change the Default Password Policy as follows:
dsconfig set-password-policy-prop --policy-name "Default Password Policy" --set
lockout-failure-count:3 --hostname localhost --port 4444 --trustAll --bindDN
"cn=Directory Manager" --bindPassword ****** --no-prompt
Rather than modifying the Default Password Policy, a preferred method is to create a new password policy and apply your own specific settings to the new policy. This policy can then be applied to a specific set of users.
The syntax for using the OpenDJ dsconfig command to create a new password policy can be seen below.
dsconfig create-password-policy --set default-password-storage-scheme:"Salted
  SHA-1" --set password-attribute:userpassword --set lockout-failure-count:3
  --type password-policy --policy-name "Example Corp User Password Policy"
  --hostname localhost --port 4444 --trustAll --bindDN cn="Directory Manager"
  --bindPassword ****** --no-prompt
Note: This example contains a minimum number of settings (default-password-storage-scheme, password-attribute, and lockout-failure-count). Consider adding additional settings to customize your password policy as desired.
You can now assign the password policy to an individual user by adding the following attribute as a subentry to the user’s object:
ds-pwp-password-policy-dn:  cn=Example Corp User Password Policy,cn=Password
  Policies, cn=config
This can be performed using any LDAP client where you have write permissions to a user’s entry. The following example uses the ldapmodify command in an interactive mode to perform this operation:
$ ldapmodify -D "cn=Directory Manager" -w ****** <ENTER>
dn: uid=bnelson,ou=People,dc=example,dc=com <ENTER>
changetype: modify <ENTER>
replace: ds-pwp-password-policy-dn <ENTER>
ds-pwp-password-policy-dn: cn=Example Corp User Password Policy,
  cn=Password Policies,cn=config <ENTER>
<ENTER>
Another method of setting this password policy is through the use of a dynamically created virtual attribute (i.e. one that is not persisted in the OpenDJ database backend). The following definition automatically assigns this new password policy to all users that exist beneath the ou=people container (the scope of the virtual attribute).
dn: cn=Example Corp User Password Policy Assignment,cn=Virtual
  Attributes,cn=config
objectClass: ds-cfg-virtual-attribute
objectClass: ds-cfg-user-defined-virtual-attribute
objectClass: top
ds-cfg-base-dn: ou=people,dc=example,dc=com
cn: Example Corp User Password Policy Assignment
ds-cfg-attribute-type: ds-pwp-password-policy-dn
ds-cfg-enabled: true
ds-cfg-java-class:
  org.opends.server.extensions.UserDefinedVirtualAttributeProvider
ds-cfg-filter: (objectclass=sbacperson)
ds-cfg-value: cn=Example Corp User Password Policy,cn=Password
  Policies,cn=config
Note: You can also use filters to create very granular results on how password polices are applied.
Configuring Account Lockout in OpenDJ has more flexibility and as such may be considered to be more powerful than OpenAM in this area. The potential confusion, however, comes when attempting to unlock a user’s account when they have been locked out of both OpenAM and OpenDJ. This is described in the following example.
A Deeper Dive into Account Lockout
Consider an environment where OpenAM is configured with the LDAP authentication module and that module has been configured to use an OpenDJ instance as the authentication database.

OpenDJ Configured as AuthN Database
OpenAM and OpenDJ have both been configured to lock a user’s account after 3 invalid password attempts. What kind of behavior can you expect? Let’s walk through each step of an Account Lockout process and observe the behavior on Account Lockout specific attributes.
Step 1: Query Account Lockout Specific Attributes for the Test User
$ ldapsearch -D "cn=Directory Manager" -w ****** uid=testuser1 inetuserstatus \
  sunAMAuthInvalidAttemptsData pwdFailureTime pwdAccountLockedTime

dn: uid=testuser1,ou=test,dc=example,dc=com
inetuserstatus: Active
The user is currently active and Account Lockout specific attributes are empty.
Step 2: Open the OpenAM Console and access the login screen for the realm where Account Lockout has been configured.

OpenAM Login Page
Step 3: Enter an invalid password for this user

OpenAM Authentication Failure Message
Step 4: Query Account Lockout Specific Attributes for the Test User
$ ldapsearch -D "cn=Directory Manager" -w ****** uid=testuser1 inetuserstatus \
  sunAMAuthInvalidAttemptsData pwdFailureTime pwdAccountLockedTime

dn: uid=testuser1,ou=test,dc=example,dc=com
sunAMAuthInvalidAttemptsData:: PEludmFsaWRQYXNzd29yZD48SW52YWxpZENvdW50PjE8L0
  ludmFsaWRDb3VudD48TGFzdEludmFsaWRBdD4xMzk4MTcxNTAwMDE4PC9MYXN0SW52YWxpZEF0P
  jxMb2NrZWRvdXRBdD4wPC9Mb2NrZWRvdXRBdD48QWN0dWFsTG9ja291dER1cmF0aW9uPjA8L0Fj
  dHVhbExvY2tvdXREdXJhdGlvbj48L0ludmFsaWRQYXNzd29yZD4=
inetuserstatus: Active
pwdFailureTime: 20140422125819.918Z
You now see that there is a value for the pwdFailureTime. This is the timestamp of when the first password failure occurred. This attribute was populated by OpenDJ.
The sunAMAuthInvalidAttemptsData attribute is populated by OpenAM. This is a base64 encoded value that contains valuable information regarding the invalid password attempt. Run this through a base64 decoder and you will see that this attribute contains the following information:
<InvalidPassword><InvalidCount>1</InvalidCount><LastInvalidAt>1398171500018
  </LastInvalidAt><LockedoutAt>0</LockedoutAt><ActualLockoutDuration>0
  </ActualLockoutDuration></InvalidPassword>
Step 5: Repeat Steps 2 and 3. (This is the second password failure.)
Step 6: Query Account Lockout Specific Attributes for the Test User
$ ldapsearch -D "cn=Directory Manager" -w ****** uid=testuser1 inetuserstatus \
  sunAMAuthInvalidAttemptsData pwdFailureTime pwdAccountLockedTime

dn: uid=testuser1,ou=test,dc=example,dc=com
sunAMAuthInvalidAttemptsData:: PEludmFsaWRQYXNzd29yZD48SW52YWxpZENvdW50PjI8L0
  ludmFsaWRDb3VudD48TGFzdEludmFsaWRBdD4xMzk4MTcxNTUzMzUwPC9MYXN0SW52YWxpZEF0P
  jxMb2NrZWRvdXRBdD4wPC9Mb2NrZWRvdXRBdD48QWN0dWFsTG9ja291dER1cmF0aW9uPjA8L0Fj
  dHVhbExvY2tvdXREdXJhdGlvbj48L0ludmFsaWRQYXNzd29yZD4=
inetuserstatus: Active
pwdFailureTime: 20140422125819.918Z
pwdFailureTime: 20140422125913.151Z
There are now two values for the pwdFailureTime attribute – one for each password failure. The sunAMAuthInvalidAttemptsData attribute has been updated as follows:
<InvalidPassword><InvalidCount>2</InvalidCount><LastInvalidAt>1398171553350
  </LastInvalidAt><LockedoutAt>0</LockedoutAt><ActualLockoutDuration>0
  </ActualLockoutDuration></InvalidPassword>
Step 7: Repeat Steps 2 and 3. (This is the third and final password failure.)

OpenAM Inactive User Page
OpenAM displays an error message indicating that the user’s account is not active. This is OpenAM’s way of acknowledging that the user’s account has been locked.
Step 8: Query Account Lockout Specific Attributes for the Test User
$ ldapsearch -D "cn=Directory Manager" -w ****** uid=testuser1 inetuserstatus \
  sunAMAuthInvalidAttemptsData pwdFailureTime pwdAccountLockedTime

dn: uid=testuser1,ou=test,dc=example,dc=com
sunAMAuthInvalidAttemptsData:: PEludmFsaWRQYXNzd29yZD48SW52YWxpZENvdW50PjA8L0
  ludmFsaWRDb3VudD48TGFzdEludmFsaWRBdD4wPC9MYXN0SW52YWxpZEF0PjxMb2NrZWRvdXRBd
  D4wPC9Mb2NrZWRvdXRBdD48QWN0dWFsTG9ja291dER1cmF0aW9uPjA8L0FjdHVhbExvY2tvdXRE
  dXJhdGlvbj48L0ludmFsaWRQYXNzd29yZD4=
inetuserstatus: Inactive
pwdFailureTime: 20140422125819.918Z
pwdFailureTime: 20140422125913.151Z
pwdFailureTime: 20140422125944.771Z
pwdAccountLockedTime: 20140422125944.771Z
There are now three values for the pwdFailureTime attribute – one for each password failure. The sunAMAuthInvalidAttemptsData attribute has been updated as follows:
<InvalidPassword><InvalidCount>0</InvalidCount><LastInvalidAt>0</LastInvalidAt>
  <LockedoutAt>0</LockedoutAt><ActualLockoutDuration>0</ActualLockoutDuration>
  </InvalidPassword>
You will note that the counters have all been reset to zero. That is because the user’s account has been inactivated by OpenAM by setting the value of the inetuserstatus attribute to Inactive. Additionally, the third invalid password caused OpenDJ to lock the account by setting the value of the pwdAccountLockedTime attribute to the value of the last password failure.
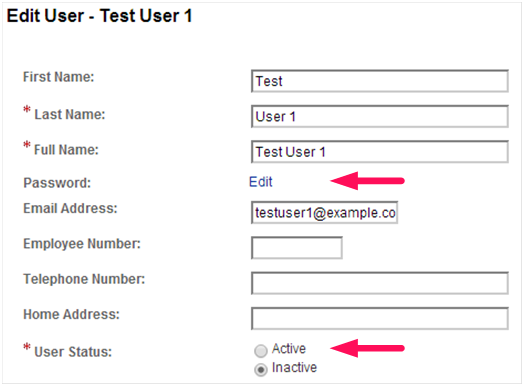
Now that the account is locked out, how do you unlock it? The natural thing for an OpenAM administrator to do is to reset the value of the inetuserstatus attribute and they would most likely use the OpenAM Console to do this as follows:

OpenAM Edit User Page (Change User Status)
The problem with this approach is that while the user’s status in OpenAM is now made active, the status in OpenDJ remains locked.
$ ldapsearch -D "cn=Directory Manager" -w ****** uid=testuser1 inetuserstatus \
  sunAMAuthInvalidAttemptsData pwdFailureTime pwdAccountLockedTime

dn: uid=testuser1,ou=test,dc=example,dc=com
sunAMAuthInvalidAttemptsData:: PEludmFsaWRQYXNzd29yZD48SW52YWxpZENvdW50PjA8L0
  ludmFsaWRDb3VudD48TGFzdEludmFsaWRBdD4wPC9MYXN0SW52YWxpZEF0PjxMb2NrZWRvdXRBd
  D4wPC9Mb2NrZWRvdXRBdD48QWN0dWFsTG9ja291dER1cmF0aW9uPjA8L0FjdHVhbExvY2tvdXRE
  dXJhdGlvbj48L0ludmFsaWRQYXNzd29yZD4=
inetuserstatus: Active
pwdFailureTime: 20140422125819.918Z
pwdFailureTime: 20140422125913.151Z
pwdFailureTime: 20140422125944.771Z
pwdAccountLockedTime: 20140422125944.771Z
Attempting to log in to OpenAM with this user’s account yields an authentication error that would make most OpenAM administrators scratch their head; especially after just resetting the user’s status.

OpenAM Authentication Failure Message
The trick to fixing this is to clear the pwdAccountLockedTime and pwdFailureTime attributes and the way to do this is by modifying the user’s password. Once again, the ldapmodify command can be used as follows:
$ ldapmodify -D "cn=Directory Manager" -w ****** <ENTER>
dn: uid=testuser1,ou=test,dc=example,dc=com <ENTER>
changetype: modify <ENTER>
replace: userPassword <ENTER>
userPassword: newpassword <ENTER>
<ENTER>
$ ldapsearch -D "cn=Directory Manager" -w ****** uid=testuser1 inetuserstatus \
  sunAMAuthInvalidAttemptsData pwdFailureTime pwdAccountLockedTime

dn: uid=testuser1,ou=test,dc=example,dc=com
sunAMAuthInvalidAttemptsData:: PEludmFsaWRQYXNzd29yZD48SW52YWxpZENvdW50PjA8L0
  ludmFsaWRDb3VudD48TGFzdEludmFsaWRBdD4wPC9MYXN0SW52YWxpZEF0PjxMb2NrZWRvdXRBd
  D4wPC9Mb2NrZWRvdXRBdD48QWN0dWFsTG9ja291dER1cmF0aW9uPjA8L0FjdHVhbExvY2tvdXRE
  dXJhdGlvbj48L0ludmFsaWRQYXNzd29yZD4=
inetuserstatus: Active
pwdChangedTime: 20140422172242.676Z
This, however, requires two different interfaces for managing the user’s account. An easier method is to combine the changes into one interface. You can modify the inetuserstatus attribute using ldapmodify or if you are using the OpenAM Console, simply change the password while you are updating the user’s status.
OpenAM Edit User Page (Change Password)
There are other ways to update one attribute by simply modifying the other. This can range in complexity from a simple virtual attribute to a more complex yet powerful custom OpenDJ plugin. But in the words of Voltaire, “With great power comes great responsibility.”
So go forth and wield your new found power; but do it in a responsible manner.
It’s OK to Get Stressed Out with OpenAM
In fact, it’s HIGHLY recommended….
Performance testing and stress testing are closely related and are essential tasks in any OpenAM deployment.

When conducting performance testing, you are trying to determine how well your system performs when subjected to a particular load. A primary goal of performance testing is to determine whether the system that you just built can support your client base (as defined by your performance requirements). Oftentimes you must tweak things (memory, configuration settings, hardware) in order to meet your performance requirements, but without executing performance tests, you will never know if you can support your clients until you are actually under fire (and by then, it may be too late).
Performance testing is an iterative process as shown in the following diagram:

Each of the states may be described as follows:
- Test – throw a load at your server
- Measure – take note of the results
- Compare – compare your results to those desired
- Tweak – modify the system to help achieve your performance results
During performance testing you may continue in this loop until such time that you meet your performance requirements – or until you find that your requirements were unrealistic in the first place.
Stress testing (aka “torture testing”) goes beyond normal performance testing in that the load you place on the system intentionally exceeds the anticipated capacity. The goal of stress testing is to determine the breaking point of the system and observe the behavior when the system fails.

Stress testing allows you to create contingency plans for those ‘worse case scenarios’ that will eventually occur (thanks to Mr. Murphy).
Before placing OpenAM into production you should test to see if your implementation meets your current performance requirements (concurrent sessions, authentications per second, etc.) and have a pretty good idea of where your limitations are. The problem is that an OpenAM deployment is comprised of multiple servers – each that may need to be tested (and tuned) separately. So how do you know where to start?
When executing performance and stress tests in OpenAM, there are three areas where I like to place my focus: 1) the protected application, 2) the OpenAM server, and 3) the data store(s). Testing the system as a whole may not provide enough information to determine where problems may lie and so I prefer to take an incremental approach that tests each component in sequence. I start with the data stores (authentication and user profile databases) and work my way back towards the protected application – with each iteration adding a new component.

Note: It should go without saying that the testing environment should mimic your production environment as closely as possible. Any deviation may cause your test results to be skewed and provide inaccurate data.
Data Store(s)
An OpenAM deployment may consist of multiple data stores – those that are used for authentication (Active Directory, OpenDJ, Radius Server, etc.) and those that are used to build a user’s profile (LDAP and RDBMS). Both of these are core to an OpenAM deployment and while they are typically the easiest to test, a misconfiguration here may have a pretty big impact on overall performance. As such, I start my testing at the database layer and focus only on that component.

Performance of an authentication database can be measured by the average number of authentications that occur over a particular period of time (seconds, minutes, hours) and the easiest way to test these types of databases is to simply perform authentication operations against them.
You can write your own scripts to accomplish this, but there are many freely available tools that can be used as well. One tool that I have used in the past is the SLAMD Distributed Load Generation Engine. SLAMD was designed to test directory server performance, but it can be used to test web applications as well. Unfortunately, SLAMD is no longer being actively developed, but you can still download a copy from http://dl.thezonemanager.com/slamd/.
A tool that I have started using to test authentications against an LDAP server is authrate, which is included in ForgeRock’s OpenDJ LDAP Toolkit. Authrate allows you to stress the server and display some really nice statistics while doing so. The authrate command line tool measures bind throughput and response times and is perfect for testing all sorts of LDAP authentication databases.
Performance of a user profile database is typically measured in search performance against that database. If your user profile database can be searched using LDAP (i.e. Active Directory or any LDAPv3 server), then you can use searchrate – also included in the OpenDJ LDAP Toolkit. searchrate is a command line tool that measures search throughput and response time.
The following is sample output from the searchrate command:
-------------------------------------------------------------------------------
     Throughput                            Response Time
   (ops/second)                           (milliseconds)
recent  average  recent  average  99.9%  99.99%  99.999%  err/sec  Entries/Srch
-------------------------------------------------------------------------------
 188.7    188.7   3.214    3.214  306.364 306.364  306.364    0.0           0.0
 223.1    205.9   2.508    2.831  27.805  306.364  306.364    0.0           0.0
 245.7    219.2   2.273    2.622  20.374  306.364  306.364    0.0           0.0
 238.7    224.1   2.144    2.495  27.805  306.364  306.364    0.0           0.0
 287.9    236.8   1.972    2.368  32.656  306.364  306.364    0.0           0.0
 335.0    253.4   1.657    2.208  32.656  306.364  306.364    0.0           0.0
 358.7    268.4   1.532    2.080  30.827  306.364  306.364    0.0           0.0
The first two columns represent the throughput (number of operations per second) observed in the server. The first column contains the most recent value and the second column contains the average throughput since the test was initiated (i.e. the average of all values contained in column one).
The remaining columns represent response times with the third column being the most recent response time and the fourth column containing the average response time since the test was initiated. Columns five, six, and seven (represented by percentile headers) demonstrate how many operations fell within that range.
For instance, by the time we are at the 7th row, 99.9% of the operations are completed in 30.827 ms (5th column, 7th row), 99.99% are completed in 306.364 ms (6th column, 7th row), and 99.999% of them are completed within 306.364 ms (7th column, 7th row). The percentile rankings provide a good indication of the real system performance and can be interpreted as follows:
- 1 out of 1,000 search requests is exceeding 30 ms
- 1 one out of 100,000 requests is exceeding 306 ms
Note: The values contained in this search were performed on an untuned, limited resource test system. Results will vary depending on the amount of JVM memory, the system CPU(s), and the data contained in the directory. Generally, OpenDJ systems can achieve much better performance that the values shown above.
There are several factors that may need to be considered when tuning authentication and user profile databases. For instance, if you are using OpenDJ for your database you may need to modify your database cache, the number of worker threads, or even how indexing is configured in the server. If your constraint is operating system based, you may need to increase the size of the JVM or the number of file descriptors. If the hardware is the limiting factor, you may need to increase RAM, use high speed disks, or even faster network interfaces. No matter what the constraint, you should optimize the databases (and database servers) before moving up the stack to the OpenAM instance.
OpenAM Instance + Data Store(s)
Once you have optimized any data store(s) you can now begin testing directly against OpenAM as it is configured against those data store(s). Previous testing established a performance baseline and any degradation introduced at this point will be due to OpenAM or the environment (operating system, Java container) where it has been configured.

But how can you test an OpenAM instance without introducing the application that it is protecting? One way is to generate a series of authentications and authorizations using direct interfaces such as the OpenAM API or REST calls. I prefer to use REST calls as this is the easiest to implement.
There are browser based applications such as Postman that are great for functional testing, but these are not easily scriptable. As such, I lean towards a shell or Perl script containing a loop of cURL commands.
Note: You should use the same authentication and search operations in your cURL commands to be sure that you are making a fair comparison between the standalone database testing and the introduction of OpenAM.
You should expect some decrease in performance when the OpenAM server is introduced, but it should not be too drastic. If you find that it falls outside of your requirements, however, then you should consider updating OpenAM in one of the following areas:
- LDAP Configuration Settings (i.e. connections to the Configuration Server)
- Session Settings (if you are hitting limitations)
- JVM Settings (pay particular attention to garbage collection)
- Cache Settings (size and time to live)
Details behind each of these areas can be found in the OpenAM Administration Guide.
You may also find that OpenAM’s interaction with the database(s) introduces searches (or other operations) that you did not previously test for. This may require you to update your database(s) to account for this and restart your performance testing.
Note: Another tool I have started playing with is the Java Application Monitor (aka JAMon). While this tool is typically used to monitor a Java application, it provides some useful information to help determine bottlenecks working with databases, file IO, and garbage collection.
Application + OpenAM Instance + Data Store(s)
Once you feel comfortable with the performance delivered by OpenAM and its associated data store(s), it is time to introduce the final component – the protected application, itself.
This will differ quite a bit based on how you are protecting your application (for instance, policy agents will behave differently from OAuth2/OpenID Connect or SAML2) but this does provide you with the information you need to determine if you can meet your performance requirements in a production deployment.
If you have optimized everything up to this point, then the combination of all three components will provide a full end to end test of the entire system. In this case, then an impact due to network latency will be the most likely factor in performance testing.
To perform a full end to end test of all components, I prefer to use Apache JMeter. You configure JMeter to use a predefined set of credentials, authenticate to the protected resource, and look for specific responses from the server. Once you see those responses, JMeter will act according to how you have preconfigured it to act. This tool allows you to generate a load against OpenAM from login to logout and anything in between.
Other Considerations
Keep in mind that any time that you introduce a monitoring tool into a testing environment, the tool (itself) can impact performance. So while the numbers you receive are useful, they are not altogether acurate. There may be some slight performance degradation (due to the introduction of the tool) that your users will never see.
You should also be aware that the client machine (where the load generation tools are installed) may become a bottleneck if you are not careful. You should consider distributing your performance testing tools across multiple client machines to minimize this effect. This is another way of ensuring that the client environment does not become the limiting factor.
Summary
Like many other areas in our field, performance testing an OpenAM deployment may be considered as much of an art as it is a science. There may be as many methods for testing as there are consultants and each varies based on the tools they use. The information contained here is just one approach performance testing – one that I have used successfully in our deployments.
What methods have you used? Feel free to share in the comments, below.
Single Sign-On Explained
So what is SSO and why do I care?
SSO is an acronym for “Single Sign-On”. There are various forms of single sign-on with the most common being Enterprise Single Sign-On (ESSO) and Web Single Sign-On (WSSO).
Each method utilizes different technologies to reduce the number of times a user has to enter their username/password in order to gain access to protected resources.
Note: There are various offshoots from WSSO implementations – most notably utilizing proxies or portal servers to act as a central point of authentication and authorization.
Enterprise Single Sign-On
In ESSO deployments, software typically resides on the user’s desktop; the desktop is most commonly Microsoft. The software detects when a user launches an application that contains the username and password fields. The software “grabs” a previously saved username/password from either a local file or remote storage (i.e. a special entry in Active Directory), enters these values into the username and password fields on behalf of the application, and submits the form on behalf of the user. This process is followed for every new application that is launched that contains a username and password field. It can be used for fat clients (i.e. Microsoft Outlook), thin clients (i.e. Citrix), or Web-based applications (i.e. Web Forms) and in most cases the applications themselves are not even aware that the organization has implemented an ESSO solution. There are definite advantages to implementing an ESSO solution in terms of flexibility. The drawback to ESSO solutions, however, is that software needs to be distributed, installed, and maintained on each desktop where applications are launched. Additionally, because the software resides on the desktop, there is no central location in which to determine if the user is allowed access to the application (authorization or AuthZ). As such, each application must maintain its own set of security policies.
The following diagram provides an overview of the steps performed in ESSO environments.

A user launches an application on their desktop. An agent running in the background detects a login screen from a previously defined template. If this is the first time the user has attempted to access this application, they are prompted to provide their credentials. Once a successful login has been performed, the credentials are stored in a credentials database. This database can be a locally encrypted database or a remote server (such as Active Directory). Subsequent login attempts do not prompt the user for their credentials. Instead, the data is simply retrieved from the credentials database and submitted on behalf of the user.
Container-Based Single Sign-On
Session information (such as authenticated credentials) can be shared between Web applications deployed to the same application server. This is single sign-on in its most basic and limited fashion as it can only be used across applications in the same container.
The following diagram provides a high level overview of the steps performed in container-based single sign-on environments.

A user accesses a Web application through a standard Web browser. They are prompted for their credentials which can be basic (such as username and password) or can utilize other forms of authentication (such as multi-factor, X.509 certificates, or biometric). Once the user has authenticated to the application server, they are able to access other applications installed in the same J2EE container without having to re-authenticate (that is, if the other applications have been configured to permit this).
Traditional Web Single Sign-On
In contrast, WSSO deployments only apply to the Web environment and Web-based applications. They do not work with fat clients or thin clients. Software is not installed on the user’s desktop, but instead resides centrally within the Web container or J2EE container of the Web application being protected. The software is often times called a “policy agent” and its purpose is to manage both authentication and authorization tasks.
The following diagram provides a high level overview of traditional Web Single Sign-On.

A user first attempts to access a Web resource (such as ADP) through a Web browser. They are not authenticated to the domain so they are directed to the central authentication server where they provide their credentials. Once validated, they receive a cookie indicating that they are authenticated to the domain. They are then redirected back to the original Web resource where they present the cookie. The Web resource consults the authentication server to determine if the cookie is valid and that the session is still active. They also determine if this user is allowed access to the Web resource. If so, they are granted access. If the user were to attempt to access another Web resource in the same domain (i.e. Oracle eBusiness Suite), they would present the cookie as proof that they are authenticated to the domain. The Web resource consults the authentication server to determine the validity of the cookie, session, and access rights. This process continues for any server in the domain that is protected by WSSO.
Portal or Proxy-Based Single Sign-On
Portal and proxy-based single sign-on solutions are similar to Standard Web Single Sign-On except that all traffic is directed through the central server.
Portal Based Single Sign-On
Target-based policy agents can be avoided by using Portal Servers such as LifeRay or SharePoint. In such cases the policy agent is installed in the Portal Server. In turn, the Portal Server acts as a proxy for the target applications and may use technologies such as SAML or auto-form submission. Portal Servers may be customized to dynamically provide access to target systems based on various factors. This includes the user’s role or group, originating IP address, time of day, etc. Portal-based single sign-on (PSSO) serves as the foundation for most vendors who are providing cloud-based WSSO products. When implementing PSSO solutions, direct access to target systems is still permitted. This allows users to bypass the Portal but in so doing, they need to remember their application specific credentials. You can disallow direct access by creating container-specific rules that only allow traffic from the Portal to the application.
Single Sign-On Involving Proxy Servers
Proxy servers are similar to PSSO implementations in that they provide a central point of access. They differ, however, in that they do not provide a graphical user interface. Instead, users are directed to the proxy through various methods (i.e. DNS, load balancers, Portal Servers, etc.). Policy agents are installed in the proxy environment (which may be an appliance) and users are granted or denied access to target resources based on whether they have the appropriate credentials and permission for the target resource.
The following diagram provides a high level overview of centralized single sign-on using Portal or Proxy Servers.

Federation
Federation is designed to enable Single Sign-On and Single Logout between trusted partners across a heterogeneous environment (i.e. different domains). Companies that wish to offer services to their customers or employees enter into a federated agreement with trusted partners who in turn provide the services themselves. Federation enables this partnership by defining a set of open protocols that are used between partners to communicate identity information within a Circle of Trust. Protocols include SAML, Liberty ID-FF, and WS-Federation.
Implementation of federated environments requires coordination between each of its members. Companies have roles to play as some entities act as identity providers (IDP – where users authenticate and credentials are verified) and service providers (SP – where the content and/or service originate). Similar to standard Web Single Sign-On, an unauthenticated user attempting to access content on a SP is redirected to an appropriate IDP where their identity is verified. Once the user has successfully authenticated, the IDP creates an XML document called an assertion in which it asserts certain information about the user. The assertion can contain any information that the IDP wishes to share with the SP, but is typically limited to the context of the authentication. Assertions are presented to SPs but are not taken at face value. The manner in which assertions are validated vary between the type of federation being employed and may range from dereferencing artifacts (which are similar to cookies) or by verifying digital signatures associated with an IDP’s signed assertion.
The interaction between the entities involved in a federated environment (user, SP and IDP) is similar to the Web Single Sign-On environment except that authentication is permitted across different domains.
A major difference between federated and WSSO environments involves the type of information generated by the authenticating entity to vouch for the user and how it is determined that that vouch is valid and had not been altered in any way.
The following table provides a feature comparison between Web SSO and Enterprise SSO.
| Features | WSSO / PSSO / Proxy | ESSO |
| Applications Supported: | Web Only | Web Applications and Fat Clients |
| “Agent” Location: | Target System | User Desktop |
| Technologies: | SAML, Form Submission, Cookies | Form Submission |
| Internal Users? | Yes | Yes (through portal) |
| External Users? | Yes | No |
| Central Authentication? | Yes | No |
| Central Authorization? | Yes | No |
| Central Session Logoff? | Yes | No |
| Global Account Deactivation? | Yes (through password change) | No |
Identity Management Lessons from Sarah Palin
By now, many of you have already heard about the hacking of Alaska Governor Sarah Palin’s Yahoo e-mail account earlier this week (on or about Tuesday 9/16/2008). If not, here is a brief synopsys of the story.
Sarah Palin’s personal Yahoo e-mail account was compromised and the contents of her account (including her address book, inbox and several family photos) were posted to the Internet.
Someone with the e-mail address of rubico10@yahoo.com posted a message on the Web site 4chan about how he used Yahoo! Mail’s password-recovery tool to change the Alaska governor’s password and gain full access to her e-mail account.
“i am the lurker who did it, and i would like to tell the story,” rubico10@yahoo.com wrote.
(I have included the full text at the bottom of the post for those interested. Be forewarned that some of the language is NOT family friendly.)
The rubico10@yahoo.com e-mail account has been linked to 20-year old David Kernell; son of democratic Tennessee State Representative, Mike Kernell, and a student at the University of Tennessee-Knoxville. While David has not been included in any official investigation as of yet, his father, has confirmed that the person being the subject of the many blog posts and news articles around the Internet is indeed his son.
So how did the alleged hacker do it?
First of all, he had to identify Sarah Palin’s email address to be gov.palin@yahoo.com. A recent article in The Washington Post indicated that Sarah Palin was using a personal e-mail address of gov.sarah@yahoo.com to conduct government business. But that was not the e-mail account that got hacked. So how do you get from gov.sarah@yahoo.com to gov.palin@yahoo.com?
Allahpundit posted an article on hotair.com that presents some interesting ideas about how the hacker might have arrived at the gov.palin@yahoo.com account, but for the time being — and void of any conspiracy theories — let’s just assume he figured it out.
Now that he had the e-mail address, how was he able to gain access to the account?
The hacker claims to have used Yahoo! Mail”s password-recovery tool to reset the password. To do this, you simply go to Yahoo! Mail and click on the Forget your ID or password link.

This takes you to a page where you enter your Yahoo! ID. In the case of Sarah Palin’s account, this would be “gov.palin”.

To reset your password with Yahoo! Mail, you can either have it sent to your secondary email address or you can indicate that you no longer have access to this account.
(As a side note, I do not particularly like the fact that Yahoo! shows even a portion of my secondary email account in the email address HINT. But that is another story. )

Selecting the “I can’t access my alternate email address” radio button allows you to answer questions to challenge questions as follows:

These are generic authentication questions, but in the case of Sarah Palin, the hacker had to answer one additional question that had to do with where she met her husband. The hacker guessed that Alaska’s governor had met her husband in high school, and knew the Republican vice presidential candidate’s date of birth and home Zip code, the Associated Press reported. Using those details, the hacker was able to successfully access Palin’s email account where he was able to assign a new password of “popcorn”.
The rest is simply news.
So what does the hacking of Sarah Palin’s email account tell us about security and Identity Management in general?
One of the big benefits of an Identity Management solution is that it provides end-users with a way to update their own data and reset their own passwords. This is a HUGE cost reduction for companies as it reduces the number of calls to the Help Desk. But just like everything else, there has to be a careful balance between security and convenience.
Authentication questions provide a means for users to gain access to their accounts when they have forgotten their passwords. This is the mechanism that Yahoo! Mail uses and has been adopted by many Identity Management solutions. Authentication questions are extremely convenient for companies that have password policies that are so stringent that their users cannot remember their passwords. They also come in handy after three-day holiday weekends as the day that employees return to work typically generates numerous calls to the Help Desk for password reset.
While authentication questions are convenient and produce a cost savings, a company does, however, need to take care when providing this solution. Who decides what the questions are and what happens if the end-user does not have an answer for a particular question? These are some of the issues that need to be considered. I have seen questions all over the board. Below are some of the ones that I find particularly insecure since many of them can be answered by Google searches or social engineering. In some cases, the questions cannot be answered with one answer and some cannot be answered at all.
Questions that can be answered by social engineering or search:
· What is your mother’s maiden name?
· In what city where you born?
· In what year where you born?
· What was your first school?
· What was your first phone number?
Questions that might not be answered at all:
· Who is your favorite superhero?
· What is your pet’s name?
· What is your library card number?
· What was your first teacher’s name?
· What is the air speed velocity of a coconut-laden swallow?
If you force a user to provide answers that are easily obtainable, then your risk is drastically increased (just ask Sarah Palin). If you force users to answer questions that are difficult (or impossible) to answer, then then your risk is also increased as the user may just provide a common answer to all questions (i.e. “blue”). So either way you go, it can be a difficult decision to make.
I have found that one of the best mechanisms is a an approach that allows the end user to define their own set of authentication questions while the company provides a sample set of common (yet hopefully secure) questions as well. This allows the company to have certain control, but also allows the user the ability to provide questions and answers using information that only they know. Now, I know that some may argue that users typically pick the path of least resistance and that many of them will pick easy questions (and therefore have easy answers) but by combining a set of the company-specific questions in addition to those supplied by the user the company can bridge the gap between security and convenience.
By the way, if you use an application that allows you to provide your own authentication questions, then I STRONGLY suggest that you go and provide your own security question(s) to one(s) that have meaning and applicability to you.
Here is the synopsis of what rubico said at 4chan:
|
rubico 09/17/08(Wed)12:57:22 No.85782652
Hello, /b/ as many of you might already know, last night sarah palin’s yahoo was “hacked” and caps were posted on /b/, i am the lurker who did it, and i would like to tell the story. In the past couple days news had come to light about palin using a yahoo mail account, it was in news stories and such, a thread was started full of newfags trying to do something that would not get this off the ground, for the next 2 hours the acct was locked from password recovery presumably from all this bulls**t spamming. after the password recovery was reenabled, it took seriously 45 mins on wikipedia and google to find the info, Birthday? 15 seconds on wikipedia, zip code? well she had always been from wasilla, and it only has 2 zip codes (thanks online postal service!) the second was somewhat harder, the question was “where did you meet your spouse?” did some research, and apparently she had eloped with mister palin after college, if youll look on some of the screensh**s that I took and other fellow anon have so graciously put on photobucket you will see the google search for “palin eloped” or some such in one of the tabs. I found out later though more research that they met at high school, so I did variations of that, high, high school, eventually hit on “Wasilla high” I promptly changed the password to popcorn and took a cold shower… >> rubico 09/17/08(Wed)12:58:04 No.85782727 this is all verifiable if some anal /b/tard wants to think Im a troll, and there isn’t any hard proof to the contrary, but anyone who had followed the thread from the beginning to the 404 will know I probably am not, the picture I posted this topic with is the same one as the original thread. I read though the emails… ALL OF THEM… before I posted, and what I concluded was anticlimactic, there was nothing there, nothing incriminating, nothing that would derail her campaign as I had hoped, all I saw was personal stuff, some clerical stuff from when she was governor…. And pictures of her family I then started a topic on /b/, peeps asked for pics or gtfo and I obliged, then it started to get big Earlier it was just some prank to me, I really wanted to get something incriminating which I was sure there would be, just like all of you anon out there that you think there was some missed opportunity of glory, well there WAS NOTHING, I read everything, every little blackberry confirmation… all the pictures, and there was nothing, and it finally set in, THIS internet was serious business, yes I was behind a proxy, only one, if this s**t ever got to the FBI I was f****d, I panicked, i still wanted the stuff out there but I didn’t know how to rapids**t all that stuff, so I posted the pass on /b/, and then promptly deleted everything, and unplugged my internet and just sat there in a comatose state Then the white knight f****r came along, and did it in for everyone, I trusted /b/ with that email password, I had gotten done what I could do well, then passed the torch , all to be let down by the douchebaggery, good job /b/, this is why we cant have nice things |
 |
