Archive
A Review of the Grizzly Steppe (Russian Hacking) Report
I, like many, have heard the stories that the Russians hacked into sensitive applications/servers in an effort to compromise the US elections. That is a bold statement and if true, may justify the actions recently taken by the Obama administration. So it was with keen interest that I rushed to read the findings from the Joint Analysis Report (JAR-16-20296) between DHS and the FBI to see what evidence they had to substantiate these claims.
The full report may be found here:

The report makes the following claims:
“This document provides technical details regarding the tools and infrastructure used by the Russian civilian and military intelligence Services (RIS) to compromise and exploit networks and endpoints associated with the U.S. election…”
“Previous JARs have not attributed malicious cyber activity to specific countries or threat actors. However, public attribution of these activities to RIS is supported by technical indicators from the U.S. Intelligence Community, DHS, FBI, the private sector, and other entities.”
Based on this information the US felt like it had the smoking gun and definitive proof of the following:
- The Who – the Russians were behind the attack
- The Why – to affect the US elections in order to guide the outcome
With this information in hand, I continued reading to now learn about:
- The How – how the attacks were performed
- The Proof – the evidence to substantiate Who, Why, and How
The report describes the “How” in a two pronged attack as follows:
Hack #1 – Casting the Phish Net…

1. A general spearphishing attack was sent to more than 1,000 people which included (in addition to others) several people from the U.S. Government.
Note: The number “1,000” is very specific so it seems like the government has some knowledge of the recipients – but they stop short of specifying if that 1,000 was directed at a particular party or not. I would think that would be important to know if the purpose of the attack was to affect the US election.
2. The attack led to one person from a particular U.S. political party falling prey to the attack and opening an attachment containing malware. This led to a chain of events where the malware was able to:
- Establish persistence on a “political party system”
- “Escalate privileges”
- “Enumerate Active Directory accounts”
- “Exfiltrate email from several accounts through encrypted connections back through operational infrastructure”
Note: This all sounds really impressive, but what does it all mean? If you remove all the jargon (enumerate, exfiltrate, etc.) and put this in layman’s terms, it sounds like the following occurred:
- Someone installed malware on their PC when they opened a file that they shouldn’t have
- Somehow the malware was able to gain privileged access to Active Directory
- The malware was able to perform a search against Active Directory
- The results of the search returned several email accounts
With this information on mind, there are a few things I am curious about.
First, the malware is only able to impersonate the user on the operating system on which it was installed. I’m not sure how a “normal user” can have escalated privileges in Active Directory unless that user is an administrator with escalated privileges (which brings up a whole different conversation about administrators knowing better). So I am curious how the malware was able to “escalate privileges” on its own.
Second, if the user (hence the malware) was not an administrator and they were able to perform an unauthorized search against Active Directory, then that indicates that Active Directory authorization and/or limitations were not configured properly. It has been my experience that Active Directory is (by default) pretty well locked down. Is it possible that the default settings were “relaxed” a bit and therefore may have opened up a hole?
Finally, would I really need “escalated privileges” just to troll email accounts? Couldn’t I simply scan the Outlook address book to obtain this information? It seems like the approach described in the report would take a lot of effort to code and would have a limited chance of success. Wouldn’t the malware have to land on an administrator’s computer for this approach to work?
3. Either way, the end result was that APT29 was able to get a list of email addresses from Active Directory.
Fast forward almost a year later (summer 2015 to spring 2016) and this takes us to the second part of our story.
Hack #2 – Hooking the Phish…

1. In the second hack, a targeted spearphishing attack was launched against the same political party that was compromised in the first attack.
Note: It should be noted that while the first attach was general (casting a net if you will), the second attack was targeted at a certain set of people using specific information to more easily trick those people. While the report doesn’t specifically say this, it is assumed that the attack targeted those email addresses that were obtained from the first attack.
Does this indicate that the political party in question was targeted because the end goal was to affect the election? If so, then this attack was planned almost a year in advance when we really didn’t have a clear picture as to who the candidates would be from either party. Were the Russians hedging their bets in case a certain party (or a certain candidate) was found to be leading? It seems more plausible that the second attack was launched more against a certain set of users more as a target of opportunity than anything else.
2. This spearphishing attack tricked multiple people into “changing their passwords through a fake webmail domain hosted by APT28”.
3. Upon initial login, APT28 was able to obtain the “real” credentials of users associated with the political party in question.
4. With these credentials in hand, APT28 was able to log into the real email server and access content (emails, attachments, etc.). The report goes on to say that this information was subsequently “leaked to the press and publicly disclosed.”
Where’s the Smoking Gun?
While the report is somewhat interesting, it does not provide the “smoking gun” that was anticipated. The report does provide a list of 48 hacker names of which APT28 and APT29 are included. The title of the table is “Reported Russian Military and Civilian Intelligence Services (RIS)” but there is nothing more than that to introduce the table and tell us anything about the names contained in the table. Am I supposed to jump to the conclusion that because APT28 and APT29 are listed that this is definitive proof that:
- they are the ones behind these attacks
- no one else has attempted to use these names as their hacking alias
- they specifically targeted a particular political party
- their intent was to affect the US election
- and most importantly, they are “state sponsored”
The last item is one of the most important as the administration has chosen to take action against Russia (the state) as if they sanctioned the attacks. If that is true then the need for a smoking gun becomes infinitely more important and that information is simply not provided. Going back to a statement made early on in the report,
“Previous JARs have not attributed malicious cyber activity to specific countries or threat actors. However, public attribution of these activities to RIS is supported by technical indicators from the U.S. Intelligence Community, DHS, FBI, the private sector, and other entities.”
the government has made it clear that it is stepping outside of normal protocol by publicly naming the attacker in the JAR. But they don’t provide any information to back up their claim. Nor is there anything specifically that indicates that this had anything to do with an attempt to affect the outcome of the US election; in fact, the information presented may lead one to believe the contrary.
In general, the report lacks information and forces us to accept the government’s assertion of the Who (the Russians) and the Why (to affect the election) without providing the Proof. Maybe the government has more information that they are not sharing, but to ask me to simply trust without verifying is asking me to trust too much.
Performing Bulk Operations in OpenIDM
OpenIDM does not support bulk operations out of the box. One way to to do this, however, is to obtain a list of IDs that you want to perform an operation on and then loop through the list performing the desired operation on each ID.
Yes this is a hack, but let’s be honest, isn’t life just one big set of hacks when you think about it?
Here are the steps.
Suppose for instance that you want to delete all managed users in OpenIDM that have a last name of “Nelson”. The first step is to obtain a list of those users; which you can easily do using a cURL command and an OpenIDM filter as follows:
curl -u openidm-admin:openidm-admin 'http://localhost:8080/openidm/managed/user?_queryFilter=(sn+eq+"Nelson")&_fields=_id&_prettyPrint=true'
This returns a listing of all managed objects that match the filter as follows.
{
  "result" : [ {
    "_id" : "ed979deb-2da2-4fe1-a309-2b7e9677d931",
    "_rev" : "5"
  },
  {
    "_id" : "581c2e13-d7c4-4fff-95b8-2d1686ef5b9c",
    "_rev" : "1"
  },
  {
    "_id" : "1295d5db-c6f8-4108-9842-06c4cde0d4eb",
    "_rev" : "3"
  } ],
  "resultCount" : 3,
  "pagedResultsCookie" : null,
  "totalPagedResultsPolicy" : "NONE",
  "totalPagedResults" : -1,
  "remainingPagedResults" : -1
}
But most of the data returned is extraneous for the purposes of this exercise; we only want the “_id” values for these users and to obtain this information, you can pipe the output into a grep command and redirect the output to a file as follows:
curl -u openidm-admin:openidm-admin 'http://localhost:8080/openidm/managed/user?_queryFilter=(sn+eq+"Nelson")&_fields=_id&_prettyPrint=true' | grep "_id" >> bulkOperationIDs.txt
This will produce a file that looks like this:
     "_id": "ed979deb-2da2-4fe1-a309-2b7e9677d931",
     "_id": "581c2e13-d7c4-4fff-95b8-2d1686ef5b9c",
     "_id": "1295d5db-c6f8-4108-9842-06c4cde0d4eb"
(yes, there are leading spaces in that output).
You are still not done yet as you need to strip off all the extraneous stuff and get it down to just the values of the “_id” attribute. You can probably devise a cool sed script, or find an awesome regular expression for the grep command, but it is just as easy to simply edit the file with and perform a couple global search/replace operations:
:1,$ s/      "_id": "//g

:1,$ s/",//g
The above example demonstrates a global search/replace operation in the “vi” editor – the best damn editor on God’s green earth!
However you approach it, the goal is to get the file to consist of only the IDs as follows:
ed979deb-2da2-4fe1-a309-2b7e9677d931
581c2e13-d7c4-4fff-95b8-2d1686ef5b9c
1295d5db-c6f8-4108-9842-06c4cde0d4eb
Now that you have this file, you can perform any operation you would like on it using a simple command line script tied into the appropriate cURL command. For instance, the following would perform a GET operation on all entries in the file (it is HIGHLY recommended that you do this before jumping right into a DELETE operation):
for i in `cat bulkOperationIDs.txt`; do curl -u openidm-admin:openidm-admin -X GET "http://localhost:8080/openidm/managed/user/$i?_prettyPrint=true"; done
Once you feel comfortable with the response, you can change the GET operation to a DELETE and kick the Nelsons to the proverbial curb.
Configuring OpenIDM on a Read Only File System in 10 Easy Steps
During the normal course of events, OpenIDM writes or updates various files on the file system to which it is installed. This includes log files, audit files, process IDs, configuration files, or even cached information. There are times, however when you find yourself needing to deploy OpenIDM to a read only file system – one to which you cannot write typical data.
 Fortunately, OpenIDM is flexible enough to allow such an installation, you just need to make some adjustments to various settings to accommodate this.
The following information provides details on how to configure OpenIDM on a read only file system. It includes the types of information that OpenIDM writes by default, where it writes the information, and how you can alter the default behavior – and it does it in just 10 EASY Steps (and not all of them are even required!).
Note: The following steps assume that you have a shared (mounted) folder at /idm, that you are using OpenIDM 4.0, it is running as the frock user, and that the frock user has write access to the /idm folder.
1. Create external folder structure for logging, auditing, and internal repository information.
$ sudo mkdir -p /idm/log/openidm/audit

$ sudo mkdir /idm/log/openidm/logs

$ sudo mkdir -p /idm/cache/openidm/felix-cache

$ sudo mkdir /idm/run/openidm
2. Change ownership of the external folders to the “idm” user.
$ sudo chown -R frock:frock /idm/log/openidm

$ sudo chown -R frock:frock /idm/cache/openidm

$ sudo chown -R frock:frock /idm/run/openidm
Note: OpenIDM writes its audit data (recon, activity, access, etc.) to two locations by default: the filesystem and the repo. This is configured in the conf/audit.json file.
3. Open the conf/audit.json file and verify that OpenIDM is writing its audit data to the repo as follows (note: this is the default setting):
"handlerForQueries" : "repo",
4. Open the conf/audit.json file and redirect the audit data to the external folder as follows:
"config" : {

  "logDirectory" : "/idm/log/openidm/audit"

},
After making these changes, this section of the audit.json will appear as follows (see items in bold font):
{

  "auditServiceConfig" : {

    "handlerForQueries" : "repo",

    "availableAuditEventHandlers" : [

      "org.forgerock.audit.events.handlers.csv.CsvAuditEventHandler",

      "org.forgerock.openidm.audit.impl.RepositoryAuditEventHandler",

      "org.forgerock.openidm.audit.impl.RouterAuditEventHandler"

    ]

},

"eventHandlers" : [

  {

    "name" : "csv",

    "class" : "org.forgerock.audit.events.handlers.csv.CsvAuditEventHandler",

    "config" : {

      "logDirectory" : "/idm/log/openidm/audit"

    },

    "topics" : [ "access", "activity", "recon", "sync", "authentication", "config" ]

},
As an alternate option you can disable the writing of audit data altogether by setting the enabled flag to false for the appropriate event handler(s). The following snippet from the audit.json demonstrates how to disable file-based auditing.
"eventHandlers" : [

  {

    "name" : "csv",

    "enabled" : false,

    "class" : "org.forgerock.audit.events.handlers.csv.CsvAuditEventHandler",

    "config" : {

      "logDirectory" : "/audit",

    },

    "topics" : [ "access", "activity", "recon", "sync", "authentication", "config" ]
Note: OpenIDM writes its logging data to the local filesystem by default. This is configured in the conf/logging.properties file.
5. Open the conf/logging.properties file and redirect OpenIDM logging data to the external folder as follows:
java.util.logging.FileHandler.pattern = /idm/log/openidm/logs/openidm%u.log
Note: OpenIDM caches its Felix files in the felix-cache folder beneath the local installation. This is configured in the conf/config.properties file.
6. Open the conf/config.properties file and perform the following steps:
a. Redirect OpenIDM Felix Cache to the external folder as follows:
# If this value is not absolute, then the felix.cache.rootdir controls

# how the absolute location is calculated. (See buildNext property)

org.osgi.framework.storage=${felix.cache.rootdir}/felix-cache
b. Define the relative path to the Felix Cache as follows:
# The following property is used to convert a relative bundle cache

# location into an absolute one by specifying the root to prepend to

# the relative cache path. The default for this property is the

# current working directory.

felix.cache.rootdir=/idm/cache/openidm
After making these changes, this section of the config.properties will appear as follows (see items in bold font):
# If this value is not absolute, then the felix.cache.rootdir controls

# how the absolute location is calculated. (See buildNext property)

org.osgi.framework.storage=${felix.cache.rootdir}/felix-cache
# The following property is used to convert a relative bundle cache
# location into an absolute one by specifying the root to prepend to
# the relative cache path. The default for this property is the
# current working directory.
felix.cache.rootdir=/idm/cache/openidm
Note: During initial startup, OpenIDM generates a self-signed certificate and stores its security information in the keystore and truststore files as appropriate. This is not possible in a read-only file system, however. As such, you should generate a certificate ahead of time and make it part of your own deployment.
7. Update keystore and truststore files with certificate information and an updated password file as appropriate. The process you choose to follow will depend on whether you use a self-signed certificate or obtain one from a certificate authority.
Note: On Linux systems, OpenIDM creates a process ID file (PID file) on startup and removes the file during shutdown. The location of the PID File is defined in both the start script (startup.sh) and the shutdown script (shutdown.sh). The default location of the process ID is $OPENIDM_HOME folder.
8. Open the startup.sh script and update the location of the process ID file by adding the following line immediately after the comments section of the file:
OPENIDM_PID_FILE="/idm/run/openidm/.openidm.pid"
9. Repeat Step 7 with the shutdown.sh script.
Note: OpenIDM reads configuration file changes from the file system by default. If your environment allows you to update these files during the deployment process of a new release, then no additional changes are necessary. However, if you truly have a read only file system (i.e. no changes even to configuration files) then you can disable the monitoring of these configuration files in the next step. Keep in mind, however, that this requires that all configuration changes must then be performed over REST.
10. Open the conf/system.properties file and disable monitoring of JSON and subsequent loading of configuration file changes by uncommenting the following line:
#openidm.fileinstall.enabled=false
OpenIDM Property Value Substitution
Property value substitution can be a useful technique for customizing OpenIDM deployments across multiple environments.
Assume, for instance, that you have three environments (Development, Test, and Production). Your OpenIDM deployment has been configured for one OpenDJ system resource, but the configuration properties for that resource is different across each environment. The following diagram demonstrates the different host names for the OpenDJ instance in each environment.


In order to accommodate this you would need to maintain three separate provisioner files – one for each environment you are operating in and you would need to manage each file separately under source control.

An alternative, however, is to create OpenIDM variables that customize the OpenDJ configuration parameters based on the environment. The customizations are then centralized in a common file and selected based on settings contained in OpenIDM’s environment variables.
Here are the steps necessary to configure OpenIDM property values.
- Stop the OpenIDM instance.
- Edit the conf/boot.properties file and add environment specific variables as follows:
DEV.odjhost=dev.opendj.example.com
TEST.odjhost=test.opendj.example.com
PROD.odjhost=opendj.example.com
[Where DEV, TEST, and PROD are the OpenIDM environment variables set in OPENIDM_OPTS, odjhost is the name of the property used across the three environments, and the values (i.e. dev.opendj.example.com, test.opendj.example.com, and opendj.example.com) are the environment specific values.]
3. Edit the provisioner file (provisioner.openicf-ODJ.json) and replace the value of the host property as follows:
“configurationProperties” : {
“host” : “&{&{environment}.odjhost}”,
“port” : “1389”,
Properties are referenced in OpenIDM with the construct, &{property}. When OpenIDM sees these references, it replaces them with the appropriate property value as defined in the boot.properties file. The example shown above demonstrates nesting of property values and assuming that the environment variable is set to a value of TEST in OPENIDM_OPTS, then the substitution occurs from the innermost to the outermost brackets as follows:

You now have a consistent set of configuration files (i.e. boot.properties and provisioner.openicf-ODJ.json) that can be deployed to all three environments (Development, Test, and Production), the only step remaining is to configure OPENIDM_OPTS in each environment. This can be accomplished by setting the environment variable in your /etc/init.d/openidm or openidm/startup.sh scripts as follows:
OPENIDM_OPTS=”-Xmx1024m -Xms1024m -Dfile.encoding=UTF-8 –Denvironment=TEST“
4. Start the OpenIDM instance and look for any errors in the openidm0.log.0 log file.
Assuming that everything started without any problems, you can now see that your environment specific parameters have been set correctly by querying the configuration object for OpenDJ, or simply by looking at the connector configuration in the OpenIDM Admin Console as follows.

The Real Reason Oracle Dropped Sun Identity Manager
I always appreciate it when someone attempts to educate others about identity management and related technologies. So when I saw the the following presentation, it quickly caught my attention as I was working with both products when the Oracle deal to purchase Sun went down.
Why Oracle Dropped Waveset Lighthouse and Went to Oracle Identity Manager (OIM)
Not to be too nit picky, but there are quite a few errors in this presentation that I simply couldn’t ignore.
- OID is not the acronym for “Oracle Identity Management”, it is an acronym for “Oracle Internet Directory” – Oracle’s LDAPv3 directory server. OIM is the acronym for “Oracle Identity Manager”.
- SIM (“Sun Identity Manager”) was not a “suite of identity manager products” as you state. SIM was a data synchronization and provisioning product. SIM was part of the suite of Sun Identity Management products that also included Sun Directory Server Enterprise Edition (SDSEE), Sun Access Manager/OpenSSO, and Sun Role Manager (SRM).
- It is stated that one reason that Oracle did not elect to continue with SIM was because it did not have a Web 2.0 UI. SIM version 9.0 (the version being developed when Oracle purchased Sun) did have a Web 2.0 UI. So this is not quite an accurate representation.
- “Oracle IDM” is Oracle’s suite of identity management products which includes Oracle Virtual Directory (OVD), Oracle Identity Directory (OID), Oracle Access Manager (OAM), and Oracle Identity Manager (OIM). The presentation uses “Oracle IDM” (and later, simply “IDM”) to refer specifically to Oracle Identity Manager, however. This is both confusing and misleading.
- It is stated that “IDM allowed faster application on-boarding.” As an integrator of both OIM and SIM, I can honestly say that this is not a true statement. We could have simple SIM deployments up and running in the order of days/week and a production deployment in a month or two. OIM, consistently took several months to deploy – which was great for a billable professional services firm, but not so great for the customer (who had to pay for those services).
- It is inferred that OIM is able to provision to cloud and SIM was not and that was a reason why Oracle chose to go with OIM. That is a misleading statement as SIM was able to provision to cloud applications as well. SIM also supported SPML (not a big fan, myself) and SCIM for provisioning to other identity platforms and cloud based applications.
The main reasons that Oracle chose to go with OIM versus SIM was simply the deeper integration with Oracle products and their not wanting to alter the Oracle IDM roadmap. I was on the early calls with Oracle when they announced which products they would keep and which products they were getting rid of. During those calls, they had their “politically correct” reasons as well as the “real” reasons and it always came back to these two.
There was only one place where I saw Oracle forced into altering their position and they had to update their roadmap; this was with the SDSEE product. Oracle made it very clear that the only product they wanted in Sun’s identity product line was Sun Role Manager (which later became Oracle Identity Analytics). In fact, only a couple weeks after the purchase was made, Oracle had already set an end of life date for all identity products including SDSEE. What Oracle hadn’t counted on was how well entrenched that product was across Sun’s major customers (including the US Government and major Telcos). It wasn’t until the outcry from their customers was raised that Oracle “decided” to continue product development.
Purely from a technology perspective, if you are a company that has deployed a wide array of Oracle products, then it made sense to go with OIM due to the deeper integration with Oracle products, but not so much if you are a heterogenous company. In such cases, I have found other products to be more flexible than OIM and provide a much quicker deployment times at much lower costs.
Configuring OpenIDM Password Reset
ForgeRock OpenIDM is a powerful account management and data synchronization tool that provides many robust features out of the box. Some of these features must be enabled, however, before they can be used. Once such feature allows a user to reset their password in the OpenIDM Web UI by responding to challenge questions.
The OpenIDM Web UI provides an out of the box experience for resetting an OpenIDM user’s password based on a user’s response to challenge questions. This functionality is disabled by default and must be enabled in the ui-configuration.json file before attempting to perform this operation in the WebUI.
The following instructions describe how to enable this functionality and test the password reset flow and have been tested with OpenIDM version 3.1.0.
Configure Password Reset
1. In a terminal window, change to the OpenIDM configuration folder
$ cd openidm/conf
2. Edit the ui-configuration.json file
3. Modify the value of the “securityQuestions” attribute from “false” to “true” as follows:
{
 "configuration" : {
 "selfRegistration" : false,
 "securityQuestions" : true,
 "siteIdentification" : false,
 "lang" : "en",
4. (OPTIONAL) The minimum length for responses to security questions is 16 characters. This is defined by the securityAnswer policy in the openidm/conf/policy.json file. You can modify the minimum number of characters associated with this policy by editing the minLength parameter in the minimum-length policyID as follows:
"name" : "securityAnswer",
 "policies" : [
    {
              "policyId" : "required-if-configured",
              "params" : {
                     "configBase" : "ui/configuration",
                     "baseKey" : "configuration.securityQuestions",
                    "exceptRoles" : [
                             "system",
                             "openidm-admin"
                    ]
             }
 },
 {
              "policyId" : "minimum-length",
              "params" : {
                      "minLength" : 4
               }
 },
Note: Modifications to files in the conf folder are hot swappable; this means that your changes are now in effect without the need to restart OpenIDM. Assuming you have not made any errors in configuring either of these two files (you can confirm by looking for errors in the openidm/logs/openidm0.log.0 file), then you have now enabled password reset for the WebUI. Before this feature can be used, however, a user must first enter responses to challenge questions.
Enter Responses to Challenge Questions
4. Go to OpenIDM user interface (http://openidm.example.com:8080/openidmui/index.html#login/). You will now see a “Reset your password” link available in the login form.

5. Log in as an existing user (i.e. bill.nelson@example.com).
6. Select the “Change Security Data” link.
7. Enter your current password in the form provided and select the “Continue” button.

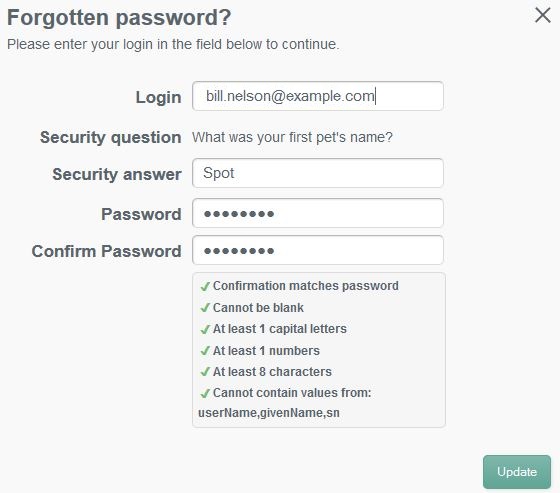
8. Enter and confirm your password in the fields provided.
9. Select a security question and provide an answer in the space provided.

10. Select the “Update” button and then log out of the user interface.
Note: You can now test the password reset functionality.
Test Password Reset Functionality
11. Return to OpenIDM user interface (http://openidm.example.com:8080/openidmui/index.html#login/).
12. Select the “Reset your password link”.
13. Enter your username (i.e. bill.nelson@example.com) and click the “Submit” button.

14. You should see the security question that you selected in step 9 appear. Provide the response that you entered in step 9 and click the “Submit” button.
Note: Case matters!
15. If you responded to your security question properly, then you will now see form elements appear allowing you to enter and confirm a new password.
16. When you click the “Update” button, the new password will be applied to your OpenIDM object and you will be automatically logged in to the end user interface.
OpenDJ and the Fine Art of Impersonation
Directory servers are often used in multi-tier applications to store user profiles, preferences, or other information useful to the application. Oftentimes the web application includes an administrative console to assist in the management of that data; allowing operations such as user creation or password reset. Multi-tier environments pose a challenge, however, as it is difficult to determine the identity of the user that actually performed the operation as opposed to the user that simply showed up in the log file(s).
Consider the relationship between the user logging in to the web application and the interaction between the web application and a directory server such as OpenDJ.
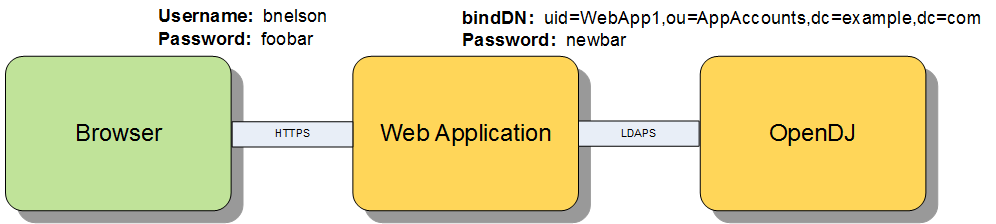
There are two general approaches that many web applications follow when performing actions against the directory server; I will refer to these as Application Access and User Access. In both scenarios, the user must first log in to the web application. Their credentials may be validated directly against the directory server (using local authentication) or they may be accessing the web application using single sign-on. In either pattern, the user must first prove his identity to the web application before they are allowed to perform administrative tasks. The differences become apparent post authentication and can be found in the manner in which the web application integrates with the directory server to perform subsequent administrative tasks.
Note: The following assumes that you are already familiar with OpenDJ access control. If this is not the case, then it is highly advisable that you review the following: OpenDJ Access Control Explained.
Approach 1: Application Access
In the case of the Application Access approach all operations against the directory server are performed as an application owner account configured in the directory server. This account typically has a superset of privileges required by all Web Application administrators in order to perform the tasks required of those users. In this scenario, the Web Application binds to the directory server using its Web Application service account and performs the operation. A quick look in the directory server log files demonstrates that all operations coming from the Web Application are performed by the service account and not the user who logged in to the Web Application.
[27/Mar/2015:16:37:40 +0000] BIND REQ conn=2053 op=0 msgID=1 version=3 type=SIMPLE dn=”uid=WebApp1,ou=AppAccounts,dc=example,dc=com”
[27/Mar/2015:16:37:40 +0000] BIND RES conn=2053 op=0 msgID=1 result=0 authDN=”uid=WebApp1,ou=AppAccounts,dc=example,dc=com” etime=1
[27/Mar/2015:16:37:40 +0000] SEARCH REQ conn=2053 op=1 msgID=2 base=”ou=People,dc=example,dc=com” scope=wholeSubtree filter=”(l=Tampa)” attrs=”ALL”
[27/Mar/2015:16:37:40 +0000] SEARCH RES conn=2053 op=1 msgID=2 result=0 nentries=69 etime=2
While easiest to configure, one drawback to this approach is that you need to reconcile the directory server log files with the Web Application log files in order to determine the identity of the user performing the action. This makes debugging more difficult. Not all administrators have the same access rights; so another problem with this approach is that entitlements must be maintained and/or recognized in the Web Application and associated with Web Application users. This increases complexity in the Web Application as those relationships must be maintained in yet another database. Finally, some security officers may find this approach to be insecure as the entry appearing in the log files is not indicative of the user performing the actual operation.
Approach 2: User Access
The User Access approach is an alternative where the Web Application impersonates the user when performing operations. Instead of the Web Application binding with a general service account, it takes the credentials provided by the user, crafts a user-specific distinguished name, and then binds to the directory server with those credentials. This approach allows you to manage access control in the directory server and the logs reflect the identity of the user that performed the operation.
[27/Mar/2015:17:01:01 +0000] BIND REQ conn=2059 op=0 msgID=1 version=3 type=SIMPLE dn=”uid=bnelson,ou=Administators,dc=example,dc=com”
[27/Mar/2015:17:01:01 +0000] BIND RES conn=2059 op=0 msgID=1 result=0 authDN=” uid=bnelson,ou=Administators,dc=example,dc=com ” etime=1
[27/Mar/2015:17:40:40 +0000] SEARCH REQ conn=2059 op=1 msgID=2 base=”ou=People,dc=example,dc=com” scope=wholeSubtree filter=”(l=Tampa)” attrs=”ALL”
[27/Mar/2015:17:40:40 +0000] SEARCH RES conn=2059 op=1 msgID=2 result=0 nentries=69 etime=2
A benefit to this approach is that entitlements can be maintained in the directory server, itself. This reduces the complexity of the application, but requires that you configure appropriate access controls for each user. This can easily be performed at the group level, however, and even dynamically configured based on user attributes. A drawback to this approach is that the Web Application is acting as if they are the user – which they are not. The Browser is essentially the user and the Browser is not connecting directly to the directory server. So while the log files may reflect the user, they are somewhat misleading as the connection will always be from the Web Application. The other problem with this approach is the user’s credentials must be cached within the Web Application in order to perform subsequent operations against the directory server. One could argue that you could simply keep the connection between the Web Application and the directory server open, and that is certainly an option, but you would need to keep it open for the user’s entire session to prevent them from having to re-authenticate. This could lead to performance problems if you have extended session durations, a large number of administrative users, or a number of concurrent sessions by each administrative user.
Proxy Control – The Hybrid Approach
There are both benefits and drawbacks to each of the previously mentioned approaches, but I would like to offer up an alternative proxy-based approach that is essentially a hybrid between the two. RFC 4370 defines a proxied authorization control (2.16.840.1.113730.3.4.18) that allows a client (i.e. the Web Application) to request the directory server (i.e. OpenDJ) to perform an operation not based on the access control granted to the client, but based on another identity (i.e. the person logging in to the Web Application).
The proxied authorization control requires a client to bind to the directory server as themselves, but it allows them to impersonate another entry for a specific operation. This control can be used in situations where the application is trusted, but they need to perform operations on behalf of different users. The fact that the client is binding to the directory server eliminates the need to cache the user’s credentials (or re-authenticate for each operation). The fact that access is being determined based on that of the impersonated user means that you can centralize entitlements in the directory server and grant access based on security groups. This is essentially the best of both worlds and keeps a smile on the face of your security officer (as if that were possible).
So how do you configure proxy authorization? I am glad you asked.
Configuring Proxied Access
Before configuring proxied access, let’s return to the example of performing a search based on Application Access. The following is an example of a command line search that can be used to retrieve information from an OpenDJ server. The search operation uses the bindDN and password of the WebApp1 service account.
./ldapsearch -h localhost -D “uid=WebApp1,ou=AppAccounts,dc=example,dc=com ” -w password -b “ou=People,dc=example,dc=com” “l=Tampa”
The response to this search would include all entries that matched the filter (l=Tampa) beneath the container (ou=People). My directory server has been configured with 69 entries that match this search and as such, the OpenDJ access log would contain the following entries:
[27/Mar/2015:16:37:40 +0000] SEARCH REQ conn=2053 op=1 msgID=2 base=”ou=People,dc=example,dc=com” scope=wholeSubtree filter=”(l=Tampa)” attrs=”ALL”
[27/Mar/2015:16:37:40 +0000] SEARCH RES conn=2053 op=1 msgID=2 result=0 nentries=69 etime=2
As previously mentioned, these are the results you would expect to see if the search was performed as the WebApp1 user. So how can you perform a search impersonating another user? The answer lies in the parameters used in the search operation. The LDAP API supports a proxied search, you just need to determine how to access this functionality in your own LDAP client.
Note: I am using ldapsearch as the LDAP client for demonstration purposes. This is a command line tool that is included with the OpenDJ distribution. If you are developing a web application to act as the LDAP client, then you would need to determine how to access this functionality within your own development framework.
The OpenDJ search command includes a parameter that allows you to use the proxy authorization control. Type ./ldapsearch –help to see the options for the ldapsearch command and look for the -Y or –proxyAs parameter as follows.

Now perform the search again, but this time include the proxy control (without making any changes to the OpenDJ server). You will be binding as the WebApp1 account, but using the -Y option to instruct OpenDJ to evaluate ACIs based on the following user: uid=bnelson,ou=People,dc=example,dc=com.
./ldapsearch -h localhost -D “uid=WebApp1,ou=AppAccounts,dc=example,dc=com” -w password –Y “uid=bnelson,ou=People,dc=example,dc=com” -b “ou=People,dc=example,dc=com” “l=Tampa”
You should see the following response:
SEARCH operation failed
Result Code: 123 (Authorization Denied)
Additional Information: You do not have sufficient privileges to use the proxied authorization control The request control with Object Identifier (OID) “2.16.840.1.113730.3.4.18” cannot be used due to insufficient access rights
The corresponding entries in OpenDJ’s access log would be as follows:
[27/Mar/2015:10:47:18 +0000] SEARCH REQ conn=787094 op=1 msgID=2 base=”ou=People,dc=example,dc=com” scope=wholeSubtree filter=”(l=Tampa)” attrs=”ALL”
[27/Mar/2015:10:47:18 +0000] SEARCH RES conn=787094 op=1 msgID=2 result=123 message=”You do not have sufficient privileges to use the proxied authorization control You do not have sufficient privileges to use the proxied authorization control” nentries=0 etime=1
The key phrase in these messages is the following:
You do not have sufficient privileges to use the proxied authorization control
The key word in that phrase is “privileges” as highlighted above; the WebApp1 service account does not have the appropriate privileges to perform a proxied search and as such, the search operation is rejected. The first step in configuring proxied access control is to grant proxy privileges to the Application Account.
Step 1: Grant Proxy Privileges to the Application Account
The first step in allowing the WebApp1 service account to perform a proxied search is to give that account the proxied-auth privilege. You can use the ldapmodify utility to perform this action as follows:
./ldapmodify -D “cn=Directory Manager” -w password
dn: uid=WebApp1,ou=AppAccounts,dc=example,dc=com
changetype: modify
add: ds-privilege-name
ds-privilege-name: proxied-auth
Processing MODIFY request for uid=WebApp1,ou=AppAccounts,dc=example,dc=com
MODIFY operation successful for DN uid=WebApp1,ou=AppAccounts,dc=example,dc=com
Now repeat the proxied search operation.
./ldapsearch -h localhost -D “uid=WebApp1,ou=AppAccounts,dc=example,dc=com” -w password –Y “uid=bnelson,ou=People,dc=example,dc=com” -b “ou=People,dc=example,dc=com” “l=Tampa”
Once again your search will fail, but this time it is for a different reason.
SEARCH operation failed
Result Code: 12 (Unavailable Critical Extension)
Additional Information: The request control with Object Identifier (OID) “2.16.840.1.113730.3.4.18” cannot be used due to insufficient access rights
The corresponding entries in OpenDJ’s access log would be as follows:
[27/Mar/2015:11:39:17 +0000] SEARCH REQ conn=770 op=1 msgID=2 base=” ou=People,dc=example,dc=com ” scope=wholeSubtree filter=”(l=Tampa)” attrs=”ALL”
[27/Mar/2015:11:39:17 +0000] SEARCH RES conn=770 op=1 msgID=2 result=12 message=”” nentries=0 authzDN=”uid=bnelson,ou=People,dc=example,dc=com” etime=3
As discussed in OpenDJ Access Control Explained, authorization to perform certain actions may consist of a combination of privileges and ACIs. You have granted the proxied-auth privilege to the WebApp1 service account, but it still needs an ACI to allow it to perform proxy-based operations. For the purposes of this demonstration, we will use the following ACI to grant this permission.
(targetattr=”*”) (version 3.0; acl “Allow Proxy Authorization to Web App 1 Service Account”; allow (proxy) userdn=”ldap:///uid=WebApp1,ou=AppAccounts,dc=example,dc=com”;)
This ACI will be placed at the root suffix for ease of use, but you should consider limiting the scope of the ACI by placing it at the appropriate branch in your directory tree (and limiting the targetattr values).
Step 2: Create a (Proxy) ACI for the Application Account
Once again, you can use the ldapmodify utility to update OpenDJ with this new ACI.
./ldapmodify -D “cn=Directory Manager” -w password
dn: dc=example,dc=com
changetype: modify
add: aci
aci: (targetattr=”*”) (version 3.0; acl “Allow Proxy Authorization to Web App 1 Service Account”; allow (proxy) userdn=”ldap:///uid=WebApp1,ou=AppAccounts,dc=example,dc=com”;)
Processing MODIFY request for dc=example,dc=com
MODIFY operation successful for DN dc=example,dc=com
Now repeat the proxied search a final time.
./ldapsearch -h localhost -D “uid=WebApp1,ou=AppAccounts,dc=example,dc=com” -w password –Y “uid=bnelson,ou=People,dc=example,dc=com” -b “ou=People,dc=example,dc=com” “l=Tampa”
This time you should see the results of the search performed correctly. But how do you know that this was a proxied search and not simply one performed by the WebApp1 as before? The clue is once again in the OpenDJ access log file. Looking in this file, you will see the following entries:
[27/Mar/2015:11:40:23 +0000] SEARCH REQ conn=797 op=1 msgID=2 base=”ou=People,dc=example,dc=com” scope=wholeSubtree filter=”(l=Tampa)” attrs=”ALL”
[27/Mar/2015:11:40:23 +0000] SEARCH RES conn=797 op=1 msgID=2 result=12 message=”” nentries=69 authzDN=”uid=bnelson,ou=people,dc=example,dc=com” etime=1
The authzDN value contains the DN of the entry used for authorization purposes. This is a clear indicator that access control was based on the uid=bnelson entry and not uid=WebApp1.
Still not convinced? You can verify this by removing the rights for the uid=bnelson entry and running your search again. Add the following ACI to the top of your tree.
(targetattr=”*”)(version 3.0;acl ” Deny Access to BNELSON”; deny (all)(userdn = “ldap:///uid=bnelson,out=people,dc=example,dc=com”);)
Now run the search again. This time, you will not see any errors, but you will also not see any entries returned. While you are binding as the WebApp1 service account, for all intents and purposes, you are impersonating the uid=bnelson user when determining access rights.
Summary of Steps
The following steps should be performed when configuring OpenDJ for proxied access control.
Create the Application Account in OpenDJ (i.e. WebApp1)
- Create the Application Account in OpenDJ (i.e. WebApp1)
- Add the proxy-auth privilege to the Application Account
- Create an ACI allowing the Application Account to perform proxy operations
- Create a User Account in OpenDJ (i.e. bnelson)
- Configure ACIs for User Account as appropriate
- Test the configuration by performing a command line search using the proxied access control parameter.
Hacking OpenAM – An Open Response to Radovan Semancik
I have been working with Sun, Oracle and ForgeRock products for some time now and am always looking for new and interesting topics that pertain to theirs and other open source identity products. When Google alerted me to the following blog posting, I just couldn’t resist:
Hacking OpenAM, Level: Nightmare
Radovan Semancik | February 25, 2015
There were two things in the alert that caught my attention. The first was the title and the obvious implications that it contained and the second is the author of the blog and the fact that he’s associated with Evolveum, a ForgeRock OpenIDM competitor.
The identity community is relatively small and I have read many of Radovan’s postings in the past. We share a few of the same mailing lists and I have seen his questions/comments come up in those forums from time to time. I have never met Radovan in person, but I believe we are probably more alike than different. We share a common lineage; both being successful Sun identity integrators. We both agree that open source identity is preferable to closed source solutions. And it seems that we both share many of the same concerns over Internet privacy. So when I saw this posting, I had to find out what Radovan had discovered that I must have missed over the past 15 years in working with these products. After reading his blog posting, however, I do not share his same concerns nor do I come to the same conclusions. In addition, there are several inaccuracies in the blog that could easily be misinterpreted and are being used to spread fear, uncertainty, and doubt around OpenAM.
What follows are my responses to each of Radovan’s concerns regarding OpenAM. These are based on my experiences of working with the product for over 15 years and as Radovan aptly said, “your mileage may vary.”
In the blog Radovan comments “OpenAM is formally Java 6. Which is a problem in itself. Java 6 does not have any public updates for almost two years.”
ForgeRock is not stuck with Java 6. In fact, OpenAM 12 supports Java 7 and Java 8. I have personally worked for governmental agencies that simply cannot upgrade their Java version for one reason or another. ForgeRock must make their products both forward looking as well as backward compatible in order to support their vast customer base.
In the blog Radovan comments “OpenAM also does not have any documents describing the system architecture from a developers point of view.”
I agree with Radovan that early versions of the documentation were limited. As with any startup, documentation is one of the things that suffers during the initial phases, but over the past couple of years, this has flipped. Due to the efforts of the ForgeRock documentation team I now find most of my questions answered in the ForgeRock documentation. In addition, ForgeRock is a commercial open source company, so they do not make all high value documents publicly available. This is part of the ForgeRock value proposition for subscription customers.
In the blog Radovan comments “OpenAM is huge. It consists of approx. 2 million lines of source code. It is also quite complicated. There is some component structure. But it does not make much sense on the first sight.”
I believe that Radovan is confusing the open source trunk with commercial open source product. Simply put, ForgeRock does not include all code from the trunk in the OpenAM commercial offering. As an example the extensions directory, which is not part of the product, has almost 1000 Java files in it.
More importantly, you need to be careful in attempting to judge functionality, quality, and security based solely on the number of lines of code in any product. When I worked at AT&T, I was part of a development team responsible for way more than 2M lines of code. My personal area of responsibility was directly related to approximately 250K lines of code that I knew inside and out. A sales rep could ask me a question regarding a particular feature or issue and I could envision the file, module, and even where in the code the question pertained (other developers can relate to this). Oh, and this code was rock solid.
In the blog Radovan comments that the “bulk of the OpenAM code is still efficiently Java 1.4 or even older.”
Is this really a concern? During the initial stages of my career as a software developer, my mentor beat into my head the following mantra:
If it ain’t broke, don’t fix it!
I didn’t always agree with my mentor, but I was reminded of this lesson each time I introduced bugs into code that I was simply trying to make better. Almost 25 years later this motto has stuck with me but over time I have modified it to be:
If it ain’t broke, don’t fix it, unless there is a damn good reason to do so!
It has been my experience that ForgeRock follows a mantra similar to my modified version. When they decide to refactor the code, they do so based on customer or market demand not just because there are newer ways to do it. If the old way works, performance is not limited, and security is not endangered, then why change it. Based on my experience with closed-source vendors, this is exactly what they do; their source code, however, is hidden so you don’t know how old it really is.
A final thought on refactoring. ForgeRock has refactored the Entitlements Engine and the Secure Token Service (both pretty mammoth projects) all while fixing bugs, responding to RFEs, and implementing new market-driven features such as:
- Adaptive Authentication
- New XUI Interface
- REST STS
- WS-TRUST STS
- OpenID Connect
- OAuth 2.0
- Core Token Service
In my opinion, ForgeRock product development is focused on the right areas.
In the blog Radovan comments “OpenAM is in fact (at least) two somehow separate products. There is “AM” part and “FM” part.”
From what I understand, ForgeRock intentionally keeps the federation code independent. This was done so that administrators could easily create and export a “Fedlet” which is essentially a small web application that provides a customer with the code they need to implement SAML in a non-SAML application. In short, keeping it separate allows for sharing between the OpenAM core services and providing session independent federation capability. Keeping federation independent has also made it possible to leverage the functionality in other products such as OpenIG.
In the blog Radovan comments “OpenAM debugging is a pain. It is almost uncontrollable, it floods log files with useless data and the little pieces of useful information are lost in it.“
There are several places that you can look in order to debug OpenAM issues and where you look depends mostly on how you have implemented the product.
- Debug Files – OpenAM debug files contain messages output by the developer in order to debug code. This includes a timestamp, the ID of the thread that called the Debug API, the message recorded by the code (error, info, warning), and optionally, a Java stack trace. As a default, the verbosity level is low, but you can increase the verbosity to see additional messages.
- OpenAM Log Files – OpenAM log files contain operational information for the OpenAM components. They are not designed for debugging purposes, but they may shed additional light in the debugging process. As a default, the verbosity level is low, but you can increase the verbosity to see additional messages.
- Java Container Log Files – The Java container hosting the OpenAM application will also contain log files that may assist in the debugging process. These log files contain general connection request/response for all connectivity to/from OpenAM.
- Policy Agent Log Files – Policy Agents also generate log messages when used in an OpenAM implementation. These log files may be stored on the server hosting the Policy Agent or on OpenAM, itself (or both).
I will agree with Radovan’s comments that this can be intimidating at first, but as with most enterprise products, knowing where to look and how to interpret the results is as much of an art as it is a science. For someone new to OpenAM, debugging can be complex. For skilled OpenAM customers, integrators, and ForgeRock staff, the debug logs yield a goldmine of valuable information that often assists in the rapid diagnosis of a problem.
Note: Debugging the source code is the realm of experienced developers and ForgeRock does not expect their customers to diagnose product issues.
For those who stick strictly to the open source version, the learning curve can be steep and they have to rely on the open source community for answers (but hey, what do you want for free). ForgeRock customers, however, will most likely have taken some training on the product to know where to look and what to look for. In the event that they need to work with ForgeRock’s 24×7 global support desk, then they will most likely be asked to capture these files (as well as configuration information) in order to submit a ticket to ForgeRock.
In the blog Radovan comments that the “OpenAM is still using obsolete technologies such as JAX-RPC. JAX-RPC is a really bad API.” He then goes on to recommend Apache CXF and states “it takes only a handful of lines of code to do. But not in OpenAM.”
Ironically, OpenAM 12 has a modern REST STS along with a WS-TRUST Apache CXF based implementation (exactly what Radovan recommends). ForgeRock began migrating away from JAX-RPC towards REST-based web services as early as version 11.0. Now with OpenAM 12, ForgeRock has a modern (fully documented) REST STS along with a WS-TRUST Apache CXF based implementation (exactly what Radovan recommends).
ForgeRock’s commitment to REST is so strong, in fact, that they have invested heavily in the ForgeRock Common REST (CREST) Framework and API – which is used across all of their products. They are the only vendor that I am aware of that provides REST interfaces across all products in their IAM stack. This doesn’t mean, however, that ForgeRock can simply eliminate JAX-RPC functionality from the product. They must continue to support JAX-RPC to maintain backwards compatibility for existing customers that are utilizing this functionality.
In the blog Radovan comments “OpenAM originated between 1998 and 2002. And the better part of the code is stuck in that time as well.”
In general, Radovan focuses on very specific things he does not like in OpenAM, but ignores all the innovations and enhancements that have been implemented since Sun Microsystems. As mentioned earlier, ForgeRock has continuously refactored, rewritten, and added several major new features to OpenAM.
“ForgeRock also has a mandatory code review process for every code modification. I have experienced that process first-hand when we were cooperating on OpenICF. This process heavily impacts efficiency and that was one of the reasons why we have separated from OpenICF project.”
I understand how in today’s Agile focused world there is the tendency to shy away from old school concepts such as design reviews and code reviews. I understand the concerns about how they “take forever” and “cost a lot of money”, but consider the actual cost of a bug getting out the door and into a customer’s environment. The cost is born by both the vendor and the customer but ultimately it is the vendor who incurs a loss of trust, reputation, and ultimately customers. Call me old school, but I will opt for code reviews every time – especially when my customer’s security is on the line.
Note: there is an interesting debate on the effectiveness of code reviews on Slashdot.
Conclusion
So, while I respect Radovan’s opinions, I don’t share them and apparently neither do many of the rather large companies and DOD entities that have implemented OpenAM in their own environments. The DOD is pretty extensive when it comes to product reviews and I have worked with several Fortune 500 companies that have had their hands all up in the code – and still choose to use it. I have worked with companies that elect to have a minimal IAM implementation team (and rely on ForgeRock for total support) to those that have a team of developers building in and around their IAM solution. I have seen some pretty impressive integrations between OpenAM log files, debug files, and the actual source code using tools such as Splunk. And while you don’t need to go to the extent that I have seen some companies go in getting into the code, knowing that you could if you wanted to is a nice thing to have in your back pocket. That is the benefit of open source code and one of the benefits of working with ForgeRock in general.
I can remember working on an implementation for one rather large IAM vendor where we spent more than three months waiting for a patch. Every status meeting with the customer became more and more uncomfortable as we waited for the vendor to respond. With ForgeRock software, I have the opportunity to look into the code and put in my own temporary patch if necessary. I can even submit the patch to ForgeRock and if they agree with the change (once it has gone through the code review), my patch can then be shared with others and become supported by ForgeRock.
It is the best of both worlds, it is commercial open source!
OpenDJ Access Control Explained
 An OpenDJ implementation will contain certain data that you would like to explicitly grant or deny access to. Personally identifiable information (PII) such as a user’s home telephone number, their address, birth date, or simply their email address might be required by certain team members or applications, but it might be a good idea to keep this type of information private from others. On the other hand, you may want their office phone number published for everyone within the company to see but limit access to this data outside of the company.
Controlling users’ access to different types of information forms the basis of access control in OpenDJ and consists of the following two stages:
- Authentication (AuthN) – the process of positively identifying a subject
- Authorization (AuthZ) – the process of determining the rights that a subject has on a particular resource
Before you are allowed to perform any action within OpenDJ, it must first know who you are. Once your identity has been established, OpenDJ can then ascertain the rights you have to perform actions either on the data contained in its database(s) or within the OpenDJ process, itself.

Access Control = Authentication + Authorization
Note: Access control is not defined in any of the LDAP RFCs so the manner in which directory servers implement access control varies from vendor to vendor. Many directory services (including OpenDJ) follow the LDAP v3 syntax introduced by Netscape.
Access control is implemented with an operational attribute called aci (which stands for access control instruction). Access control instructions can be configured globally (the entire OpenDJ instance) or added to specific directory entries.
1. Global ACIs:
Global ACIs are not associated with directory entries and therefore are not available when searching against a typical OpenDJ suffix (such as dc=example,dc=com). Instead, Global ACIs are considered configuration objects and may be found in the configuration suffix (cn=config). You can find the currently configured Global ACIs by opening the config.ldif file and locating the entry for the “Access Control Handler”. Or, you can search for “cn=Access Control Handler” in the configuration suffix (cn=config) as follows:
./ldapsearch –h hostname –p portnumber –D “cn=directory manager” –w “password” -b “cn=config” -s sub “cn=Access Control Handler” ds-cfg-global-aci
This returns the following results on a freshly installed (unchanged) OpenDJ server.
dn: cn=Access Control Handler,cn=config
ds-cfg-global-aci: (extop=”1.3.6.1.4.1.26027.1.6.1 || 1.3.6.1.4.1.26027.1.6.3 || 1.3.6.1.4.1.4203.1.11.1 || 1.3.6.1.4.1.1466.20037 || 1.3.6.1.4.1.4203.1.11.3″) (version 3.0; acl “Anonymous extended operation access”; allow(read) userdn=”ldap:///anyone”;)
ds-cfg-global-aci: (target=”ldap:///”)(targetscope=”base”)(targetattr=”objectClass||namingContexts||supportedAuthPasswordSchemes||supportedControl||supportedExtension||supportedFeatures||supportedLDAPVersion||supportedSASLMechanisms||supportedTLSCiphers||supportedTLSProtocols||vendorName||vendorVersion”)(version 3.0; acl “User-Visible Root DSE Operational Attributes”; allow (read,search,compare) userdn=”ldap:///anyone”;)
ds-cfg-global-aci: target=”ldap:///cn=schema”)(targetattr=”attributeTypes||objectClasses”)(version 3.0;acl “Modify schema”; allow (write)(userdn = “ldap:///uid=openam,ou=Service Accounts,dc=example,dc=com”);)
ds-cfg-global-aci: target=”ldap:///cn=schema”)(targetscope=”base”)(targetattr=” objectClass||attributeTypes||dITContentRules||dITStructureRules||ldapSyntaxes||matchingRules||matchingRuleUse||nameForms||objectClasses”)(version 3.0; acl “User-Visible Schema Operational Attributes”; allow (read,search,compare) userdn=”ldap:///anyone”;)
ds-cfg-global-aci: (target=”ldap:///dc=replicationchanges”)(targetattr=”*”)(version 3.0; acl “Replication backend access”; deny (all) userdn=”ldap:///anyone”;)
ds-cfg-global-aci: (targetattr!=”userPassword||authPassword||changes||changeNumber||changeType||changeTime||targetDN||newRDN||newSuperior||deleteOldRDN”)(version 3.0; acl “Anonymous read access”; allow (read,search,compare) userdn=”ldap:///anyone”;)
ds-cfg-global-aci: (targetattr=”audio||authPassword||description||displayName||givenName||homePhone||homePostalAddress||initials||jpegPhoto||labeledURI||mobile||pager||postalAddress||postalCode||preferredLanguage||telephoneNumber||userPassword”)(version 3.0; acl “Self entry modification”; allow (write) userdn=”ldap:///self”;)
ds-cfg-global-aci: (targetattr=”createTimestamp||creatorsName||modifiersName||modifyTimestamp||entryDN||entryUUID||subschemaSubentry||etag||governingStructureRule||structuralObjectClass||hasSubordinates||numSubordinates”)(version 3.0; acl “User-Visible Operational Attributes”; allow (read,search,compare) userdn=”ldap:///anyone”;)
ds-cfg-global-aci: (targetattr=”userPassword||authPassword”)(version 3.0; acl “Self entry read”; allow (read,search,compare) userdn=”ldap:///self”;)
ds-cfg-global-aci: (targetcontrol=”1.3.6.1.1.12 || 1.3.6.1.1.13.1 || 1.3.6.1.1.13.2 || 1.2.840.113556.1.4.319 || 1.2.826.0.1.3344810.2.3 || 2.16.840.1.113730.3.4.18 || 2.16.840.1.113730.3.4.9 || 1.2.840.113556.1.4.473 || 1.3.6.1.4.1.42.2.27.9.5.9″) (version 3.0; acl “Authenticated users control access”; allow(read) userdn=”ldap:///all”;)
ds-cfg-global-aci: (targetcontrol=”2.16.840.1.113730.3.4.2 || 2.16.840.1.113730.3.4.17 || 2.16.840.1.113730.3.4.19 || 1.3.6.1.4.1.4203.1.10.2 || 1.3.6.1.4.1.42.2.27.8.5.1 || 2.16.840.1.113730.3.4.16 || 1.2.840.113556.1.4.1413″) (version 3.0; acl “Anonymous control access”; allow(read) userdn=”ldap:///anyone”;)
2. Entry-Based ACIs:
Access control instructions may also be applied to any entry in the directory server. This allows fine grained access control to be applied anywhere in the directory information tree and therefore affects the scope of the ACI.
Note: Placement has a direct effect on the entry where the ACI is applied as well as any children of that entry.
You can obtain a list of all ACIs configured in your server (sans the Global ACIs) by performing the following search:
./ldapsearch –h hostname –p portnumber –D “cn=directory manager” –w “password” –b “dc=example,dc=com” –s sub aci=* aci
By default, there are no ACIs configured at the entry level. The following is an example of ACIs that might be returned if you did have ACIs configured, however.
dn: dc=example,dc=com
aci: (targetattr=”*”)(version 3.0;acl “Allow entry search”; allow (search,read)(userdn = “ldap:///uid=openam,ou=Service Accounts,dc=example,dc=com”);)
aci: (targetattr=”*”)(version 3.0;acl “Modify config entry”; allow (write)(userdn = “ldap:///uid=openam,ou=Service Accounts,dc=example,dc=com”);)
aci: (targetcontrol=”2.16.840.1.113730.3.4.3″)(version 3.0;acl “Allow persistent search”; allow (search, read)(userdn = “ldap:///uid=openam,ou=Service Accounts,dc=example,dc=com”);)
aci: (version 3.0;acl “Add config entry”; allow (add)(userdn = “ldap:///uid=openam,ou=Service Accounts,dc=example,dc=com”);)
aci: (version 3.0;acl “Delete config entry”; allow (delete)(userdn = “ldap:///uid=openam,ou=Service Accounts,dc=example,dc=com”); )
dn: ou=Applications,dc=example,dc=com
aci: (target =”ldap:///ou=Applications,dc=example,dc=com”)(targetattr=”*”)(version 3.0;acl “Allow Application Config Access to Web UI Admin”; allow (all)(userdn = “ldap:///uid=webui,ou=Applications,dc=example,dc=com”); )
ACI Syntax:
The syntax for access control instructions is not specific to OpenDJ, in fact, for the most part, it shares the same syntax with the Oracle Directory Server Enterprise Edition (“ODSEE”). This is mainly due the common lineage with Sun Microsystems, but other directory servers do not use the same syntax and this makes migration more difficult (even the schema in both servers contains an attribute called aci). If you export OpenDJ directory entries to LDIF and attempt to import them into another vendor’s server, the aci statements would either be ignored, or worse, might have unpredictable results, altogether.
The following syntax is used by the OpenDJ server.

Access control instructions require three inputs: target, permission, and subject. The target specifies the entries to which the aci applies. The subject applies to the client that is performing the operation and the permissions specify what the subject is allowed to do. You can create some very powerful access control based on these three inputs.
The syntax also includes the version of the aci syntax, version 3.0. This is the aci syntax version, not the LDAP version. Finally, the syntax allows you to enter a human readable name. This allows you to easily search for and identify access control statements in the directory server.
Note: Refer to the OpenDJ Administration Guide for a more detailed description of the aci A components.
The following is an example of an ACI that permits a user to write to their own password and mobile phone attributes.

You cannot read the ACI from left to right, or even right to left, you simply have to dive right in and look for the information required to understand the intent of the ACI. If you have been working with ACIs for some time, you probably already have your own process, but I read/interpret the preceding ACI as follows:
This ACI “allows” a user to “write” to their own (“ldap:///self”) userPassword and mobile attributes “(targetattr=”userPassword||mobile”)”
If you place this ACI on a particular user’s object (i.e. uid=bnelson, ou=people,dc=example,dc=com), then this ACI would only apply to this object. If you place this ACI on a container of multiple user objects (i.e. ou=people,dc=example,dc=com), then this ACI would apply to all user objects included in this container.
Access Control Processing:
Access control instructions provide fine-grained control over what a given user or group member is authorized to do within the directory server.
When a directory-enabled client tries to perform an operation on any entry in the server, an access control list (ACL) is created for that particular entry. The ACL for any given entry consists of the entry being accessed as well as any parent entries all the way up to the root entry.

The ACL is essentially the summation of all acis defined for the target(s) being accessed plus the acis for all parent entries all the way to the top of the tree. Included in this list are any Global ACIs that may have been configured in the cn=config as well. While not entirely mathematically accurate, the following formula provides an insight into how the ACL is generated.

Using the previous formula, the access control lists for each entry in the directory information tree would be as follows:

Once the ACL is created, the list is then processed to determine if the client is allowed to perform the operation or not. ACLs are processed as follows:
- If there exists at least one explicit DENY rule that prevents a user from performing the requested action (i.e. deny(write)), then the user is denied.
- If there exists at least one explicit ALLOW rule that allows a user to perform the requested action (i.e. allow(write)), then the user is allowed (as long as there are no other DENY rules preventing this).
- If there are neither DENY nor ALLOW rules defined for the requested action, then the user is denied. This is referred to as the implicit deny.
Something to Think About…
 |
Thought 1: If in the absence of any access control instructions, the default is to deny access, then what is the purpose of access control instructions you might ask? ACIs with ALLOW rules are used to grant a user permission to perform some action. Without ALLOW ACIs, all actions are denied (due to the implicit deny rule).
Thought 2: If the default is to implicitly deny a user, then what is the purpose of DENY rules? DENY rules are used to revoke a previously granted permission. For instance, suppose that you create an ALLOW rule for the Help Desk Admin group to access a user’s PII data in order to help determine the user’s identity for a password reset. But you have a recently hired Help Desk Admin that has not completed the required sensitivity training. You may elect to keep him in the Help Desk Admin group for other reasons, but revoke his ability to read users’ PII data until his training has been completed.Note: You should use DENY rules sparingly. If you are creating too many DENY rules you should question how you have created your ALLOW rules. Thought 3: If the absence of access control instructions means that everyone is denied, then how can we manage OpenDJ in the event that conflicting ACIs are introduced? Or worse, ACIs are dropped altogether? That is where the OpenDJ Super User and OpenDJ privileges come in. |
OpenDJ’s Super User:
The RootDN user (“cn=Directory Manager” by default) is a special administrative user that can pretty much perform any action in OpenDJ. This user account is permitted full access to directory server data and can perform almost any action in the directory service, itself. Essentially, this account is similar to the root or Administrator accounts on UNIX and Windows systems, respectively.
If you look in the directory server you will find that there are no access control instruction granting the RootDN this unrestricted access; but there are however privileges that do so.
Privileges:
While access control instructions restrict access to directory data through LDAP operations, privileges define administrative tasks that may be performed by users within OpenDJ. Assignment of privileges to users (either directly or through groups) effectively allows those users the ability to perform the administrative tasks defined by those privileges.
The following table provides a list of common privileges and their relationship to the RootDN user.
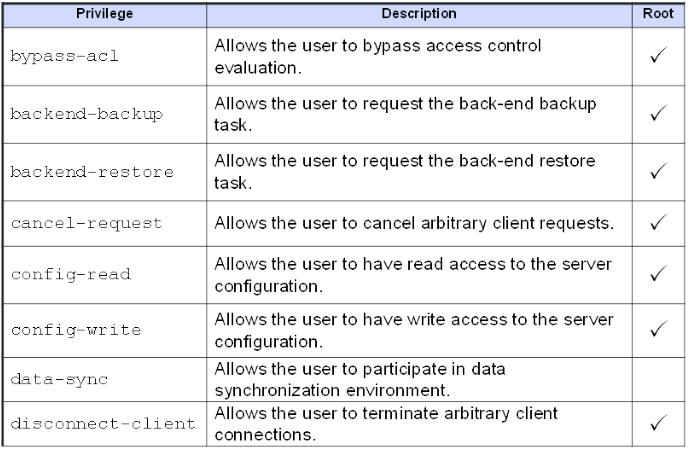
The RootDN user is assigned these privileges by default and similar to Global ACIs, these privileges are defined and maintained in the OpenDJ configuration object. The following is the default list of privileges associated with Root DN users (of which the Directory Manager account is a member).
dn: cn=Root DNs,cn=config
objectClass: ds-cfg-root-dn
objectClass: top
ds-cfg-default-root-privilege-name: bypass-lockdown
ds-cfg-default-root-privilege-name: bypass-acl
ds-cfg-default-root-privilege-name: modify-acl
ds-cfg-default-root-privilege-name: config-read
ds-cfg-default-root-privilege-name: config-write
ds-cfg-default-root-privilege-name: ldif-import
ds-cfg-default-root-privilege-name: ldif-export
ds-cfg-default-root-privilege-name: backend-backup
ds-cfg-default-root-privilege-name: backend-restore
ds-cfg-default-root-privilege-name: server-lockdown
ds-cfg-default-root-privilege-name: server-shutdown
ds-cfg-default-root-privilege-name: server-restart
ds-cfg-default-root-privilege-name: disconnect-client
ds-cfg-default-root-privilege-name: cancel-request
ds-cfg-default-root-privilege-name: password-reset
ds-cfg-default-root-privilege-name: update-schema
ds-cfg-default-root-privilege-name: privilege-change
ds-cfg-default-root-privilege-name: unindexed-search
ds-cfg-default-root-privilege-name: subentry-write
cn: Root DNs
This list can retrieved using the OpenDJ dsconfig command:
./dsconfig –h localhost –p 4444 –D “cn=directory manager” –w password get-root-dn-prop
with the ldapsearch command:
./ldapsearch –h hostname –p portnumber –D “cn=directory manager” –w “password” -b “cn=config” -s sub “cn=Root DNs” ds-cfg-default-root-privilege-name
or simply by opening the config.ldif file and locating the entry for the “cn=Root DNs” entry.
Most operations involving sensitive or administrative data require that a user has both the appropriate privilege(s) as well as certain access control instructions. This allows you to configure authorization at a fine grained level – such as managing access control or resetting passwords.
Privileges are assigned to users and apply globally to the directory service. Any user can be granted or denied any privilege and by default only the RootDN users are assigned a default set of privileges.
Note: Consider creating different types of administrative groups in OpenDJ and assign the privileges and ACIs to those groups to define what a group member is allowed to do. Adding users to that group then automatically grants those users the rights defined in the group and conversely, removing them from the group drops those privileges (unless they are granted through another group).
Effective Rights:
Once you set up a number of ACIs, you may find it difficult to understand how the resulting access control list is processed and ultimately the rights that a particular user may have. Fortunately OpenDJ provides a method of evaluating the effective rights that a subject has on a given target.
You can use the ldapsearch command to determine the effective rights that a user has on one or more attributes on one or more entries.
$ ldapsearch –h localhost –p 1389 -D “cn=Directory Manager” -w password
-g “dn:uid=helpdeskadmin,ou=administrators, dc=example,dc=com” -b “uid=scarter,ou=people, dc=example,dc=com” -s base ‘(objectclass=*)’ ‘*’ aclrights
The preceding search is being performed by the Root DN user (“cn=Directory Manager”). It is passing the –g option requesting the get effective rights control (to which the Directory Manager has the appropriate access configured). The command wants to determine what rights the Help Desk Administrator (uid=helpdeskadmin,…) has on Sam Carter’s entry (uid=scarter,…). The scope of the search has been limited only to Sam Carter’s entry using the base parameter. Finally, the search operation is returning not only the attributes, but the effective rights (aclrights) as well.
Possible results from a search operation such as this are as follows:
dn: uid=scarter,ou=People,dc=example,dc=com
objectClass: person
objectClass: top
uid: scarter
userPassword: {SSHA}iMgzz9mFA6qYtkhS0Z7bhQRnv2Ic8efqpctKDQ==
givenName: Sam
cn: Sam Carter
sn: Carter
mail: sam.carter@example.com
aclRights;attributeLevel;objectclass: search:1,read:1,compare:1,write:0,selfwrit
e_add:0,selfwrite_delete:0,proxy:0
aclRights;attributeLevel;uid: search:1,read:1,compare:1,write:0,selfwrite_add:0,
selfwrite_delete:0,proxy:0
aclRights;attributeLevel;userpassword: search:0,read:0,compare:0,write:1,selfwri
te_add:0,selfwrite_delete:0,proxy:0
aclRights;attributeLevel;givenname: search:1,read:1,compare:1,write:0,selfwrite_
add:0,selfwrite_delete:0,proxy:0
aclRights;attributeLevel;cn: search:1,read:1,compare:1,write:0,selfwrite_add:0,s
elfwrite_delete:0,proxy:0
aclRights;attributeLevel;sn: search:1,read:1,compare:1,write:0,selfwrite_add:0,s
elfwrite_delete:0,proxy:0
aclRights;attributeLevel;mail: search:1,read:1,compare:1,write:0,selfwrite_add:0
,selfwrite_delete:0,proxy:0
aclRights;entryLevel: add:0,delete:0,read:1,write:0,proxy:0
The search results contain not only the attributes/attribute values associated with Sam Carter’s object, but the effective rights that the Help Desk Admins have on those attributes. For instance,
aclRights;attributeLevel;givenname: search:1,read:1,compare:1,write:0,selfwrite_
add:0,selfwrite_delete:0,proxy:0
The aclRights;attributeLevel;givenname notation indicate that this line includes the effective rights for the givenname attribute. Individual permissions are listed that demonstrate the rights that the Help Desk Administrator has on this attribute for Sam Carter’s entry (1 = allowed and 0 = denied).
Recommendations:
An OpenDJ installation includes a set of default (Global) access control instructions which by some standards may be considered insecure. For instance, there are five ACIs that allow an anonymous user the ability to read certain controls, extended operations, operational attributes, schema attributes, and user attributes. The basic premise behind this is that ForgeRock wanted to provide an easy out-of-the-box evaluation of the product while at the same time providing a path forward for securing the product. It is intended that OpenDJ should be hardened in order to meet a company’s security policies and in fact, one task that is typically performed before placing OpenDJ in production is to limit anonymous access. There are two ways you can perform this:
- Enable the reject-unauthenticated-request property using the dsconfig command.
- Update the Global ACIs
Mark Craig provides a nice blog posting on how to turn off anonymous access using the dsconfig command. You can find that blog here. The other option is to simply change the reference in the Global ACIs from ldap:///anyone to ldap:///all. This prevents anonymous users from gaining access to this information.
Note: Use of ldap:///anyone in an ACI includes both authenticated and anonymous users – essentially, anyone. Changing this to ldap:///all restricts the subject to all authenticated users.
The following comments from Ludo Poitou (ForgeRock’s OpenDJ Product Manager) should be considered before simply removing anonymous access.
You don’t want to remove the ACI rules for Anonymous access, you want to change it from granting access to anyone (ldap:///anyone) to granting access to all authenticated users (ldap:///all).
This said, there are some differences between fully rejecting unauthenticated requests and using ACI to control access. The former will block all access including the attempts to discover the server’s capabilities by reading the RootDSE. The later allows you to control which parts can be accessed anonymously, and which shouldn’t.
There’s been a lot of fuss around allowing anonymous access to a directory service. Some people are saying that features and naming context discovery is a threat to security, allowing malicious users to understand what the server contains and what security mechanisms are available and therefore not available. At the same time, it is important for generic purpose applications to understand how they can or must use the directory service before they actually authenticate to it.
Fortunately, OpenDJ has mechanisms that allow administrators to configure the directory services according to their security constraints, using either a simple flag to reject all unauthenticated requests, or by using ACIs.
A few other things to consider when configuring access control in OpenDJ include the following:
- Limit the number of Root DN user accounts
You should have one Root DN account and it should not be shared with multiple administrators. Doing so makes it nearly impossible to determine the identity of the person who performed a configuration change or operation in OpenDJ. Instead, make the password complex and store it in a password vault.
- Create a delegated administration environment
Now that you have limited the number of Root DN accounts, you need to create groups to allow users administrative rights in OpenDJ. Users would then log in as themselves and perform operations against the directory server using their own account. The tasks associated with this are as follows:
- Create administrative groups
- Use the ds-privilege-name attribute to assign privilege(s) to the group entry
- Create ACIs based on the group name, not an individual user. For instance, “groupdn:///cn=Help Desk Admin, ou=Administrators,dc=example,dc=com”
- Add users to the groups
- Associate privileges and ACIs to users for fine grained access control
Now that you have create administrative groups, you are ultimately going to need to provide certain users with more rights than others. You can create additional administrative groups, but what if you only need one user to have these rights. Creating a group of one may or may not be advisable and may actually lead to group explosion (where you end up with more groups than you actually have users). Instead, consider associating privileges to a particular user and then create ACIs based on that user.
The Next Generation of Identity Management
The face of identity is changing. Historically, it was the duty of an identity management solution to manage and control an individual’s access to corporate resources. Such solutions worked well as long as the identity was safe behind the corporate firewall – and the resources were owned by the organization.
But in today’s world of social identities (BYOI), mobile devices (BYOD), dynamic alliances (federation), and everything from tractors to refrigerators being connected to the Internet (IoT), companies are finding that legacy identity management solutions are no longer able to keep up with the demand. Rather than working with thousands to hundreds of thousands of identities, today’s solutions are tasked with managing hundreds of thousands to millions of identities and include not only carbon-based life forms (people) but also those that are silicon-based (devices).
In order to meet this demand, today’s identity solutions must shift from the corporation-centric view of a user’s identity to one that is more user-centric. Corporations typically view the identity relationship as one between the user and the organization’s resources. This is essentially a one-to-many relationship and is relatively easy to manage using legacy identity management solutions.

What is becoming evident, however, is the growing need to manage many-to-many relationships as these same users actually have multiple identities (personas) that must be shared with others that, in turn, have multiple identities, themselves.

The corporation is no longer the authoritative source of a user’s identity, it has been diminished to the role of a persona as users begin to take control of their own identities in other aspects of their lives.
Identity : the state or fact of being the same one as described.
Persona : (in the psychology of C. G. Jung) the mask or façade presented to satisfy the demands of the situation or the environment.
In developing the next generation of identity management solutions, the focus needs to move away from the node (a reference to an entry in a directory server) and more towards the links (or relationships) between the nodes (a reference to social graphs).

In order to achieve this, today’s solutions must take a holistic view of the user’s identity and allow the user to aggregate, manage, and decide with whom to share their identity data.
Benefits to Corporations
While corporations may perceive this as a loss of control, in actuality it is the corporation that stands to benefit the most from a user-centric identity management solution. Large corporations spend hundreds of thousands of dollars each year in an attempt to manage a user’s identity only to find that much of what they have on file is incorrect. There are indeed many characteristics that must be managed by the organization, but many of a user’s attributes go well-beyond a corporation’s reach. In such cases, its ability to maintain accurate data within these attributes is relatively impossible without the user’s involvement.
Take for instance a user’s mobile telephone number; in the past, corporations issued, sponsored, and managed these devices. But today’s employees typically purchase their own mobile phones and change carriers (or even phone numbers) on a periodic basis. As such, corporate white pages are filled with inaccurate data; this trend will only increase as users continue to bring more and more of themselves into the workplace.
Legacy identity solutions attempt to address this issue by introducing “end-user self-service” – a series of Web pages that allow a user to maintain their corporate profile. Users are expected to update their profile whenever a change occurs. The problem with this approach is that users selectively update their profiles and in some cases purposely supply incorrect data (in order to avoid after hours calls). The other problem with this approach is that it still adheres to a corporate-centric/corporate-owned identity mindset. The truth is that users’ identities are not centralized, they are distributed across many different systems both in front of and behind the corporate firewall and while companies may “own” certain data, it is the information that the user brings from other sources that is elusive to the company.
Identity Relationship Management
A user has relationships that extend well beyond those maintained within a company and as such has core identity data strewn across hundreds, if not thousands of databases. The common component in all of these relationships is the user. It is the user who is in charge of that data and it is the user who elects to share their information within the context of those relationships. The company is just one of those relationships, but it is the one for which legacy identity management solutions have been written.
Note: Relationships are not new, but the number of relationships that a user has and types of relationships they have with other users and other things is rapidly growing.
Today’s identity management solutions must evolve to accept (or at a minimum acknowledge) multiple authoritative sources beyond their own. They must evolve to understand the vast number of relationships that a user has both with other users, but also with the things the user owns (or uses) and they must be able to provide (or deny) services based on those relationships and even the context of those relationships. These are lofty goals for today’s identity management solutions as they require vendors to think in a whole new way, implement a whole new set of controls, and come up with new and inventive interfaces to scale to the order of millions. To borrow a phrase from Ian Glazer, we need to kill our current identity management solutions in order to save them, but such an evolution is necessary for identity to stay relevant in today’s relationship-driven world.
I am not alone in recognizing the need for a change. Others have come to similar conclusions and this has given rise to the term, Identity Relationship Management (or IRM). The desire for change is so great in fact that Kantara has sponsored the Identity Relationship Management Working Group of which I am privileged to be a member. This has given rise to a LinkedIn Group on IRM, a Twitter feed (@irmwg), various conferences either focused on or discussing IRM, and multiple blogs of which this is only one.
LinkedIn IRM Working Group Description:
In today’s internet-connected world, employees, partners, and customers all need anytime access to secure data from millions of laptops, phones, tablets, cars, and any devices with internet connections.
Identity relationship management platforms are built for IoT, scale, and contextual intelligence. No matter the device, the volume, or the circumstance, an IRM platform will adapt to understand who you are and what you can access.
Call to Action
Do you share similar thoughts and/or concerns? Are you looking to help craft the future of identity management? If so, then consider being part of the IRM Working Group or simply joining the conversation on LinkedIn or Twitter.
 |
