Archive
OpenDJ Attribute Uniqueness (and the Effects on OpenAM)
In real life we tend to value those traits that make us unique from others; but in an identity management deployment uniqueness is essential to the authentication process and should not be taken for granted.

Case in point, attributes in OpenDJ may share values that you may or may not want (or need) to be unique. For instance the following two (different) entries are both configured with the same value for the email address:
dn: uid=bnelson,ou=people,dc=example,dc=com
uid: bnelson
mail: bill.nelson@identityfusion.com
[LDIF Stuff Snipped]
dn: uid=scarter,ou=people,dc=example,dc=com
uid: scarter
mail: bill.nelson@identityfusion.com
[LDIF Stuff Snipped]
In some cases this may be fine, but in others this may not be the desired effect as you may need to enforce uniqueness for attributes such as uid, guid, email address, or simply credit cards. To ensure that attribute values are unique across directory server entries you need to configure attribute uniqueness.
UID Uniqueness Plug-In
OpenDJ has an existing plug-in that can be used to configure unique values for the uid attribute, but this plug-in is disabled by default. You can find this entry in OpenDJ’s main configuration file (config.ldif) or by searching the cn=config tree in OpenDJ (assuming you have the correct permissions to do so).
dn: cn=UID Unique Attribute,cn=Plugins,cn=config
objectClass: ds-cfg-unique-attribute-plugin
objectClass: ds-cfg-plugin
objectClass: top
ds-cfg-enabled: false
ds-cfg-java-class: org.opends.server.plugins.UniqueAttributePlugin
ds-cfg-plugin-type: preOperationAdd
ds-cfg-plugin-type: preOperationModify
ds-cfg-plugin-type: preOperationModifyDN
ds-cfg-plugin-type: postOperationAdd
ds-cfg-plugin-type: postOperationModify
ds-cfg-plugin-type: postOperationModifyDN
ds-cfg-plugin-type: postSynchronizationAdd
ds-cfg-plugin-type: postSynchronizationModify
ds-cfg-plugin-type: postSynchronizationModifyDN
ds-cfg-invoke-for-internal-operations: true
ds-cfg-type: uid
cn: UID Unique Attribute
Leaving this plug-in disabled can cause problems with OpenAM, however, if OpenAM has been configured to authenticate using the uid attribute (and you ‘accidentally’ create entries with the same uid value). In such cases you will see an authentication error during the login process as OpenAM cannot determine which account you are trying to use for authentication.
Configuring Uniqueness
To fix this problem in OpenAM, you can use the OpenDJ dsconfig command to enable the UID Unique Attribute plug-in as follows:
./dsconfig set-plugin-prop --hostname localhost --port 4444  \
--bindDN "cn=Directory Manager" --bindPassword password \
--plugin-name "UID Unique Attribute" \
--set base-dn:ou=people,dc=example,dc=com --set enabled:true \
--trustAll --no-prompt
This will prevent entries from being added to OpenDJ where the value of any existing uids conflicts with the incoming entry’s uid. This will address the situation where you are using the uid attribute for authentication in OpenAM, but what if you want to use a different attribute (such as mail) to authenticate? In such cases, you need to create your own uniqueness plug-in as follows:
./dsconfig create-plugin --hostname localhost --port 4444  \
--bindDN "cn=Directory Manager" --bindPassword password \
--plugin-name "Unique Email Address Plugin" \
--type unique-attribute --set type:mail --set enabled:true \
--set base-dn:ou=people,dc=example,dc=com --trustAll \
--no-prompt
In both cases the base-dn parameter defines the scope where the the uniqueness applies. This is useful in multitenant environments where you may want to define uniqueness within a particular subtree but not necessarily across the entire server.
Prerequisites
The uniqueness plug-in requires that you have an existing equality index configured for the attribute where you would like to enforce uniqueness. The index is necessary so that OpenDJ can search for other entries (within the scope of the base-dn) where the attribute may already have a particular value set.
The following dscconfig command can be used to create an equality index for the mail attribute:
./dsconfig  create-local-db-index  --hostname localhost --port 4444  \
--bindDN "cn=Directory Manager" --bindPassword password --backend-name userRoot  \
--index-name mail  --set index-type:equality --trustAll --no-prompt
Summary
OpenAM’s default settings (Data Store, LDAP authentication module, etc) uses the uid attribute to authenticate and uniquely identify a user. OpenDJ typically uses uid as the unique naming attribute in a user’s distinguished name. When combined together, it is almost assumed that you will be using the uid attribute in this manner, but that is not always the case. You can easily run into issues when you start coloring outside of the lines and begin using other attributes (i.e. mail) for this purpose. Armed with the information contained in this post, however, you should easily be able to configure OpenDJ to enforce uniqueness for any attribute.
Understanding OpenAM and OpenDJ Account Lockout Behaviors
The OpenAM Authentication Service can be configured to lock a user’s account after a defined number of log in attempts has failed. Account Lockout is disabled by default, but when configured properly, this feature can be useful in fending off brute force attacks against OpenAM login screens.
If your OpenAM environment includes an LDAP server (such as OpenDJ) as an authentication database, then you have options on how (and where) you can configure Account Lockout settings. This can be performed in either OpenAM (as mentioned above) or in the LDAP server, itself. But the behavior is different based on where this is configured. There are benefits and drawbacks towards configuring Account Lockout in either product and knowing the difference is essential.
Note: Configuring Account Lockout simultaneously in both products can lead to confusing results and should be avoided unless you have a firm understanding of how each product works. See the scenario at the end of this article for a deeper dive on Account Lockout from an attribute perspective.
The OpenAM Approach
You can configure Account Lockout in OpenAM either globally or for a particular realm. To access the Account Lockout settings for the global configuration,
- Log in to OpenAM Console
- Navigate to: Configuration > Authentication > Core
- Scroll down to Account Lockout section
To access Account Lockout settings for a particular realm,
- Log in to OpenAM Console
- Navigate to: Access Control > realm > Authentication > All Core Settings
- Scroll down to Account Lockout section
In either location you will see various parameters for controlling Account Lockout as follows:

Configuring Account Lockout in OpenAM
Account Lockout is disabled by default; you need to select the “Login Failure Lockout Mode” checkbox to enable this feature. Once it is enabled, you configure the number of attempts before an account is locked and even if a warning message is displayed to the user before their account is locked. You can configure how long the account is locked and even the duration between successive lockouts (which can increase if you set the duration multiplier). You can configure the attributes to use to store the account lockout information in addition to the default attributes configured in the Data Store.
Enabling Account Lockout affects the following Data Store attributes: inetUserStatus and sunAMAuthInvalidAttemptsData. By default, the value of the inetUserStatus attribute is either Active or Inactive, but this can be configured to use another attribute and another attribute value. This can be configured in the User Configuration section of the Data Store configuration as follows:

Data Store Account Lockout Attributes
These attributes are updated in the Data Store configuration for the realm. A benefit of implementing Account Lockout in OpenAM is that you can use any LDAPv3 directory, Active Directory, or even a relational database – but you do need to have a Data Store configured to provide OpenAM with somewhere to write these values. An additional benefit is that OpenAM is already configured with error messages that can be easily displayed when a user’s account is about to be locked or has become locked. Configuring Account Lockout within OpenAM, however, may not provide the level of granularity that you might need and as such, you may need to configure it in the authentication database (such as OpenDJ).
The OpenDJ Approach
OpenDJ can be configured to lock accounts as well. This is defined in a password policy and can be configured globally (the entire OpenDJ instance) or it may be applied to a subentry (a group of users or a specific user). Similar to OpenAM, a user’s account can be locked after a number of invalid authentication attempts have been made. And similar to OpenAM, you have several additional settings that can be configured to control the lockout period, whether warnings should be sent, and even who to notify when the account has been locked.
But while configuring Account Lockout in OpenAM may recognize invalid password attempts in your SSO environment, configuring it in OpenDJ will recognize invalid attempts for any application that is using OpenDJ as an authentication database. This is more of a centralized approach and can recognize attacks from several vectors.
Configuring Account Lockout in OpenDJ affects the following OpenDJ attributes: pwdFailureTime (a multivalued attribute consisting of the timestamp of each invalid password attempt) and pwdAccountLockedTime (a timestamp indicating when the account was locked).
Another benefit of implementing Account Lockout in OpenDJ is the ability to configure Account Lockout for different types of users. This is helpful when you want to have different password policies for users, administrators, or even service accounts. This is accomplished by assigning different password polices directly to those users or indirectly through groups or virtual attributes. A drawback to this approach, however, is that OpenAM doesn’t necessarily recognize the circumstances behind error messages returned from OpenDJ when a user is unable to log in. A scrambled password in OpenDJ, for instance, simply displays as an Authentication failed error message in the OpenAM login screen.
By default, all users in OpenDJ are automatically assigned a generic (rather lenient) password policy that is aptly named: Default Password Policy. The definition of this policy can be seen as follows:
dn: cn=Default Password Policy,cn=Password Policies,cn=config
objectClass: ds-cfg-password-policy
objectClass: top
objectClass: ds-cfg-authentication-policy
ds-cfg-skip-validation-for-administrators: false
ds-cfg-force-change-on-add: false
ds-cfg-state-update-failure-policy: reactive
ds-cfg-password-history-count: 0
ds-cfg-password-history-duration: 0 seconds
ds-cfg-allow-multiple-password-values: false
ds-cfg-lockout-failure-expiration-interval: 0 seconds
ds-cfg-lockout-failure-count: 0
ds-cfg-max-password-reset-age: 0 seconds
ds-cfg-max-password-age: 0 seconds
ds-cfg-idle-lockout-interval: 0 seconds
ds-cfg-java-class: org.opends.server.core.PasswordPolicyFactory
ds-cfg-lockout-duration: 0 seconds
ds-cfg-grace-login-count: 0
ds-cfg-force-change-on-reset: false
ds-cfg-default-password-storage-scheme: cn=Salted SHA-1,cn=Password Storage
  Schemes,cn=config
ds-cfg-allow-user-password-changes: true
ds-cfg-allow-pre-encoded-passwords: false
ds-cfg-require-secure-password-changes: false
cn: Default Password Policy
ds-cfg-require-secure-authentication: false
ds-cfg-expire-passwords-without-warning: false
ds-cfg-password-change-requires-current-password: false
ds-cfg-password-generator: cn=Random Password Generator,cn=Password Generators,
  cn=config
ds-cfg-password-expiration-warning-interval: 5 days
ds-cfg-allow-expired-password-changes: false
ds-cfg-password-attribute: userPassword
ds-cfg-min-password-age: 0 seconds
The value of the ds-cfg-lockout-failure-count attribute is 0; which means that user accounts are not locked by default – no matter how many incorrect attempts are made. This is one of the many security settings that you can configure in a password policy and while many of these mimic what is available in OpenAM, others go quite deeper.
You can use the OpenDJ dsconfig command to change the Default Password Policy as follows:
dsconfig set-password-policy-prop --policy-name "Default Password Policy" --set
lockout-failure-count:3 --hostname localhost --port 4444 --trustAll --bindDN
"cn=Directory Manager" --bindPassword ****** --no-prompt
Rather than modifying the Default Password Policy, a preferred method is to create a new password policy and apply your own specific settings to the new policy. This policy can then be applied to a specific set of users.
The syntax for using the OpenDJ dsconfig command to create a new password policy can be seen below.
dsconfig create-password-policy --set default-password-storage-scheme:"Salted
  SHA-1" --set password-attribute:userpassword --set lockout-failure-count:3
  --type password-policy --policy-name "Example Corp User Password Policy"
  --hostname localhost --port 4444 --trustAll --bindDN cn="Directory Manager"
  --bindPassword ****** --no-prompt
Note: This example contains a minimum number of settings (default-password-storage-scheme, password-attribute, and lockout-failure-count). Consider adding additional settings to customize your password policy as desired.
You can now assign the password policy to an individual user by adding the following attribute as a subentry to the user’s object:
ds-pwp-password-policy-dn:  cn=Example Corp User Password Policy,cn=Password
  Policies, cn=config
This can be performed using any LDAP client where you have write permissions to a user’s entry. The following example uses the ldapmodify command in an interactive mode to perform this operation:
$ ldapmodify -D "cn=Directory Manager" -w ****** <ENTER>
dn: uid=bnelson,ou=People,dc=example,dc=com <ENTER>
changetype: modify <ENTER>
replace: ds-pwp-password-policy-dn <ENTER>
ds-pwp-password-policy-dn: cn=Example Corp User Password Policy,
  cn=Password Policies,cn=config <ENTER>
<ENTER>
Another method of setting this password policy is through the use of a dynamically created virtual attribute (i.e. one that is not persisted in the OpenDJ database backend). The following definition automatically assigns this new password policy to all users that exist beneath the ou=people container (the scope of the virtual attribute).
dn: cn=Example Corp User Password Policy Assignment,cn=Virtual
  Attributes,cn=config
objectClass: ds-cfg-virtual-attribute
objectClass: ds-cfg-user-defined-virtual-attribute
objectClass: top
ds-cfg-base-dn: ou=people,dc=example,dc=com
cn: Example Corp User Password Policy Assignment
ds-cfg-attribute-type: ds-pwp-password-policy-dn
ds-cfg-enabled: true
ds-cfg-java-class:
  org.opends.server.extensions.UserDefinedVirtualAttributeProvider
ds-cfg-filter: (objectclass=sbacperson)
ds-cfg-value: cn=Example Corp User Password Policy,cn=Password
  Policies,cn=config
Note: You can also use filters to create very granular results on how password polices are applied.
Configuring Account Lockout in OpenDJ has more flexibility and as such may be considered to be more powerful than OpenAM in this area. The potential confusion, however, comes when attempting to unlock a user’s account when they have been locked out of both OpenAM and OpenDJ. This is described in the following example.
A Deeper Dive into Account Lockout
Consider an environment where OpenAM is configured with the LDAP authentication module and that module has been configured to use an OpenDJ instance as the authentication database.

OpenDJ Configured as AuthN Database
OpenAM and OpenDJ have both been configured to lock a user’s account after 3 invalid password attempts. What kind of behavior can you expect? Let’s walk through each step of an Account Lockout process and observe the behavior on Account Lockout specific attributes.
Step 1: Query Account Lockout Specific Attributes for the Test User
$ ldapsearch -D "cn=Directory Manager" -w ****** uid=testuser1 inetuserstatus \
  sunAMAuthInvalidAttemptsData pwdFailureTime pwdAccountLockedTime

dn: uid=testuser1,ou=test,dc=example,dc=com
inetuserstatus: Active
The user is currently active and Account Lockout specific attributes are empty.
Step 2: Open the OpenAM Console and access the login screen for the realm where Account Lockout has been configured.

OpenAM Login Page
Step 3: Enter an invalid password for this user

OpenAM Authentication Failure Message
Step 4: Query Account Lockout Specific Attributes for the Test User
$ ldapsearch -D "cn=Directory Manager" -w ****** uid=testuser1 inetuserstatus \
  sunAMAuthInvalidAttemptsData pwdFailureTime pwdAccountLockedTime

dn: uid=testuser1,ou=test,dc=example,dc=com
sunAMAuthInvalidAttemptsData:: PEludmFsaWRQYXNzd29yZD48SW52YWxpZENvdW50PjE8L0
  ludmFsaWRDb3VudD48TGFzdEludmFsaWRBdD4xMzk4MTcxNTAwMDE4PC9MYXN0SW52YWxpZEF0P
  jxMb2NrZWRvdXRBdD4wPC9Mb2NrZWRvdXRBdD48QWN0dWFsTG9ja291dER1cmF0aW9uPjA8L0Fj
  dHVhbExvY2tvdXREdXJhdGlvbj48L0ludmFsaWRQYXNzd29yZD4=
inetuserstatus: Active
pwdFailureTime: 20140422125819.918Z
You now see that there is a value for the pwdFailureTime. This is the timestamp of when the first password failure occurred. This attribute was populated by OpenDJ.
The sunAMAuthInvalidAttemptsData attribute is populated by OpenAM. This is a base64 encoded value that contains valuable information regarding the invalid password attempt. Run this through a base64 decoder and you will see that this attribute contains the following information:
<InvalidPassword><InvalidCount>1</InvalidCount><LastInvalidAt>1398171500018
  </LastInvalidAt><LockedoutAt>0</LockedoutAt><ActualLockoutDuration>0
  </ActualLockoutDuration></InvalidPassword>
Step 5: Repeat Steps 2 and 3. (This is the second password failure.)
Step 6: Query Account Lockout Specific Attributes for the Test User
$ ldapsearch -D "cn=Directory Manager" -w ****** uid=testuser1 inetuserstatus \
  sunAMAuthInvalidAttemptsData pwdFailureTime pwdAccountLockedTime

dn: uid=testuser1,ou=test,dc=example,dc=com
sunAMAuthInvalidAttemptsData:: PEludmFsaWRQYXNzd29yZD48SW52YWxpZENvdW50PjI8L0
  ludmFsaWRDb3VudD48TGFzdEludmFsaWRBdD4xMzk4MTcxNTUzMzUwPC9MYXN0SW52YWxpZEF0P
  jxMb2NrZWRvdXRBdD4wPC9Mb2NrZWRvdXRBdD48QWN0dWFsTG9ja291dER1cmF0aW9uPjA8L0Fj
  dHVhbExvY2tvdXREdXJhdGlvbj48L0ludmFsaWRQYXNzd29yZD4=
inetuserstatus: Active
pwdFailureTime: 20140422125819.918Z
pwdFailureTime: 20140422125913.151Z
There are now two values for the pwdFailureTime attribute – one for each password failure. The sunAMAuthInvalidAttemptsData attribute has been updated as follows:
<InvalidPassword><InvalidCount>2</InvalidCount><LastInvalidAt>1398171553350
  </LastInvalidAt><LockedoutAt>0</LockedoutAt><ActualLockoutDuration>0
  </ActualLockoutDuration></InvalidPassword>
Step 7: Repeat Steps 2 and 3. (This is the third and final password failure.)

OpenAM Inactive User Page
OpenAM displays an error message indicating that the user’s account is not active. This is OpenAM’s way of acknowledging that the user’s account has been locked.
Step 8: Query Account Lockout Specific Attributes for the Test User
$ ldapsearch -D "cn=Directory Manager" -w ****** uid=testuser1 inetuserstatus \
  sunAMAuthInvalidAttemptsData pwdFailureTime pwdAccountLockedTime

dn: uid=testuser1,ou=test,dc=example,dc=com
sunAMAuthInvalidAttemptsData:: PEludmFsaWRQYXNzd29yZD48SW52YWxpZENvdW50PjA8L0
  ludmFsaWRDb3VudD48TGFzdEludmFsaWRBdD4wPC9MYXN0SW52YWxpZEF0PjxMb2NrZWRvdXRBd
  D4wPC9Mb2NrZWRvdXRBdD48QWN0dWFsTG9ja291dER1cmF0aW9uPjA8L0FjdHVhbExvY2tvdXRE
  dXJhdGlvbj48L0ludmFsaWRQYXNzd29yZD4=
inetuserstatus: Inactive
pwdFailureTime: 20140422125819.918Z
pwdFailureTime: 20140422125913.151Z
pwdFailureTime: 20140422125944.771Z
pwdAccountLockedTime: 20140422125944.771Z
There are now three values for the pwdFailureTime attribute – one for each password failure. The sunAMAuthInvalidAttemptsData attribute has been updated as follows:
<InvalidPassword><InvalidCount>0</InvalidCount><LastInvalidAt>0</LastInvalidAt>
  <LockedoutAt>0</LockedoutAt><ActualLockoutDuration>0</ActualLockoutDuration>
  </InvalidPassword>
You will note that the counters have all been reset to zero. That is because the user’s account has been inactivated by OpenAM by setting the value of the inetuserstatus attribute to Inactive. Additionally, the third invalid password caused OpenDJ to lock the account by setting the value of the pwdAccountLockedTime attribute to the value of the last password failure.
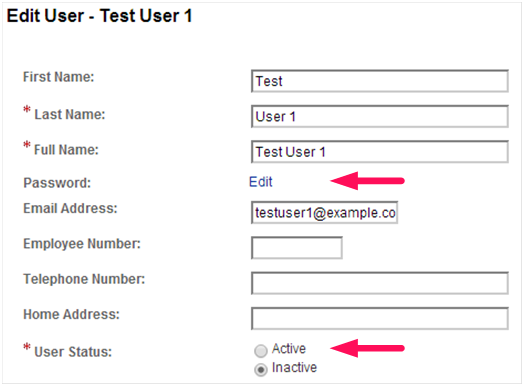
Now that the account is locked out, how do you unlock it? The natural thing for an OpenAM administrator to do is to reset the value of the inetuserstatus attribute and they would most likely use the OpenAM Console to do this as follows:

OpenAM Edit User Page (Change User Status)
The problem with this approach is that while the user’s status in OpenAM is now made active, the status in OpenDJ remains locked.
$ ldapsearch -D "cn=Directory Manager" -w ****** uid=testuser1 inetuserstatus \
  sunAMAuthInvalidAttemptsData pwdFailureTime pwdAccountLockedTime

dn: uid=testuser1,ou=test,dc=example,dc=com
sunAMAuthInvalidAttemptsData:: PEludmFsaWRQYXNzd29yZD48SW52YWxpZENvdW50PjA8L0
  ludmFsaWRDb3VudD48TGFzdEludmFsaWRBdD4wPC9MYXN0SW52YWxpZEF0PjxMb2NrZWRvdXRBd
  D4wPC9Mb2NrZWRvdXRBdD48QWN0dWFsTG9ja291dER1cmF0aW9uPjA8L0FjdHVhbExvY2tvdXRE
  dXJhdGlvbj48L0ludmFsaWRQYXNzd29yZD4=
inetuserstatus: Active
pwdFailureTime: 20140422125819.918Z
pwdFailureTime: 20140422125913.151Z
pwdFailureTime: 20140422125944.771Z
pwdAccountLockedTime: 20140422125944.771Z
Attempting to log in to OpenAM with this user’s account yields an authentication error that would make most OpenAM administrators scratch their head; especially after just resetting the user’s status.

OpenAM Authentication Failure Message
The trick to fixing this is to clear the pwdAccountLockedTime and pwdFailureTime attributes and the way to do this is by modifying the user’s password. Once again, the ldapmodify command can be used as follows:
$ ldapmodify -D "cn=Directory Manager" -w ****** <ENTER>
dn: uid=testuser1,ou=test,dc=example,dc=com <ENTER>
changetype: modify <ENTER>
replace: userPassword <ENTER>
userPassword: newpassword <ENTER>
<ENTER>
$ ldapsearch -D "cn=Directory Manager" -w ****** uid=testuser1 inetuserstatus \
  sunAMAuthInvalidAttemptsData pwdFailureTime pwdAccountLockedTime

dn: uid=testuser1,ou=test,dc=example,dc=com
sunAMAuthInvalidAttemptsData:: PEludmFsaWRQYXNzd29yZD48SW52YWxpZENvdW50PjA8L0
  ludmFsaWRDb3VudD48TGFzdEludmFsaWRBdD4wPC9MYXN0SW52YWxpZEF0PjxMb2NrZWRvdXRBd
  D4wPC9Mb2NrZWRvdXRBdD48QWN0dWFsTG9ja291dER1cmF0aW9uPjA8L0FjdHVhbExvY2tvdXRE
  dXJhdGlvbj48L0ludmFsaWRQYXNzd29yZD4=
inetuserstatus: Active
pwdChangedTime: 20140422172242.676Z
This, however, requires two different interfaces for managing the user’s account. An easier method is to combine the changes into one interface. You can modify the inetuserstatus attribute using ldapmodify or if you are using the OpenAM Console, simply change the password while you are updating the user’s status.
OpenAM Edit User Page (Change Password)
There are other ways to update one attribute by simply modifying the other. This can range in complexity from a simple virtual attribute to a more complex yet powerful custom OpenDJ plugin. But in the words of Voltaire, “With great power comes great responsibility.”
So go forth and wield your new found power; but do it in a responsible manner.
Directory Servers vs Relational Databases
An interesting question was posed on LinkedIn that asked, “If you were the architect of LinkedIn, MySpace, Facebook or other social networking sites and wanted to model the relationships amongst users and had to use LDAP, what would the schema look like?”
You can find the original post and responses here.
After reading the responses from other LinkedIn members, I felt compelled to add my proverbial $.02.
Directory Servers are simply special purpose data repositories. They are great for some applications and not so great for others. You can extend the schema and create a tree structure to model just about any kind of data for any type of application. But just because you “can” do something does not mean that you “should” do it.
The question becomes “Should you used a directory server or should you use a relational database?” For some applications a directory server would be a definite WRONG choice, for others it is clearly the RIGHT one, for yet others, the choice is not so clear. So, how do you decide?
Here are some simply rules of thumb that I have found work for me:
1) How often does your data change?
Keep in mind that directory servers are optimized for reads — this oftentimes comes at the expense of write operations. The reason is that directory servers typically implement extensive indexes that are tied to schema attributes (which by the way are tied to the application fields). So the question becomes, how often do these attributes change? If they do so often, then a directory server may not be the best choice (as you would be constantly rebuilding the indexes). If, however, they are relatively static, then a directory server would be a great choice.
2) What type of data are you trying to model?
If your data can be described in an attribute: value pair (i.e., name:Bill Nelson), then a directory server would be a good choice. If, however, your data is not so discrete, then a directory server should not be used. For instance, uploads to YouTube should NOT be kept in a directory server. User profiles in LinkedIn, however, would be.
3) Can your data be modeled in a hierarchical (tree-like) structure?
Directory servers implement a hierarchical structure for data modeling (similar to a file system layout). A benefit of a directory server is the ability to apply access control at a particular point in the tree and have that apply to all child elements in the tree structure. Additionally, you can start searching at a lower (child element) and increase your search performance times (much like selecting the proper starting point for the Unix “find” command). Relational databases cannot do this. You have to search all entries in the table. If your data lends to a hierarchical structure then a directory server might be a good choice.
I am a big fan on directory servers and have architected/implemented projects that sit 100% on top of a directory, 100% on top of relational databases, and a hybrid of both. Directory servers are extremely fast, flexible, scalable, and are able to handle the type of traffic you see on the Internet very well. Their ability to implement chaining, referrals, web services, and a flexible data modeling structure make them a very nice choice to use as a data repository to many applications, but I would not always lead with a directory server for every application.
So how do you decide which is best? It all comes down to the application, itself, and the way you want to access your data.
A site like LinkedIn might actually be modeled pretty well with a directory server as quite a bit of the content is actually static, lends well to an attribute:value pair, and can easily be modeled in a heirarchical structure. The user profiles for a site like facebook or YouTube could easily be modeled in a directory server, but I would NOT attempt to reference the YouTube or facebook uploads or the “what are you working on now” status with a directory server as it is constantly changing.
If you do decide to use a directory server, here are the general steps you should consider for development (your mileage may vary, but probably not too much):
- Evaluate the data fields that you want to access from your application
- Map the fields to existing directory server schema (extend if necessary).
- Build a heirarchical structure to model your data as appropriate (this is called the directory information tree, or DIT)
- Architect a directory solution based on where your applications reside thorughout the world (do you need one, two, or multiple directories?) and then determine how you want your data to flow through the system (chaining, referrals, replication)
- Implement the appropriate access control for attributes or the DIT in general
- Implement an effective indexing strategy to increase performance
- Test, test, test
 |
