Archive
OpenDJ and the Fine Art of Impersonation
Directory servers are often used in multi-tier applications to store user profiles, preferences, or other information useful to the application. Oftentimes the web application includes an administrative console to assist in the management of that data; allowing operations such as user creation or password reset. Multi-tier environments pose a challenge, however, as it is difficult to determine the identity of the user that actually performed the operation as opposed to the user that simply showed up in the log file(s).
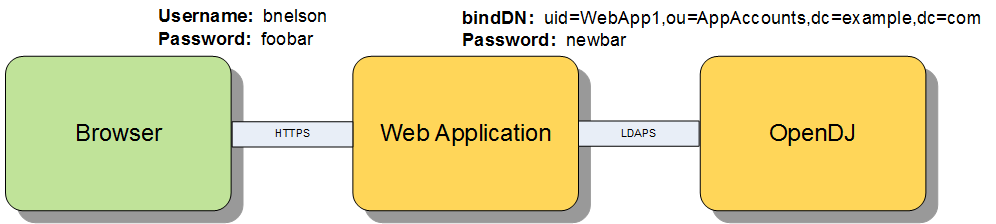
Consider the relationship between the user logging in to the web application and the interaction between the web application and a directory server such as OpenDJ.
There are two general approaches that many web applications follow when performing actions against the directory server; I will refer to these as Application Access and User Access. In both scenarios, the user must first log in to the web application. Their credentials may be validated directly against the directory server (using local authentication) or they may be accessing the web application using single sign-on. In either pattern, the user must first prove his identity to the web application before they are allowed to perform administrative tasks. The differences become apparent post authentication and can be found in the manner in which the web application integrates with the directory server to perform subsequent administrative tasks.
Note: The following assumes that you are already familiar with OpenDJ access control. If this is not the case, then it is highly advisable that you review the following: OpenDJ Access Control Explained.
Approach 1: Application Access
In the case of the Application Access approach all operations against the directory server are performed as an application owner account configured in the directory server. This account typically has a superset of privileges required by all Web Application administrators in order to perform the tasks required of those users. In this scenario, the Web Application binds to the directory server using its Web Application service account and performs the operation. A quick look in the directory server log files demonstrates that all operations coming from the Web Application are performed by the service account and not the user who logged in to the Web Application.
[27/Mar/2015:16:37:40 +0000] BIND REQ conn=2053 op=0 msgID=1 version=3 type=SIMPLE dn=”uid=WebApp1,ou=AppAccounts,dc=example,dc=com”
[27/Mar/2015:16:37:40 +0000] BIND RES conn=2053 op=0 msgID=1 result=0 authDN=”uid=WebApp1,ou=AppAccounts,dc=example,dc=com” etime=1
[27/Mar/2015:16:37:40 +0000] SEARCH REQ conn=2053 op=1 msgID=2 base=”ou=People,dc=example,dc=com” scope=wholeSubtree filter=”(l=Tampa)” attrs=”ALL”
[27/Mar/2015:16:37:40 +0000] SEARCH RES conn=2053 op=1 msgID=2 result=0 nentries=69 etime=2
While easiest to configure, one drawback to this approach is that you need to reconcile the directory server log files with the Web Application log files in order to determine the identity of the user performing the action. This makes debugging more difficult. Not all administrators have the same access rights; so another problem with this approach is that entitlements must be maintained and/or recognized in the Web Application and associated with Web Application users. This increases complexity in the Web Application as those relationships must be maintained in yet another database. Finally, some security officers may find this approach to be insecure as the entry appearing in the log files is not indicative of the user performing the actual operation.
Approach 2: User Access
The User Access approach is an alternative where the Web Application impersonates the user when performing operations. Instead of the Web Application binding with a general service account, it takes the credentials provided by the user, crafts a user-specific distinguished name, and then binds to the directory server with those credentials. This approach allows you to manage access control in the directory server and the logs reflect the identity of the user that performed the operation.
[27/Mar/2015:17:01:01 +0000] BIND REQ conn=2059 op=0 msgID=1 version=3 type=SIMPLE dn=”uid=bnelson,ou=Administators,dc=example,dc=com”
[27/Mar/2015:17:01:01 +0000] BIND RES conn=2059 op=0 msgID=1 result=0 authDN=” uid=bnelson,ou=Administators,dc=example,dc=com ” etime=1
[27/Mar/2015:17:40:40 +0000] SEARCH REQ conn=2059 op=1 msgID=2 base=”ou=People,dc=example,dc=com” scope=wholeSubtree filter=”(l=Tampa)” attrs=”ALL”
[27/Mar/2015:17:40:40 +0000] SEARCH RES conn=2059 op=1 msgID=2 result=0 nentries=69 etime=2
A benefit to this approach is that entitlements can be maintained in the directory server, itself. This reduces the complexity of the application, but requires that you configure appropriate access controls for each user. This can easily be performed at the group level, however, and even dynamically configured based on user attributes. A drawback to this approach is that the Web Application is acting as if they are the user – which they are not. The Browser is essentially the user and the Browser is not connecting directly to the directory server. So while the log files may reflect the user, they are somewhat misleading as the connection will always be from the Web Application. The other problem with this approach is the user’s credentials must be cached within the Web Application in order to perform subsequent operations against the directory server. One could argue that you could simply keep the connection between the Web Application and the directory server open, and that is certainly an option, but you would need to keep it open for the user’s entire session to prevent them from having to re-authenticate. This could lead to performance problems if you have extended session durations, a large number of administrative users, or a number of concurrent sessions by each administrative user.
Proxy Control – The Hybrid Approach
There are both benefits and drawbacks to each of the previously mentioned approaches, but I would like to offer up an alternative proxy-based approach that is essentially a hybrid between the two. RFC 4370 defines a proxied authorization control (2.16.840.1.113730.3.4.18) that allows a client (i.e. the Web Application) to request the directory server (i.e. OpenDJ) to perform an operation not based on the access control granted to the client, but based on another identity (i.e. the person logging in to the Web Application).
The proxied authorization control requires a client to bind to the directory server as themselves, but it allows them to impersonate another entry for a specific operation. This control can be used in situations where the application is trusted, but they need to perform operations on behalf of different users. The fact that the client is binding to the directory server eliminates the need to cache the user’s credentials (or re-authenticate for each operation). The fact that access is being determined based on that of the impersonated user means that you can centralize entitlements in the directory server and grant access based on security groups. This is essentially the best of both worlds and keeps a smile on the face of your security officer (as if that were possible).
So how do you configure proxy authorization? I am glad you asked.
Configuring Proxied Access
Before configuring proxied access, let’s return to the example of performing a search based on Application Access. The following is an example of a command line search that can be used to retrieve information from an OpenDJ server. The search operation uses the bindDN and password of the WebApp1 service account.
./ldapsearch -h localhost -D “uid=WebApp1,ou=AppAccounts,dc=example,dc=com ” -w password -b “ou=People,dc=example,dc=com” “l=Tampa”
The response to this search would include all entries that matched the filter (l=Tampa) beneath the container (ou=People). My directory server has been configured with 69 entries that match this search and as such, the OpenDJ access log would contain the following entries:
[27/Mar/2015:16:37:40 +0000] SEARCH REQ conn=2053 op=1 msgID=2 base=”ou=People,dc=example,dc=com” scope=wholeSubtree filter=”(l=Tampa)” attrs=”ALL”
[27/Mar/2015:16:37:40 +0000] SEARCH RES conn=2053 op=1 msgID=2 result=0 nentries=69 etime=2
As previously mentioned, these are the results you would expect to see if the search was performed as the WebApp1 user. So how can you perform a search impersonating another user? The answer lies in the parameters used in the search operation. The LDAP API supports a proxied search, you just need to determine how to access this functionality in your own LDAP client.
Note: I am using ldapsearch as the LDAP client for demonstration purposes. This is a command line tool that is included with the OpenDJ distribution. If you are developing a web application to act as the LDAP client, then you would need to determine how to access this functionality within your own development framework.
The OpenDJ search command includes a parameter that allows you to use the proxy authorization control. Type ./ldapsearch –help to see the options for the ldapsearch command and look for the -Y or –proxyAs parameter as follows.

Now perform the search again, but this time include the proxy control (without making any changes to the OpenDJ server). You will be binding as the WebApp1 account, but using the -Y option to instruct OpenDJ to evaluate ACIs based on the following user: uid=bnelson,ou=People,dc=example,dc=com.
./ldapsearch -h localhost -D “uid=WebApp1,ou=AppAccounts,dc=example,dc=com” -w password –Y “uid=bnelson,ou=People,dc=example,dc=com” -b “ou=People,dc=example,dc=com” “l=Tampa”
You should see the following response:
SEARCH operation failed
Result Code: 123 (Authorization Denied)
Additional Information: You do not have sufficient privileges to use the proxied authorization control The request control with Object Identifier (OID) “2.16.840.1.113730.3.4.18” cannot be used due to insufficient access rights
The corresponding entries in OpenDJ’s access log would be as follows:
[27/Mar/2015:10:47:18 +0000] SEARCH REQ conn=787094 op=1 msgID=2 base=”ou=People,dc=example,dc=com” scope=wholeSubtree filter=”(l=Tampa)” attrs=”ALL”
[27/Mar/2015:10:47:18 +0000] SEARCH RES conn=787094 op=1 msgID=2 result=123 message=”You do not have sufficient privileges to use the proxied authorization control You do not have sufficient privileges to use the proxied authorization control” nentries=0 etime=1
The key phrase in these messages is the following:
You do not have sufficient privileges to use the proxied authorization control
The key word in that phrase is “privileges” as highlighted above; the WebApp1 service account does not have the appropriate privileges to perform a proxied search and as such, the search operation is rejected. The first step in configuring proxied access control is to grant proxy privileges to the Application Account.
Step 1: Grant Proxy Privileges to the Application Account
The first step in allowing the WebApp1 service account to perform a proxied search is to give that account the proxied-auth privilege. You can use the ldapmodify utility to perform this action as follows:
./ldapmodify -D “cn=Directory Manager” -w password
dn: uid=WebApp1,ou=AppAccounts,dc=example,dc=com
changetype: modify
add: ds-privilege-name
ds-privilege-name: proxied-auth
Processing MODIFY request for uid=WebApp1,ou=AppAccounts,dc=example,dc=com
MODIFY operation successful for DN uid=WebApp1,ou=AppAccounts,dc=example,dc=com
Now repeat the proxied search operation.
./ldapsearch -h localhost -D “uid=WebApp1,ou=AppAccounts,dc=example,dc=com” -w password –Y “uid=bnelson,ou=People,dc=example,dc=com” -b “ou=People,dc=example,dc=com” “l=Tampa”
Once again your search will fail, but this time it is for a different reason.
SEARCH operation failed
Result Code: 12 (Unavailable Critical Extension)
Additional Information: The request control with Object Identifier (OID) “2.16.840.1.113730.3.4.18” cannot be used due to insufficient access rights
The corresponding entries in OpenDJ’s access log would be as follows:
[27/Mar/2015:11:39:17 +0000] SEARCH REQ conn=770 op=1 msgID=2 base=” ou=People,dc=example,dc=com ” scope=wholeSubtree filter=”(l=Tampa)” attrs=”ALL”
[27/Mar/2015:11:39:17 +0000] SEARCH RES conn=770 op=1 msgID=2 result=12 message=”” nentries=0 authzDN=”uid=bnelson,ou=People,dc=example,dc=com” etime=3
As discussed in OpenDJ Access Control Explained, authorization to perform certain actions may consist of a combination of privileges and ACIs. You have granted the proxied-auth privilege to the WebApp1 service account, but it still needs an ACI to allow it to perform proxy-based operations. For the purposes of this demonstration, we will use the following ACI to grant this permission.
(targetattr=”*”) (version 3.0; acl “Allow Proxy Authorization to Web App 1 Service Account”; allow (proxy) userdn=”ldap:///uid=WebApp1,ou=AppAccounts,dc=example,dc=com”;)
This ACI will be placed at the root suffix for ease of use, but you should consider limiting the scope of the ACI by placing it at the appropriate branch in your directory tree (and limiting the targetattr values).
Step 2: Create a (Proxy) ACI for the Application Account
Once again, you can use the ldapmodify utility to update OpenDJ with this new ACI.
./ldapmodify -D “cn=Directory Manager” -w password
dn: dc=example,dc=com
changetype: modify
add: aci
aci: (targetattr=”*”) (version 3.0; acl “Allow Proxy Authorization to Web App 1 Service Account”; allow (proxy) userdn=”ldap:///uid=WebApp1,ou=AppAccounts,dc=example,dc=com”;)
Processing MODIFY request for dc=example,dc=com
MODIFY operation successful for DN dc=example,dc=com
Now repeat the proxied search a final time.
./ldapsearch -h localhost -D “uid=WebApp1,ou=AppAccounts,dc=example,dc=com” -w password –Y “uid=bnelson,ou=People,dc=example,dc=com” -b “ou=People,dc=example,dc=com” “l=Tampa”
This time you should see the results of the search performed correctly. But how do you know that this was a proxied search and not simply one performed by the WebApp1 as before? The clue is once again in the OpenDJ access log file. Looking in this file, you will see the following entries:
[27/Mar/2015:11:40:23 +0000] SEARCH REQ conn=797 op=1 msgID=2 base=”ou=People,dc=example,dc=com” scope=wholeSubtree filter=”(l=Tampa)” attrs=”ALL”
[27/Mar/2015:11:40:23 +0000] SEARCH RES conn=797 op=1 msgID=2 result=12 message=”” nentries=69 authzDN=”uid=bnelson,ou=people,dc=example,dc=com” etime=1
The authzDN value contains the DN of the entry used for authorization purposes. This is a clear indicator that access control was based on the uid=bnelson entry and not uid=WebApp1.
Still not convinced? You can verify this by removing the rights for the uid=bnelson entry and running your search again. Add the following ACI to the top of your tree.
(targetattr=”*”)(version 3.0;acl ” Deny Access to BNELSON”; deny (all)(userdn = “ldap:///uid=bnelson,out=people,dc=example,dc=com”);)
Now run the search again. This time, you will not see any errors, but you will also not see any entries returned. While you are binding as the WebApp1 service account, for all intents and purposes, you are impersonating the uid=bnelson user when determining access rights.
Summary of Steps
The following steps should be performed when configuring OpenDJ for proxied access control.
Create the Application Account in OpenDJ (i.e. WebApp1)
- Create the Application Account in OpenDJ (i.e. WebApp1)
- Add the proxy-auth privilege to the Application Account
- Create an ACI allowing the Application Account to perform proxy operations
- Create a User Account in OpenDJ (i.e. bnelson)
- Configure ACIs for User Account as appropriate
- Test the configuration by performing a command line search using the proxied access control parameter.
OpenDJ Access Control Explained
 An OpenDJ implementation will contain certain data that you would like to explicitly grant or deny access to. Personally identifiable information (PII) such as a user’s home telephone number, their address, birth date, or simply their email address might be required by certain team members or applications, but it might be a good idea to keep this type of information private from others. On the other hand, you may want their office phone number published for everyone within the company to see but limit access to this data outside of the company.
Controlling users’ access to different types of information forms the basis of access control in OpenDJ and consists of the following two stages:
- Authentication (AuthN) – the process of positively identifying a subject
- Authorization (AuthZ) – the process of determining the rights that a subject has on a particular resource
Before you are allowed to perform any action within OpenDJ, it must first know who you are. Once your identity has been established, OpenDJ can then ascertain the rights you have to perform actions either on the data contained in its database(s) or within the OpenDJ process, itself.

Access Control = Authentication + Authorization
Note: Access control is not defined in any of the LDAP RFCs so the manner in which directory servers implement access control varies from vendor to vendor. Many directory services (including OpenDJ) follow the LDAP v3 syntax introduced by Netscape.
Access control is implemented with an operational attribute called aci (which stands for access control instruction). Access control instructions can be configured globally (the entire OpenDJ instance) or added to specific directory entries.
1. Global ACIs:
Global ACIs are not associated with directory entries and therefore are not available when searching against a typical OpenDJ suffix (such as dc=example,dc=com). Instead, Global ACIs are considered configuration objects and may be found in the configuration suffix (cn=config). You can find the currently configured Global ACIs by opening the config.ldif file and locating the entry for the “Access Control Handler”. Or, you can search for “cn=Access Control Handler” in the configuration suffix (cn=config) as follows:
./ldapsearch –h hostname –p portnumber –D “cn=directory manager” –w “password” -b “cn=config” -s sub “cn=Access Control Handler” ds-cfg-global-aci
This returns the following results on a freshly installed (unchanged) OpenDJ server.
dn: cn=Access Control Handler,cn=config
ds-cfg-global-aci: (extop=”1.3.6.1.4.1.26027.1.6.1 || 1.3.6.1.4.1.26027.1.6.3 || 1.3.6.1.4.1.4203.1.11.1 || 1.3.6.1.4.1.1466.20037 || 1.3.6.1.4.1.4203.1.11.3″) (version 3.0; acl “Anonymous extended operation access”; allow(read) userdn=”ldap:///anyone”;)
ds-cfg-global-aci: (target=”ldap:///”)(targetscope=”base”)(targetattr=”objectClass||namingContexts||supportedAuthPasswordSchemes||supportedControl||supportedExtension||supportedFeatures||supportedLDAPVersion||supportedSASLMechanisms||supportedTLSCiphers||supportedTLSProtocols||vendorName||vendorVersion”)(version 3.0; acl “User-Visible Root DSE Operational Attributes”; allow (read,search,compare) userdn=”ldap:///anyone”;)
ds-cfg-global-aci: target=”ldap:///cn=schema”)(targetattr=”attributeTypes||objectClasses”)(version 3.0;acl “Modify schema”; allow (write)(userdn = “ldap:///uid=openam,ou=Service Accounts,dc=example,dc=com”);)
ds-cfg-global-aci: target=”ldap:///cn=schema”)(targetscope=”base”)(targetattr=” objectClass||attributeTypes||dITContentRules||dITStructureRules||ldapSyntaxes||matchingRules||matchingRuleUse||nameForms||objectClasses”)(version 3.0; acl “User-Visible Schema Operational Attributes”; allow (read,search,compare) userdn=”ldap:///anyone”;)
ds-cfg-global-aci: (target=”ldap:///dc=replicationchanges”)(targetattr=”*”)(version 3.0; acl “Replication backend access”; deny (all) userdn=”ldap:///anyone”;)
ds-cfg-global-aci: (targetattr!=”userPassword||authPassword||changes||changeNumber||changeType||changeTime||targetDN||newRDN||newSuperior||deleteOldRDN”)(version 3.0; acl “Anonymous read access”; allow (read,search,compare) userdn=”ldap:///anyone”;)
ds-cfg-global-aci: (targetattr=”audio||authPassword||description||displayName||givenName||homePhone||homePostalAddress||initials||jpegPhoto||labeledURI||mobile||pager||postalAddress||postalCode||preferredLanguage||telephoneNumber||userPassword”)(version 3.0; acl “Self entry modification”; allow (write) userdn=”ldap:///self”;)
ds-cfg-global-aci: (targetattr=”createTimestamp||creatorsName||modifiersName||modifyTimestamp||entryDN||entryUUID||subschemaSubentry||etag||governingStructureRule||structuralObjectClass||hasSubordinates||numSubordinates”)(version 3.0; acl “User-Visible Operational Attributes”; allow (read,search,compare) userdn=”ldap:///anyone”;)
ds-cfg-global-aci: (targetattr=”userPassword||authPassword”)(version 3.0; acl “Self entry read”; allow (read,search,compare) userdn=”ldap:///self”;)
ds-cfg-global-aci: (targetcontrol=”1.3.6.1.1.12 || 1.3.6.1.1.13.1 || 1.3.6.1.1.13.2 || 1.2.840.113556.1.4.319 || 1.2.826.0.1.3344810.2.3 || 2.16.840.1.113730.3.4.18 || 2.16.840.1.113730.3.4.9 || 1.2.840.113556.1.4.473 || 1.3.6.1.4.1.42.2.27.9.5.9″) (version 3.0; acl “Authenticated users control access”; allow(read) userdn=”ldap:///all”;)
ds-cfg-global-aci: (targetcontrol=”2.16.840.1.113730.3.4.2 || 2.16.840.1.113730.3.4.17 || 2.16.840.1.113730.3.4.19 || 1.3.6.1.4.1.4203.1.10.2 || 1.3.6.1.4.1.42.2.27.8.5.1 || 2.16.840.1.113730.3.4.16 || 1.2.840.113556.1.4.1413″) (version 3.0; acl “Anonymous control access”; allow(read) userdn=”ldap:///anyone”;)
2. Entry-Based ACIs:
Access control instructions may also be applied to any entry in the directory server. This allows fine grained access control to be applied anywhere in the directory information tree and therefore affects the scope of the ACI.
Note: Placement has a direct effect on the entry where the ACI is applied as well as any children of that entry.
You can obtain a list of all ACIs configured in your server (sans the Global ACIs) by performing the following search:
./ldapsearch –h hostname –p portnumber –D “cn=directory manager” –w “password” –b “dc=example,dc=com” –s sub aci=* aci
By default, there are no ACIs configured at the entry level. The following is an example of ACIs that might be returned if you did have ACIs configured, however.
dn: dc=example,dc=com
aci: (targetattr=”*”)(version 3.0;acl “Allow entry search”; allow (search,read)(userdn = “ldap:///uid=openam,ou=Service Accounts,dc=example,dc=com”);)
aci: (targetattr=”*”)(version 3.0;acl “Modify config entry”; allow (write)(userdn = “ldap:///uid=openam,ou=Service Accounts,dc=example,dc=com”);)
aci: (targetcontrol=”2.16.840.1.113730.3.4.3″)(version 3.0;acl “Allow persistent search”; allow (search, read)(userdn = “ldap:///uid=openam,ou=Service Accounts,dc=example,dc=com”);)
aci: (version 3.0;acl “Add config entry”; allow (add)(userdn = “ldap:///uid=openam,ou=Service Accounts,dc=example,dc=com”);)
aci: (version 3.0;acl “Delete config entry”; allow (delete)(userdn = “ldap:///uid=openam,ou=Service Accounts,dc=example,dc=com”); )
dn: ou=Applications,dc=example,dc=com
aci: (target =”ldap:///ou=Applications,dc=example,dc=com”)(targetattr=”*”)(version 3.0;acl “Allow Application Config Access to Web UI Admin”; allow (all)(userdn = “ldap:///uid=webui,ou=Applications,dc=example,dc=com”); )
ACI Syntax:
The syntax for access control instructions is not specific to OpenDJ, in fact, for the most part, it shares the same syntax with the Oracle Directory Server Enterprise Edition (“ODSEE”). This is mainly due the common lineage with Sun Microsystems, but other directory servers do not use the same syntax and this makes migration more difficult (even the schema in both servers contains an attribute called aci). If you export OpenDJ directory entries to LDIF and attempt to import them into another vendor’s server, the aci statements would either be ignored, or worse, might have unpredictable results, altogether.
The following syntax is used by the OpenDJ server.

Access control instructions require three inputs: target, permission, and subject. The target specifies the entries to which the aci applies. The subject applies to the client that is performing the operation and the permissions specify what the subject is allowed to do. You can create some very powerful access control based on these three inputs.
The syntax also includes the version of the aci syntax, version 3.0. This is the aci syntax version, not the LDAP version. Finally, the syntax allows you to enter a human readable name. This allows you to easily search for and identify access control statements in the directory server.
Note: Refer to the OpenDJ Administration Guide for a more detailed description of the aci A components.
The following is an example of an ACI that permits a user to write to their own password and mobile phone attributes.

You cannot read the ACI from left to right, or even right to left, you simply have to dive right in and look for the information required to understand the intent of the ACI. If you have been working with ACIs for some time, you probably already have your own process, but I read/interpret the preceding ACI as follows:
This ACI “allows” a user to “write” to their own (“ldap:///self”) userPassword and mobile attributes “(targetattr=”userPassword||mobile”)”
If you place this ACI on a particular user’s object (i.e. uid=bnelson, ou=people,dc=example,dc=com), then this ACI would only apply to this object. If you place this ACI on a container of multiple user objects (i.e. ou=people,dc=example,dc=com), then this ACI would apply to all user objects included in this container.
Access Control Processing:
Access control instructions provide fine-grained control over what a given user or group member is authorized to do within the directory server.
When a directory-enabled client tries to perform an operation on any entry in the server, an access control list (ACL) is created for that particular entry. The ACL for any given entry consists of the entry being accessed as well as any parent entries all the way up to the root entry.

The ACL is essentially the summation of all acis defined for the target(s) being accessed plus the acis for all parent entries all the way to the top of the tree. Included in this list are any Global ACIs that may have been configured in the cn=config as well. While not entirely mathematically accurate, the following formula provides an insight into how the ACL is generated.

Using the previous formula, the access control lists for each entry in the directory information tree would be as follows:

Once the ACL is created, the list is then processed to determine if the client is allowed to perform the operation or not. ACLs are processed as follows:
- If there exists at least one explicit DENY rule that prevents a user from performing the requested action (i.e. deny(write)), then the user is denied.
- If there exists at least one explicit ALLOW rule that allows a user to perform the requested action (i.e. allow(write)), then the user is allowed (as long as there are no other DENY rules preventing this).
- If there are neither DENY nor ALLOW rules defined for the requested action, then the user is denied. This is referred to as the implicit deny.
Something to Think About…
 |
Thought 1: If in the absence of any access control instructions, the default is to deny access, then what is the purpose of access control instructions you might ask? ACIs with ALLOW rules are used to grant a user permission to perform some action. Without ALLOW ACIs, all actions are denied (due to the implicit deny rule).
Thought 2: If the default is to implicitly deny a user, then what is the purpose of DENY rules? DENY rules are used to revoke a previously granted permission. For instance, suppose that you create an ALLOW rule for the Help Desk Admin group to access a user’s PII data in order to help determine the user’s identity for a password reset. But you have a recently hired Help Desk Admin that has not completed the required sensitivity training. You may elect to keep him in the Help Desk Admin group for other reasons, but revoke his ability to read users’ PII data until his training has been completed.Note: You should use DENY rules sparingly. If you are creating too many DENY rules you should question how you have created your ALLOW rules. Thought 3: If the absence of access control instructions means that everyone is denied, then how can we manage OpenDJ in the event that conflicting ACIs are introduced? Or worse, ACIs are dropped altogether? That is where the OpenDJ Super User and OpenDJ privileges come in. |
OpenDJ’s Super User:
The RootDN user (“cn=Directory Manager” by default) is a special administrative user that can pretty much perform any action in OpenDJ. This user account is permitted full access to directory server data and can perform almost any action in the directory service, itself. Essentially, this account is similar to the root or Administrator accounts on UNIX and Windows systems, respectively.
If you look in the directory server you will find that there are no access control instruction granting the RootDN this unrestricted access; but there are however privileges that do so.
Privileges:
While access control instructions restrict access to directory data through LDAP operations, privileges define administrative tasks that may be performed by users within OpenDJ. Assignment of privileges to users (either directly or through groups) effectively allows those users the ability to perform the administrative tasks defined by those privileges.
The following table provides a list of common privileges and their relationship to the RootDN user.
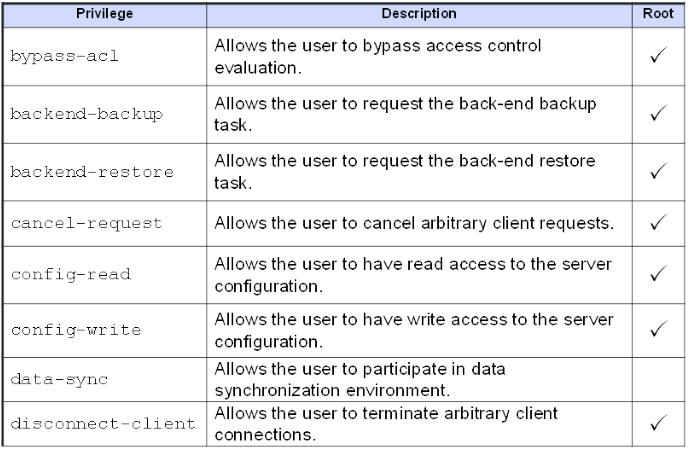
The RootDN user is assigned these privileges by default and similar to Global ACIs, these privileges are defined and maintained in the OpenDJ configuration object. The following is the default list of privileges associated with Root DN users (of which the Directory Manager account is a member).
dn: cn=Root DNs,cn=config
objectClass: ds-cfg-root-dn
objectClass: top
ds-cfg-default-root-privilege-name: bypass-lockdown
ds-cfg-default-root-privilege-name: bypass-acl
ds-cfg-default-root-privilege-name: modify-acl
ds-cfg-default-root-privilege-name: config-read
ds-cfg-default-root-privilege-name: config-write
ds-cfg-default-root-privilege-name: ldif-import
ds-cfg-default-root-privilege-name: ldif-export
ds-cfg-default-root-privilege-name: backend-backup
ds-cfg-default-root-privilege-name: backend-restore
ds-cfg-default-root-privilege-name: server-lockdown
ds-cfg-default-root-privilege-name: server-shutdown
ds-cfg-default-root-privilege-name: server-restart
ds-cfg-default-root-privilege-name: disconnect-client
ds-cfg-default-root-privilege-name: cancel-request
ds-cfg-default-root-privilege-name: password-reset
ds-cfg-default-root-privilege-name: update-schema
ds-cfg-default-root-privilege-name: privilege-change
ds-cfg-default-root-privilege-name: unindexed-search
ds-cfg-default-root-privilege-name: subentry-write
cn: Root DNs
This list can retrieved using the OpenDJ dsconfig command:
./dsconfig –h localhost –p 4444 –D “cn=directory manager” –w password get-root-dn-prop
with the ldapsearch command:
./ldapsearch –h hostname –p portnumber –D “cn=directory manager” –w “password” -b “cn=config” -s sub “cn=Root DNs” ds-cfg-default-root-privilege-name
or simply by opening the config.ldif file and locating the entry for the “cn=Root DNs” entry.
Most operations involving sensitive or administrative data require that a user has both the appropriate privilege(s) as well as certain access control instructions. This allows you to configure authorization at a fine grained level – such as managing access control or resetting passwords.
Privileges are assigned to users and apply globally to the directory service. Any user can be granted or denied any privilege and by default only the RootDN users are assigned a default set of privileges.
Note: Consider creating different types of administrative groups in OpenDJ and assign the privileges and ACIs to those groups to define what a group member is allowed to do. Adding users to that group then automatically grants those users the rights defined in the group and conversely, removing them from the group drops those privileges (unless they are granted through another group).
Effective Rights:
Once you set up a number of ACIs, you may find it difficult to understand how the resulting access control list is processed and ultimately the rights that a particular user may have. Fortunately OpenDJ provides a method of evaluating the effective rights that a subject has on a given target.
You can use the ldapsearch command to determine the effective rights that a user has on one or more attributes on one or more entries.
$ ldapsearch –h localhost –p 1389 -D “cn=Directory Manager” -w password
-g “dn:uid=helpdeskadmin,ou=administrators, dc=example,dc=com” -b “uid=scarter,ou=people, dc=example,dc=com” -s base ‘(objectclass=*)’ ‘*’ aclrights
The preceding search is being performed by the Root DN user (“cn=Directory Manager”). It is passing the –g option requesting the get effective rights control (to which the Directory Manager has the appropriate access configured). The command wants to determine what rights the Help Desk Administrator (uid=helpdeskadmin,…) has on Sam Carter’s entry (uid=scarter,…). The scope of the search has been limited only to Sam Carter’s entry using the base parameter. Finally, the search operation is returning not only the attributes, but the effective rights (aclrights) as well.
Possible results from a search operation such as this are as follows:
dn: uid=scarter,ou=People,dc=example,dc=com
objectClass: person
objectClass: top
uid: scarter
userPassword: {SSHA}iMgzz9mFA6qYtkhS0Z7bhQRnv2Ic8efqpctKDQ==
givenName: Sam
cn: Sam Carter
sn: Carter
mail: sam.carter@example.com
aclRights;attributeLevel;objectclass: search:1,read:1,compare:1,write:0,selfwrit
e_add:0,selfwrite_delete:0,proxy:0
aclRights;attributeLevel;uid: search:1,read:1,compare:1,write:0,selfwrite_add:0,
selfwrite_delete:0,proxy:0
aclRights;attributeLevel;userpassword: search:0,read:0,compare:0,write:1,selfwri
te_add:0,selfwrite_delete:0,proxy:0
aclRights;attributeLevel;givenname: search:1,read:1,compare:1,write:0,selfwrite_
add:0,selfwrite_delete:0,proxy:0
aclRights;attributeLevel;cn: search:1,read:1,compare:1,write:0,selfwrite_add:0,s
elfwrite_delete:0,proxy:0
aclRights;attributeLevel;sn: search:1,read:1,compare:1,write:0,selfwrite_add:0,s
elfwrite_delete:0,proxy:0
aclRights;attributeLevel;mail: search:1,read:1,compare:1,write:0,selfwrite_add:0
,selfwrite_delete:0,proxy:0
aclRights;entryLevel: add:0,delete:0,read:1,write:0,proxy:0
The search results contain not only the attributes/attribute values associated with Sam Carter’s object, but the effective rights that the Help Desk Admins have on those attributes. For instance,
aclRights;attributeLevel;givenname: search:1,read:1,compare:1,write:0,selfwrite_
add:0,selfwrite_delete:0,proxy:0
The aclRights;attributeLevel;givenname notation indicate that this line includes the effective rights for the givenname attribute. Individual permissions are listed that demonstrate the rights that the Help Desk Administrator has on this attribute for Sam Carter’s entry (1 = allowed and 0 = denied).
Recommendations:
An OpenDJ installation includes a set of default (Global) access control instructions which by some standards may be considered insecure. For instance, there are five ACIs that allow an anonymous user the ability to read certain controls, extended operations, operational attributes, schema attributes, and user attributes. The basic premise behind this is that ForgeRock wanted to provide an easy out-of-the-box evaluation of the product while at the same time providing a path forward for securing the product. It is intended that OpenDJ should be hardened in order to meet a company’s security policies and in fact, one task that is typically performed before placing OpenDJ in production is to limit anonymous access. There are two ways you can perform this:
- Enable the reject-unauthenticated-request property using the dsconfig command.
- Update the Global ACIs
Mark Craig provides a nice blog posting on how to turn off anonymous access using the dsconfig command. You can find that blog here. The other option is to simply change the reference in the Global ACIs from ldap:///anyone to ldap:///all. This prevents anonymous users from gaining access to this information.
Note: Use of ldap:///anyone in an ACI includes both authenticated and anonymous users – essentially, anyone. Changing this to ldap:///all restricts the subject to all authenticated users.
The following comments from Ludo Poitou (ForgeRock’s OpenDJ Product Manager) should be considered before simply removing anonymous access.
You don’t want to remove the ACI rules for Anonymous access, you want to change it from granting access to anyone (ldap:///anyone) to granting access to all authenticated users (ldap:///all).
This said, there are some differences between fully rejecting unauthenticated requests and using ACI to control access. The former will block all access including the attempts to discover the server’s capabilities by reading the RootDSE. The later allows you to control which parts can be accessed anonymously, and which shouldn’t.
There’s been a lot of fuss around allowing anonymous access to a directory service. Some people are saying that features and naming context discovery is a threat to security, allowing malicious users to understand what the server contains and what security mechanisms are available and therefore not available. At the same time, it is important for generic purpose applications to understand how they can or must use the directory service before they actually authenticate to it.
Fortunately, OpenDJ has mechanisms that allow administrators to configure the directory services according to their security constraints, using either a simple flag to reject all unauthenticated requests, or by using ACIs.
A few other things to consider when configuring access control in OpenDJ include the following:
- Limit the number of Root DN user accounts
You should have one Root DN account and it should not be shared with multiple administrators. Doing so makes it nearly impossible to determine the identity of the person who performed a configuration change or operation in OpenDJ. Instead, make the password complex and store it in a password vault.
- Create a delegated administration environment
Now that you have limited the number of Root DN accounts, you need to create groups to allow users administrative rights in OpenDJ. Users would then log in as themselves and perform operations against the directory server using their own account. The tasks associated with this are as follows:
- Create administrative groups
- Use the ds-privilege-name attribute to assign privilege(s) to the group entry
- Create ACIs based on the group name, not an individual user. For instance, “groupdn:///cn=Help Desk Admin, ou=Administrators,dc=example,dc=com”
- Add users to the groups
- Associate privileges and ACIs to users for fine grained access control
Now that you have create administrative groups, you are ultimately going to need to provide certain users with more rights than others. You can create additional administrative groups, but what if you only need one user to have these rights. Creating a group of one may or may not be advisable and may actually lead to group explosion (where you end up with more groups than you actually have users). Instead, consider associating privileges to a particular user and then create ACIs based on that user.
 |
