Archive
OpenDJ and the Fine Art of Impersonation
Directory servers are often used in multi-tier applications to store user profiles, preferences, or other information useful to the application. Oftentimes the web application includes an administrative console to assist in the management of that data; allowing operations such as user creation or password reset. Multi-tier environments pose a challenge, however, as it is difficult to determine the identity of the user that actually performed the operation as opposed to the user that simply showed up in the log file(s).
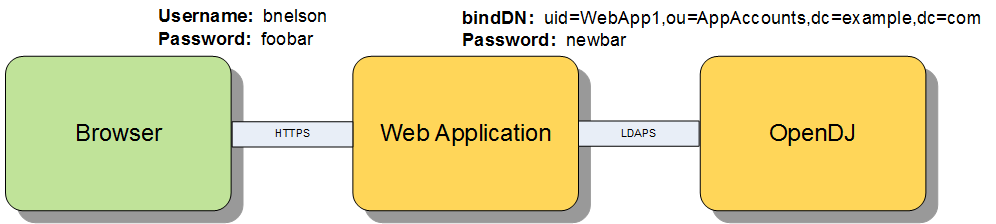
Consider the relationship between the user logging in to the web application and the interaction between the web application and a directory server such as OpenDJ.
There are two general approaches that many web applications follow when performing actions against the directory server; I will refer to these as Application Access and User Access. In both scenarios, the user must first log in to the web application. Their credentials may be validated directly against the directory server (using local authentication) or they may be accessing the web application using single sign-on. In either pattern, the user must first prove his identity to the web application before they are allowed to perform administrative tasks. The differences become apparent post authentication and can be found in the manner in which the web application integrates with the directory server to perform subsequent administrative tasks.
Note: The following assumes that you are already familiar with OpenDJ access control. If this is not the case, then it is highly advisable that you review the following: OpenDJ Access Control Explained.
Approach 1: Application Access
In the case of the Application Access approach all operations against the directory server are performed as an application owner account configured in the directory server. This account typically has a superset of privileges required by all Web Application administrators in order to perform the tasks required of those users. In this scenario, the Web Application binds to the directory server using its Web Application service account and performs the operation. A quick look in the directory server log files demonstrates that all operations coming from the Web Application are performed by the service account and not the user who logged in to the Web Application.
[27/Mar/2015:16:37:40 +0000] BIND REQ conn=2053 op=0 msgID=1 version=3 type=SIMPLE dn=”uid=WebApp1,ou=AppAccounts,dc=example,dc=com”
[27/Mar/2015:16:37:40 +0000] BIND RES conn=2053 op=0 msgID=1 result=0 authDN=”uid=WebApp1,ou=AppAccounts,dc=example,dc=com” etime=1
[27/Mar/2015:16:37:40 +0000] SEARCH REQ conn=2053 op=1 msgID=2 base=”ou=People,dc=example,dc=com” scope=wholeSubtree filter=”(l=Tampa)” attrs=”ALL”
[27/Mar/2015:16:37:40 +0000] SEARCH RES conn=2053 op=1 msgID=2 result=0 nentries=69 etime=2
While easiest to configure, one drawback to this approach is that you need to reconcile the directory server log files with the Web Application log files in order to determine the identity of the user performing the action. This makes debugging more difficult. Not all administrators have the same access rights; so another problem with this approach is that entitlements must be maintained and/or recognized in the Web Application and associated with Web Application users. This increases complexity in the Web Application as those relationships must be maintained in yet another database. Finally, some security officers may find this approach to be insecure as the entry appearing in the log files is not indicative of the user performing the actual operation.
Approach 2: User Access
The User Access approach is an alternative where the Web Application impersonates the user when performing operations. Instead of the Web Application binding with a general service account, it takes the credentials provided by the user, crafts a user-specific distinguished name, and then binds to the directory server with those credentials. This approach allows you to manage access control in the directory server and the logs reflect the identity of the user that performed the operation.
[27/Mar/2015:17:01:01 +0000] BIND REQ conn=2059 op=0 msgID=1 version=3 type=SIMPLE dn=”uid=bnelson,ou=Administators,dc=example,dc=com”
[27/Mar/2015:17:01:01 +0000] BIND RES conn=2059 op=0 msgID=1 result=0 authDN=” uid=bnelson,ou=Administators,dc=example,dc=com ” etime=1
[27/Mar/2015:17:40:40 +0000] SEARCH REQ conn=2059 op=1 msgID=2 base=”ou=People,dc=example,dc=com” scope=wholeSubtree filter=”(l=Tampa)” attrs=”ALL”
[27/Mar/2015:17:40:40 +0000] SEARCH RES conn=2059 op=1 msgID=2 result=0 nentries=69 etime=2
A benefit to this approach is that entitlements can be maintained in the directory server, itself. This reduces the complexity of the application, but requires that you configure appropriate access controls for each user. This can easily be performed at the group level, however, and even dynamically configured based on user attributes. A drawback to this approach is that the Web Application is acting as if they are the user – which they are not. The Browser is essentially the user and the Browser is not connecting directly to the directory server. So while the log files may reflect the user, they are somewhat misleading as the connection will always be from the Web Application. The other problem with this approach is the user’s credentials must be cached within the Web Application in order to perform subsequent operations against the directory server. One could argue that you could simply keep the connection between the Web Application and the directory server open, and that is certainly an option, but you would need to keep it open for the user’s entire session to prevent them from having to re-authenticate. This could lead to performance problems if you have extended session durations, a large number of administrative users, or a number of concurrent sessions by each administrative user.
Proxy Control – The Hybrid Approach
There are both benefits and drawbacks to each of the previously mentioned approaches, but I would like to offer up an alternative proxy-based approach that is essentially a hybrid between the two. RFC 4370 defines a proxied authorization control (2.16.840.1.113730.3.4.18) that allows a client (i.e. the Web Application) to request the directory server (i.e. OpenDJ) to perform an operation not based on the access control granted to the client, but based on another identity (i.e. the person logging in to the Web Application).
The proxied authorization control requires a client to bind to the directory server as themselves, but it allows them to impersonate another entry for a specific operation. This control can be used in situations where the application is trusted, but they need to perform operations on behalf of different users. The fact that the client is binding to the directory server eliminates the need to cache the user’s credentials (or re-authenticate for each operation). The fact that access is being determined based on that of the impersonated user means that you can centralize entitlements in the directory server and grant access based on security groups. This is essentially the best of both worlds and keeps a smile on the face of your security officer (as if that were possible).
So how do you configure proxy authorization? I am glad you asked.
Configuring Proxied Access
Before configuring proxied access, let’s return to the example of performing a search based on Application Access. The following is an example of a command line search that can be used to retrieve information from an OpenDJ server. The search operation uses the bindDN and password of the WebApp1 service account.
./ldapsearch -h localhost -D “uid=WebApp1,ou=AppAccounts,dc=example,dc=com ” -w password -b “ou=People,dc=example,dc=com” “l=Tampa”
The response to this search would include all entries that matched the filter (l=Tampa) beneath the container (ou=People). My directory server has been configured with 69 entries that match this search and as such, the OpenDJ access log would contain the following entries:
[27/Mar/2015:16:37:40 +0000] SEARCH REQ conn=2053 op=1 msgID=2 base=”ou=People,dc=example,dc=com” scope=wholeSubtree filter=”(l=Tampa)” attrs=”ALL”
[27/Mar/2015:16:37:40 +0000] SEARCH RES conn=2053 op=1 msgID=2 result=0 nentries=69 etime=2
As previously mentioned, these are the results you would expect to see if the search was performed as the WebApp1 user. So how can you perform a search impersonating another user? The answer lies in the parameters used in the search operation. The LDAP API supports a proxied search, you just need to determine how to access this functionality in your own LDAP client.
Note: I am using ldapsearch as the LDAP client for demonstration purposes. This is a command line tool that is included with the OpenDJ distribution. If you are developing a web application to act as the LDAP client, then you would need to determine how to access this functionality within your own development framework.
The OpenDJ search command includes a parameter that allows you to use the proxy authorization control. Type ./ldapsearch –help to see the options for the ldapsearch command and look for the -Y or –proxyAs parameter as follows.

Now perform the search again, but this time include the proxy control (without making any changes to the OpenDJ server). You will be binding as the WebApp1 account, but using the -Y option to instruct OpenDJ to evaluate ACIs based on the following user: uid=bnelson,ou=People,dc=example,dc=com.
./ldapsearch -h localhost -D “uid=WebApp1,ou=AppAccounts,dc=example,dc=com” -w password –Y “uid=bnelson,ou=People,dc=example,dc=com” -b “ou=People,dc=example,dc=com” “l=Tampa”
You should see the following response:
SEARCH operation failed
Result Code: 123 (Authorization Denied)
Additional Information: You do not have sufficient privileges to use the proxied authorization control The request control with Object Identifier (OID) “2.16.840.1.113730.3.4.18” cannot be used due to insufficient access rights
The corresponding entries in OpenDJ’s access log would be as follows:
[27/Mar/2015:10:47:18 +0000] SEARCH REQ conn=787094 op=1 msgID=2 base=”ou=People,dc=example,dc=com” scope=wholeSubtree filter=”(l=Tampa)” attrs=”ALL”
[27/Mar/2015:10:47:18 +0000] SEARCH RES conn=787094 op=1 msgID=2 result=123 message=”You do not have sufficient privileges to use the proxied authorization control You do not have sufficient privileges to use the proxied authorization control” nentries=0 etime=1
The key phrase in these messages is the following:
You do not have sufficient privileges to use the proxied authorization control
The key word in that phrase is “privileges” as highlighted above; the WebApp1 service account does not have the appropriate privileges to perform a proxied search and as such, the search operation is rejected. The first step in configuring proxied access control is to grant proxy privileges to the Application Account.
Step 1: Grant Proxy Privileges to the Application Account
The first step in allowing the WebApp1 service account to perform a proxied search is to give that account the proxied-auth privilege. You can use the ldapmodify utility to perform this action as follows:
./ldapmodify -D “cn=Directory Manager” -w password
dn: uid=WebApp1,ou=AppAccounts,dc=example,dc=com
changetype: modify
add: ds-privilege-name
ds-privilege-name: proxied-auth
Processing MODIFY request for uid=WebApp1,ou=AppAccounts,dc=example,dc=com
MODIFY operation successful for DN uid=WebApp1,ou=AppAccounts,dc=example,dc=com
Now repeat the proxied search operation.
./ldapsearch -h localhost -D “uid=WebApp1,ou=AppAccounts,dc=example,dc=com” -w password –Y “uid=bnelson,ou=People,dc=example,dc=com” -b “ou=People,dc=example,dc=com” “l=Tampa”
Once again your search will fail, but this time it is for a different reason.
SEARCH operation failed
Result Code: 12 (Unavailable Critical Extension)
Additional Information: The request control with Object Identifier (OID) “2.16.840.1.113730.3.4.18” cannot be used due to insufficient access rights
The corresponding entries in OpenDJ’s access log would be as follows:
[27/Mar/2015:11:39:17 +0000] SEARCH REQ conn=770 op=1 msgID=2 base=” ou=People,dc=example,dc=com ” scope=wholeSubtree filter=”(l=Tampa)” attrs=”ALL”
[27/Mar/2015:11:39:17 +0000] SEARCH RES conn=770 op=1 msgID=2 result=12 message=”” nentries=0 authzDN=”uid=bnelson,ou=People,dc=example,dc=com” etime=3
As discussed in OpenDJ Access Control Explained, authorization to perform certain actions may consist of a combination of privileges and ACIs. You have granted the proxied-auth privilege to the WebApp1 service account, but it still needs an ACI to allow it to perform proxy-based operations. For the purposes of this demonstration, we will use the following ACI to grant this permission.
(targetattr=”*”) (version 3.0; acl “Allow Proxy Authorization to Web App 1 Service Account”; allow (proxy) userdn=”ldap:///uid=WebApp1,ou=AppAccounts,dc=example,dc=com”;)
This ACI will be placed at the root suffix for ease of use, but you should consider limiting the scope of the ACI by placing it at the appropriate branch in your directory tree (and limiting the targetattr values).
Step 2: Create a (Proxy) ACI for the Application Account
Once again, you can use the ldapmodify utility to update OpenDJ with this new ACI.
./ldapmodify -D “cn=Directory Manager” -w password
dn: dc=example,dc=com
changetype: modify
add: aci
aci: (targetattr=”*”) (version 3.0; acl “Allow Proxy Authorization to Web App 1 Service Account”; allow (proxy) userdn=”ldap:///uid=WebApp1,ou=AppAccounts,dc=example,dc=com”;)
Processing MODIFY request for dc=example,dc=com
MODIFY operation successful for DN dc=example,dc=com
Now repeat the proxied search a final time.
./ldapsearch -h localhost -D “uid=WebApp1,ou=AppAccounts,dc=example,dc=com” -w password –Y “uid=bnelson,ou=People,dc=example,dc=com” -b “ou=People,dc=example,dc=com” “l=Tampa”
This time you should see the results of the search performed correctly. But how do you know that this was a proxied search and not simply one performed by the WebApp1 as before? The clue is once again in the OpenDJ access log file. Looking in this file, you will see the following entries:
[27/Mar/2015:11:40:23 +0000] SEARCH REQ conn=797 op=1 msgID=2 base=”ou=People,dc=example,dc=com” scope=wholeSubtree filter=”(l=Tampa)” attrs=”ALL”
[27/Mar/2015:11:40:23 +0000] SEARCH RES conn=797 op=1 msgID=2 result=12 message=”” nentries=69 authzDN=”uid=bnelson,ou=people,dc=example,dc=com” etime=1
The authzDN value contains the DN of the entry used for authorization purposes. This is a clear indicator that access control was based on the uid=bnelson entry and not uid=WebApp1.
Still not convinced? You can verify this by removing the rights for the uid=bnelson entry and running your search again. Add the following ACI to the top of your tree.
(targetattr=”*”)(version 3.0;acl ” Deny Access to BNELSON”; deny (all)(userdn = “ldap:///uid=bnelson,out=people,dc=example,dc=com”);)
Now run the search again. This time, you will not see any errors, but you will also not see any entries returned. While you are binding as the WebApp1 service account, for all intents and purposes, you are impersonating the uid=bnelson user when determining access rights.
Summary of Steps
The following steps should be performed when configuring OpenDJ for proxied access control.
Create the Application Account in OpenDJ (i.e. WebApp1)
- Create the Application Account in OpenDJ (i.e. WebApp1)
- Add the proxy-auth privilege to the Application Account
- Create an ACI allowing the Application Account to perform proxy operations
- Create a User Account in OpenDJ (i.e. bnelson)
- Configure ACIs for User Account as appropriate
- Test the configuration by performing a command line search using the proxied access control parameter.
OpenDJ Attribute Uniqueness (and the Effects on OpenAM)
In real life we tend to value those traits that make us unique from others; but in an identity management deployment uniqueness is essential to the authentication process and should not be taken for granted.

Case in point, attributes in OpenDJ may share values that you may or may not want (or need) to be unique. For instance the following two (different) entries are both configured with the same value for the email address:
dn: uid=bnelson,ou=people,dc=example,dc=com
uid: bnelson
mail: bill.nelson@identityfusion.com
[LDIF Stuff Snipped]
dn: uid=scarter,ou=people,dc=example,dc=com
uid: scarter
mail: bill.nelson@identityfusion.com
[LDIF Stuff Snipped]
In some cases this may be fine, but in others this may not be the desired effect as you may need to enforce uniqueness for attributes such as uid, guid, email address, or simply credit cards. To ensure that attribute values are unique across directory server entries you need to configure attribute uniqueness.
UID Uniqueness Plug-In
OpenDJ has an existing plug-in that can be used to configure unique values for the uid attribute, but this plug-in is disabled by default. You can find this entry in OpenDJ’s main configuration file (config.ldif) or by searching the cn=config tree in OpenDJ (assuming you have the correct permissions to do so).
dn: cn=UID Unique Attribute,cn=Plugins,cn=config
objectClass: ds-cfg-unique-attribute-plugin
objectClass: ds-cfg-plugin
objectClass: top
ds-cfg-enabled: false
ds-cfg-java-class: org.opends.server.plugins.UniqueAttributePlugin
ds-cfg-plugin-type: preOperationAdd
ds-cfg-plugin-type: preOperationModify
ds-cfg-plugin-type: preOperationModifyDN
ds-cfg-plugin-type: postOperationAdd
ds-cfg-plugin-type: postOperationModify
ds-cfg-plugin-type: postOperationModifyDN
ds-cfg-plugin-type: postSynchronizationAdd
ds-cfg-plugin-type: postSynchronizationModify
ds-cfg-plugin-type: postSynchronizationModifyDN
ds-cfg-invoke-for-internal-operations: true
ds-cfg-type: uid
cn: UID Unique Attribute
Leaving this plug-in disabled can cause problems with OpenAM, however, if OpenAM has been configured to authenticate using the uid attribute (and you ‘accidentally’ create entries with the same uid value). In such cases you will see an authentication error during the login process as OpenAM cannot determine which account you are trying to use for authentication.
Configuring Uniqueness
To fix this problem in OpenAM, you can use the OpenDJ dsconfig command to enable the UID Unique Attribute plug-in as follows:
./dsconfig set-plugin-prop --hostname localhost --port 4444  \
--bindDN "cn=Directory Manager" --bindPassword password \
--plugin-name "UID Unique Attribute" \
--set base-dn:ou=people,dc=example,dc=com --set enabled:true \
--trustAll --no-prompt
This will prevent entries from being added to OpenDJ where the value of any existing uids conflicts with the incoming entry’s uid. This will address the situation where you are using the uid attribute for authentication in OpenAM, but what if you want to use a different attribute (such as mail) to authenticate? In such cases, you need to create your own uniqueness plug-in as follows:
./dsconfig create-plugin --hostname localhost --port 4444  \
--bindDN "cn=Directory Manager" --bindPassword password \
--plugin-name "Unique Email Address Plugin" \
--type unique-attribute --set type:mail --set enabled:true \
--set base-dn:ou=people,dc=example,dc=com --trustAll \
--no-prompt
In both cases the base-dn parameter defines the scope where the the uniqueness applies. This is useful in multitenant environments where you may want to define uniqueness within a particular subtree but not necessarily across the entire server.
Prerequisites
The uniqueness plug-in requires that you have an existing equality index configured for the attribute where you would like to enforce uniqueness. The index is necessary so that OpenDJ can search for other entries (within the scope of the base-dn) where the attribute may already have a particular value set.
The following dscconfig command can be used to create an equality index for the mail attribute:
./dsconfig  create-local-db-index  --hostname localhost --port 4444  \
--bindDN "cn=Directory Manager" --bindPassword password --backend-name userRoot  \
--index-name mail  --set index-type:equality --trustAll --no-prompt
Summary
OpenAM’s default settings (Data Store, LDAP authentication module, etc) uses the uid attribute to authenticate and uniquely identify a user. OpenDJ typically uses uid as the unique naming attribute in a user’s distinguished name. When combined together, it is almost assumed that you will be using the uid attribute in this manner, but that is not always the case. You can easily run into issues when you start coloring outside of the lines and begin using other attributes (i.e. mail) for this purpose. Armed with the information contained in this post, however, you should easily be able to configure OpenDJ to enforce uniqueness for any attribute.
Understanding OpenAM and OpenDJ Account Lockout Behaviors
The OpenAM Authentication Service can be configured to lock a user’s account after a defined number of log in attempts has failed. Account Lockout is disabled by default, but when configured properly, this feature can be useful in fending off brute force attacks against OpenAM login screens.
If your OpenAM environment includes an LDAP server (such as OpenDJ) as an authentication database, then you have options on how (and where) you can configure Account Lockout settings. This can be performed in either OpenAM (as mentioned above) or in the LDAP server, itself. But the behavior is different based on where this is configured. There are benefits and drawbacks towards configuring Account Lockout in either product and knowing the difference is essential.
Note: Configuring Account Lockout simultaneously in both products can lead to confusing results and should be avoided unless you have a firm understanding of how each product works. See the scenario at the end of this article for a deeper dive on Account Lockout from an attribute perspective.
The OpenAM Approach
You can configure Account Lockout in OpenAM either globally or for a particular realm. To access the Account Lockout settings for the global configuration,
- Log in to OpenAM Console
- Navigate to: Configuration > Authentication > Core
- Scroll down to Account Lockout section
To access Account Lockout settings for a particular realm,
- Log in to OpenAM Console
- Navigate to: Access Control > realm > Authentication > All Core Settings
- Scroll down to Account Lockout section
In either location you will see various parameters for controlling Account Lockout as follows:

Configuring Account Lockout in OpenAM
Account Lockout is disabled by default; you need to select the “Login Failure Lockout Mode” checkbox to enable this feature. Once it is enabled, you configure the number of attempts before an account is locked and even if a warning message is displayed to the user before their account is locked. You can configure how long the account is locked and even the duration between successive lockouts (which can increase if you set the duration multiplier). You can configure the attributes to use to store the account lockout information in addition to the default attributes configured in the Data Store.
Enabling Account Lockout affects the following Data Store attributes: inetUserStatus and sunAMAuthInvalidAttemptsData. By default, the value of the inetUserStatus attribute is either Active or Inactive, but this can be configured to use another attribute and another attribute value. This can be configured in the User Configuration section of the Data Store configuration as follows:

Data Store Account Lockout Attributes
These attributes are updated in the Data Store configuration for the realm. A benefit of implementing Account Lockout in OpenAM is that you can use any LDAPv3 directory, Active Directory, or even a relational database – but you do need to have a Data Store configured to provide OpenAM with somewhere to write these values. An additional benefit is that OpenAM is already configured with error messages that can be easily displayed when a user’s account is about to be locked or has become locked. Configuring Account Lockout within OpenAM, however, may not provide the level of granularity that you might need and as such, you may need to configure it in the authentication database (such as OpenDJ).
The OpenDJ Approach
OpenDJ can be configured to lock accounts as well. This is defined in a password policy and can be configured globally (the entire OpenDJ instance) or it may be applied to a subentry (a group of users or a specific user). Similar to OpenAM, a user’s account can be locked after a number of invalid authentication attempts have been made. And similar to OpenAM, you have several additional settings that can be configured to control the lockout period, whether warnings should be sent, and even who to notify when the account has been locked.
But while configuring Account Lockout in OpenAM may recognize invalid password attempts in your SSO environment, configuring it in OpenDJ will recognize invalid attempts for any application that is using OpenDJ as an authentication database. This is more of a centralized approach and can recognize attacks from several vectors.
Configuring Account Lockout in OpenDJ affects the following OpenDJ attributes: pwdFailureTime (a multivalued attribute consisting of the timestamp of each invalid password attempt) and pwdAccountLockedTime (a timestamp indicating when the account was locked).
Another benefit of implementing Account Lockout in OpenDJ is the ability to configure Account Lockout for different types of users. This is helpful when you want to have different password policies for users, administrators, or even service accounts. This is accomplished by assigning different password polices directly to those users or indirectly through groups or virtual attributes. A drawback to this approach, however, is that OpenAM doesn’t necessarily recognize the circumstances behind error messages returned from OpenDJ when a user is unable to log in. A scrambled password in OpenDJ, for instance, simply displays as an Authentication failed error message in the OpenAM login screen.
By default, all users in OpenDJ are automatically assigned a generic (rather lenient) password policy that is aptly named: Default Password Policy. The definition of this policy can be seen as follows:
dn: cn=Default Password Policy,cn=Password Policies,cn=config
objectClass: ds-cfg-password-policy
objectClass: top
objectClass: ds-cfg-authentication-policy
ds-cfg-skip-validation-for-administrators: false
ds-cfg-force-change-on-add: false
ds-cfg-state-update-failure-policy: reactive
ds-cfg-password-history-count: 0
ds-cfg-password-history-duration: 0 seconds
ds-cfg-allow-multiple-password-values: false
ds-cfg-lockout-failure-expiration-interval: 0 seconds
ds-cfg-lockout-failure-count: 0
ds-cfg-max-password-reset-age: 0 seconds
ds-cfg-max-password-age: 0 seconds
ds-cfg-idle-lockout-interval: 0 seconds
ds-cfg-java-class: org.opends.server.core.PasswordPolicyFactory
ds-cfg-lockout-duration: 0 seconds
ds-cfg-grace-login-count: 0
ds-cfg-force-change-on-reset: false
ds-cfg-default-password-storage-scheme: cn=Salted SHA-1,cn=Password Storage
  Schemes,cn=config
ds-cfg-allow-user-password-changes: true
ds-cfg-allow-pre-encoded-passwords: false
ds-cfg-require-secure-password-changes: false
cn: Default Password Policy
ds-cfg-require-secure-authentication: false
ds-cfg-expire-passwords-without-warning: false
ds-cfg-password-change-requires-current-password: false
ds-cfg-password-generator: cn=Random Password Generator,cn=Password Generators,
  cn=config
ds-cfg-password-expiration-warning-interval: 5 days
ds-cfg-allow-expired-password-changes: false
ds-cfg-password-attribute: userPassword
ds-cfg-min-password-age: 0 seconds
The value of the ds-cfg-lockout-failure-count attribute is 0; which means that user accounts are not locked by default – no matter how many incorrect attempts are made. This is one of the many security settings that you can configure in a password policy and while many of these mimic what is available in OpenAM, others go quite deeper.
You can use the OpenDJ dsconfig command to change the Default Password Policy as follows:
dsconfig set-password-policy-prop --policy-name "Default Password Policy" --set
lockout-failure-count:3 --hostname localhost --port 4444 --trustAll --bindDN
"cn=Directory Manager" --bindPassword ****** --no-prompt
Rather than modifying the Default Password Policy, a preferred method is to create a new password policy and apply your own specific settings to the new policy. This policy can then be applied to a specific set of users.
The syntax for using the OpenDJ dsconfig command to create a new password policy can be seen below.
dsconfig create-password-policy --set default-password-storage-scheme:"Salted
  SHA-1" --set password-attribute:userpassword --set lockout-failure-count:3
  --type password-policy --policy-name "Example Corp User Password Policy"
  --hostname localhost --port 4444 --trustAll --bindDN cn="Directory Manager"
  --bindPassword ****** --no-prompt
Note: This example contains a minimum number of settings (default-password-storage-scheme, password-attribute, and lockout-failure-count). Consider adding additional settings to customize your password policy as desired.
You can now assign the password policy to an individual user by adding the following attribute as a subentry to the user’s object:
ds-pwp-password-policy-dn:  cn=Example Corp User Password Policy,cn=Password
  Policies, cn=config
This can be performed using any LDAP client where you have write permissions to a user’s entry. The following example uses the ldapmodify command in an interactive mode to perform this operation:
$ ldapmodify -D "cn=Directory Manager" -w ****** <ENTER>
dn: uid=bnelson,ou=People,dc=example,dc=com <ENTER>
changetype: modify <ENTER>
replace: ds-pwp-password-policy-dn <ENTER>
ds-pwp-password-policy-dn: cn=Example Corp User Password Policy,
  cn=Password Policies,cn=config <ENTER>
<ENTER>
Another method of setting this password policy is through the use of a dynamically created virtual attribute (i.e. one that is not persisted in the OpenDJ database backend). The following definition automatically assigns this new password policy to all users that exist beneath the ou=people container (the scope of the virtual attribute).
dn: cn=Example Corp User Password Policy Assignment,cn=Virtual
  Attributes,cn=config
objectClass: ds-cfg-virtual-attribute
objectClass: ds-cfg-user-defined-virtual-attribute
objectClass: top
ds-cfg-base-dn: ou=people,dc=example,dc=com
cn: Example Corp User Password Policy Assignment
ds-cfg-attribute-type: ds-pwp-password-policy-dn
ds-cfg-enabled: true
ds-cfg-java-class:
  org.opends.server.extensions.UserDefinedVirtualAttributeProvider
ds-cfg-filter: (objectclass=sbacperson)
ds-cfg-value: cn=Example Corp User Password Policy,cn=Password
  Policies,cn=config
Note: You can also use filters to create very granular results on how password polices are applied.
Configuring Account Lockout in OpenDJ has more flexibility and as such may be considered to be more powerful than OpenAM in this area. The potential confusion, however, comes when attempting to unlock a user’s account when they have been locked out of both OpenAM and OpenDJ. This is described in the following example.
A Deeper Dive into Account Lockout
Consider an environment where OpenAM is configured with the LDAP authentication module and that module has been configured to use an OpenDJ instance as the authentication database.

OpenDJ Configured as AuthN Database
OpenAM and OpenDJ have both been configured to lock a user’s account after 3 invalid password attempts. What kind of behavior can you expect? Let’s walk through each step of an Account Lockout process and observe the behavior on Account Lockout specific attributes.
Step 1: Query Account Lockout Specific Attributes for the Test User
$ ldapsearch -D "cn=Directory Manager" -w ****** uid=testuser1 inetuserstatus \
  sunAMAuthInvalidAttemptsData pwdFailureTime pwdAccountLockedTime

dn: uid=testuser1,ou=test,dc=example,dc=com
inetuserstatus: Active
The user is currently active and Account Lockout specific attributes are empty.
Step 2: Open the OpenAM Console and access the login screen for the realm where Account Lockout has been configured.

OpenAM Login Page
Step 3: Enter an invalid password for this user

OpenAM Authentication Failure Message
Step 4: Query Account Lockout Specific Attributes for the Test User
$ ldapsearch -D "cn=Directory Manager" -w ****** uid=testuser1 inetuserstatus \
  sunAMAuthInvalidAttemptsData pwdFailureTime pwdAccountLockedTime

dn: uid=testuser1,ou=test,dc=example,dc=com
sunAMAuthInvalidAttemptsData:: PEludmFsaWRQYXNzd29yZD48SW52YWxpZENvdW50PjE8L0
  ludmFsaWRDb3VudD48TGFzdEludmFsaWRBdD4xMzk4MTcxNTAwMDE4PC9MYXN0SW52YWxpZEF0P
  jxMb2NrZWRvdXRBdD4wPC9Mb2NrZWRvdXRBdD48QWN0dWFsTG9ja291dER1cmF0aW9uPjA8L0Fj
  dHVhbExvY2tvdXREdXJhdGlvbj48L0ludmFsaWRQYXNzd29yZD4=
inetuserstatus: Active
pwdFailureTime: 20140422125819.918Z
You now see that there is a value for the pwdFailureTime. This is the timestamp of when the first password failure occurred. This attribute was populated by OpenDJ.
The sunAMAuthInvalidAttemptsData attribute is populated by OpenAM. This is a base64 encoded value that contains valuable information regarding the invalid password attempt. Run this through a base64 decoder and you will see that this attribute contains the following information:
<InvalidPassword><InvalidCount>1</InvalidCount><LastInvalidAt>1398171500018
  </LastInvalidAt><LockedoutAt>0</LockedoutAt><ActualLockoutDuration>0
  </ActualLockoutDuration></InvalidPassword>
Step 5: Repeat Steps 2 and 3. (This is the second password failure.)
Step 6: Query Account Lockout Specific Attributes for the Test User
$ ldapsearch -D "cn=Directory Manager" -w ****** uid=testuser1 inetuserstatus \
  sunAMAuthInvalidAttemptsData pwdFailureTime pwdAccountLockedTime

dn: uid=testuser1,ou=test,dc=example,dc=com
sunAMAuthInvalidAttemptsData:: PEludmFsaWRQYXNzd29yZD48SW52YWxpZENvdW50PjI8L0
  ludmFsaWRDb3VudD48TGFzdEludmFsaWRBdD4xMzk4MTcxNTUzMzUwPC9MYXN0SW52YWxpZEF0P
  jxMb2NrZWRvdXRBdD4wPC9Mb2NrZWRvdXRBdD48QWN0dWFsTG9ja291dER1cmF0aW9uPjA8L0Fj
  dHVhbExvY2tvdXREdXJhdGlvbj48L0ludmFsaWRQYXNzd29yZD4=
inetuserstatus: Active
pwdFailureTime: 20140422125819.918Z
pwdFailureTime: 20140422125913.151Z
There are now two values for the pwdFailureTime attribute – one for each password failure. The sunAMAuthInvalidAttemptsData attribute has been updated as follows:
<InvalidPassword><InvalidCount>2</InvalidCount><LastInvalidAt>1398171553350
  </LastInvalidAt><LockedoutAt>0</LockedoutAt><ActualLockoutDuration>0
  </ActualLockoutDuration></InvalidPassword>
Step 7: Repeat Steps 2 and 3. (This is the third and final password failure.)

OpenAM Inactive User Page
OpenAM displays an error message indicating that the user’s account is not active. This is OpenAM’s way of acknowledging that the user’s account has been locked.
Step 8: Query Account Lockout Specific Attributes for the Test User
$ ldapsearch -D "cn=Directory Manager" -w ****** uid=testuser1 inetuserstatus \
  sunAMAuthInvalidAttemptsData pwdFailureTime pwdAccountLockedTime

dn: uid=testuser1,ou=test,dc=example,dc=com
sunAMAuthInvalidAttemptsData:: PEludmFsaWRQYXNzd29yZD48SW52YWxpZENvdW50PjA8L0
  ludmFsaWRDb3VudD48TGFzdEludmFsaWRBdD4wPC9MYXN0SW52YWxpZEF0PjxMb2NrZWRvdXRBd
  D4wPC9Mb2NrZWRvdXRBdD48QWN0dWFsTG9ja291dER1cmF0aW9uPjA8L0FjdHVhbExvY2tvdXRE
  dXJhdGlvbj48L0ludmFsaWRQYXNzd29yZD4=
inetuserstatus: Inactive
pwdFailureTime: 20140422125819.918Z
pwdFailureTime: 20140422125913.151Z
pwdFailureTime: 20140422125944.771Z
pwdAccountLockedTime: 20140422125944.771Z
There are now three values for the pwdFailureTime attribute – one for each password failure. The sunAMAuthInvalidAttemptsData attribute has been updated as follows:
<InvalidPassword><InvalidCount>0</InvalidCount><LastInvalidAt>0</LastInvalidAt>
  <LockedoutAt>0</LockedoutAt><ActualLockoutDuration>0</ActualLockoutDuration>
  </InvalidPassword>
You will note that the counters have all been reset to zero. That is because the user’s account has been inactivated by OpenAM by setting the value of the inetuserstatus attribute to Inactive. Additionally, the third invalid password caused OpenDJ to lock the account by setting the value of the pwdAccountLockedTime attribute to the value of the last password failure.
Now that the account is locked out, how do you unlock it? The natural thing for an OpenAM administrator to do is to reset the value of the inetuserstatus attribute and they would most likely use the OpenAM Console to do this as follows:

OpenAM Edit User Page (Change User Status)
The problem with this approach is that while the user’s status in OpenAM is now made active, the status in OpenDJ remains locked.
$ ldapsearch -D "cn=Directory Manager" -w ****** uid=testuser1 inetuserstatus \
  sunAMAuthInvalidAttemptsData pwdFailureTime pwdAccountLockedTime

dn: uid=testuser1,ou=test,dc=example,dc=com
sunAMAuthInvalidAttemptsData:: PEludmFsaWRQYXNzd29yZD48SW52YWxpZENvdW50PjA8L0
  ludmFsaWRDb3VudD48TGFzdEludmFsaWRBdD4wPC9MYXN0SW52YWxpZEF0PjxMb2NrZWRvdXRBd
  D4wPC9Mb2NrZWRvdXRBdD48QWN0dWFsTG9ja291dER1cmF0aW9uPjA8L0FjdHVhbExvY2tvdXRE
  dXJhdGlvbj48L0ludmFsaWRQYXNzd29yZD4=
inetuserstatus: Active
pwdFailureTime: 20140422125819.918Z
pwdFailureTime: 20140422125913.151Z
pwdFailureTime: 20140422125944.771Z
pwdAccountLockedTime: 20140422125944.771Z
Attempting to log in to OpenAM with this user’s account yields an authentication error that would make most OpenAM administrators scratch their head; especially after just resetting the user’s status.

OpenAM Authentication Failure Message
The trick to fixing this is to clear the pwdAccountLockedTime and pwdFailureTime attributes and the way to do this is by modifying the user’s password. Once again, the ldapmodify command can be used as follows:
$ ldapmodify -D "cn=Directory Manager" -w ****** <ENTER>
dn: uid=testuser1,ou=test,dc=example,dc=com <ENTER>
changetype: modify <ENTER>
replace: userPassword <ENTER>
userPassword: newpassword <ENTER>
<ENTER>
$ ldapsearch -D "cn=Directory Manager" -w ****** uid=testuser1 inetuserstatus \
  sunAMAuthInvalidAttemptsData pwdFailureTime pwdAccountLockedTime

dn: uid=testuser1,ou=test,dc=example,dc=com
sunAMAuthInvalidAttemptsData:: PEludmFsaWRQYXNzd29yZD48SW52YWxpZENvdW50PjA8L0
  ludmFsaWRDb3VudD48TGFzdEludmFsaWRBdD4wPC9MYXN0SW52YWxpZEF0PjxMb2NrZWRvdXRBd
  D4wPC9Mb2NrZWRvdXRBdD48QWN0dWFsTG9ja291dER1cmF0aW9uPjA8L0FjdHVhbExvY2tvdXRE
  dXJhdGlvbj48L0ludmFsaWRQYXNzd29yZD4=
inetuserstatus: Active
pwdChangedTime: 20140422172242.676Z
This, however, requires two different interfaces for managing the user’s account. An easier method is to combine the changes into one interface. You can modify the inetuserstatus attribute using ldapmodify or if you are using the OpenAM Console, simply change the password while you are updating the user’s status.
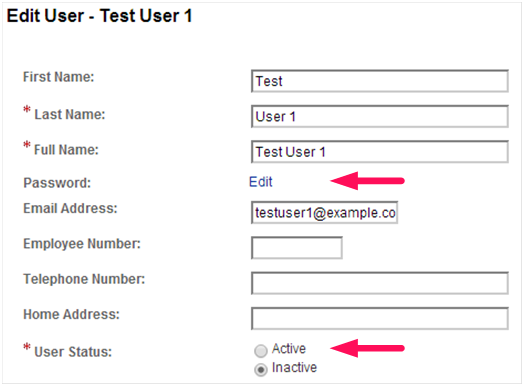
OpenAM Edit User Page (Change Password)
There are other ways to update one attribute by simply modifying the other. This can range in complexity from a simple virtual attribute to a more complex yet powerful custom OpenDJ plugin. But in the words of Voltaire, “With great power comes great responsibility.”
So go forth and wield your new found power; but do it in a responsible manner.
What do OpenDJ and McDonald’s Have in Common?
The OpenDJ directory server is highly scalable and can process all sorts of requests from different types of clients over various protocols. The following diagram provides an overview of how OpenDJ processes these requests. (See The OpenDJ Architecture for a more detailed description of each component.)
Note: The following information has been taken from ForgeRock’s OpenDJ Administration, Maintenance and Tuning Class and has been used with the permission of ForgeRock.

Client requests are accepted and processed by an appropriate Connection Handler. The Connection Handler decodes the request according to the protocol (LDAP, JMX, SNMP, etc.) and either responds immediately or converts it into an LDAP Operation Object that is added to the Work Queue.
Analogy: I like to use the analogy of the drive-through window at a fast food restaurant when describing this process. You are the client making a request of the establishment. The Connection Handler is the person who takes your order; they take your request and enter it into their ordering system (the Work Queue). They do not prepare your food; their jobs are simply to take the order as quickly and efficiently as possible.
Worker Threads monitor and detect items on the Work Queue and respond by processing them in a first in, first out fashion. Requests may be routed or filtered based on the server configuration and then possibly transformed before the appropriate backend is selected.
Analogy: Continuing with the fast food analogy, the Worker Threads are similar to the people who prepare your food. They monitor the order system (Work Queue) for any new orders and process them in a first in, first out fashion.
Note: OpenDJ routing is currently limited to the server’s determination of the appropriate backend. In future versions, this may take on more of a proxy or virtual directory type of implementation.
The result is returned to the client by the Worker Threads using the callback method specified by the Connection Handler.
Analogy: Once your order is completed, the food (or the results of your request) is given to you by one of the Worker Threads who has been tasked with that responsibility. This is the only place where the analogy somewhat breaks down. In older fast food restaurants (ones with only one window) this may sometimes be the person who took your order in the first place. In our analogy, however, the Connection Handler never responds to your request. This model is more closely attuned to more recent fast food establishments where they have two windows and there is a clear delineation of duties between the order taker (Connection Handler) and the one who provides you with your food (the Worker Thread).
Other services such as access control processing (ACIs), Logging, and Monitoring provide different access points within the request processing flow and are used to control, audit, and monitor how the requests are processed.
So, what do OpenDJ and McDonald’s have in common? They are both highly efficient entities that have been streamlined to process requests in the most efficient manner possible.
Check out ForgeRock’s website for more information on OpenDJ or click here if you are interested in attending one of ForgeRock’s upcoming training classes.
The OpenDJ Architecture
An understanding of the components that make up the OpenDJ Architecture is useful for administering, configuring, or troubleshooting the OpenDJ server.
The following information has been taken from ForgeRock’s OpenDJ Administration, Maintenance and Tuning Class and has been used with the permission of ForgeRock.

The OpenDJ server has been developed using a modular architecture in which most or all components are written to a well-defined specification. This image above provides an overview of these components. The following sections provide a brief description of some of the more prevalent components shown in this image.
Configuration Handler
The OpenDJ Configuration Handler is responsible for managing configuration information within OpenDJ’s configuration files (i.e. config.ldif). Configuration information may impact one or more components; as such, the Configuration Handler is responsible for notifying appropriate components when a configuration change occurs.
Connection Handlers
Connection and request handlers manage all interaction with LDAP clients. This includes accepting new connections and reading and responding to client. Connection handlers are responsible for any special processing that might be required for this communication, including managing encryption or performing protocol translation. It is possible to have multiple concurrent implementations active at any given time and as such, OpenDJ includes connection handlers which support various forms of communication that clients use to interact with the server (JMX, LDAP, LDAPS, LDIF, SNMP). Administrators have the ability to enable or disable these connection handlers to support their client environment.
Note: ForgeRock is currently working on REST and JSON interfaces to provide direct access to directory server data.
Backend Databases
Connection handlers place client requests onto OpenDJ’s Work Queue. Worker threads detect requests placed on the work queue and are responsible for performing the processing necessary to respond to the request. Today’s directory servers must be able to handle a tremendous number of requests in a short period of time; as such, OpenDJ’s Work Queue has been built to be both highly efficient and provide high performance.
A backend database serves as a repository for searching, retrieving, and storing directory data. OpenDJ supports multiple backends including those considered typical databases (such as Oracle, MySql, and Berekely DB) as well as file-based and memory-based backends. There can be multiple backend databases active at any given time, each of which handle mutually exclusive subsets of data (selection of the appropriate database is based on the root suffix specified in the operation). OpenDJ facilitates interaction with these backends and provides tools for enabling, disabling, creating, removing, backing up, and restoring the databases independently from each other without impacting other backends.
Note: Backends may consist of local or remote repositories (i.e. the database is stored on a remote machine). This can be found in cases where the backend interacts with a proxy or a virtual server. Support for proxy and virtual server backends are scheduled for a future release.
Loggers
OpenDJ has a robust logging capability that allows server information to be retained in various repositories. The most common loggers are as follows:
- Access Logger – stores server operations (binds, searches, modifications, etc.)
- Error Logger – stores warnings, errors, and significant events that occur with the server
- Debug Logger – records debug information when the server is run with debugging enabled and Java assertions are active.
Multiple loggers can be configured for each of these and each logger may be actively storing different information (filtered or not) in different formats in different repositories.
Note: Some error loggers can be used as an alerting mechanism to actively notify administrators of potential problems.
SASL Handlers
The LDAP protocol supports two methods that clients may use to authenticate to the server:
- LDAP simple authentication
- Simple Authentication and Security Layer (SASL)
SASL is an authentication framework that supports multiple authentication mechanisms including ANONYMOUS, CRAM-MD5, DIGEST-MD5, EXTERNAL, GSSAPI, and PLAIN.
OpenDJ includes a set of handlers that implement each of these SASL mechanisms in order to determine the identity of the client.
Access Control
OpenDJ contains an access control module that is used to determine if a client is permitted to perform a particular request or not.
Password Storage
OpenDJ includes several password storage modules that can be used to obscure user passwords using a reversible or one-way algorithm. Password storage schemes encode new passwords provided by users so that they are stored in an encoded manner. This makes it difficult or impossible for someone to determine the clear-text passwords from the encoded values. They can also be used to determine whether a clear-text password provided by a client matches the encoded value stored in the server.
Password Complexity
OpenDJ includes a series of modules that define logic used to determine whether a user’s password meets minimum requirements or not.
Syntax and Matching Rules
Attributes must follow a particular syntax and search filters determine matches based on a set of matching rules. OpenDJ contains a set of syntaxes and matching rules that define the logic for dealing with different kinds of attributes.
Database Cache
Interacting with data in memory is much faster than interacting with data on disk. As such, OpenDJ includes a database caching module that loads directory data into memory.
Check out ForgeRock’s website for more information on OpenDJ or click here if you are interested in attending one of ForgeRock’s upcoming training classes.
The Most Complete History of Directory Services You Will Ever Find

Directory Services Timeline
The Most Complete History of Directory Services You Will Ever Find
(Until the next one comes along)
| Date | Event |
Source |
| 1969 | First Arpanet node comes online; first RFC published. | |
| 1973 | Ethernet invented by Xerox PARC researchers. | |
| 1982 | TCP/IP replaces older Arpanet protocols on the Internet. | |
| 1982 | First distributed computing research paper on Grapevine published by Xerox PARC researchers. | |
| 1984 | Internet DNS comes online. | |
| 1986 | IETF formally chartered. | |
| 1989 | Quipu (X.500 software package) released. | |
| 1990 | Estimated number of Internet hosts exceeds 250,000. | |
| 1990 | First version of the X.500 standard published. | |
| 1991 | A team at CERN headed by Tim Berners-Lee releases the first World Wide Web software. | |
| 1992 | University of Michigan developers release the first LDAP software. | |
| 1993 | NDS debuts in Netware 4.0. | |
| July 1993 | LDAP specification first published as RFC 1487. | |
| December 1995 | First standalone LDAP server (SLAPD) ships as part of U-M LDAP 3.2 release. | |
| April 1996 | Consortium of more than 40 leading software vendors endorses LDAP as the Internet directory service protocol of choice. | |
| 1996 | Netscape Hires Tim Howes, Mark Smith, and Gordon Good from University of Michigan. Howes serves as a directory server architect. | |
| September 1997 | Sun Microsystems releases Sun Directory Services 1.0, derived from U-M LDAP 3.2 |
3 |
| November 1997 | LDAPv3 named the winner of the PC Magazine Award for Technical Excellence. | |
| December 1997 | LDAPv3 approved as a proposed Internet Standard. | |
| 1998 | The OpenLDAP Project was started by Kurt Zeilenga. The project started by cloning the LDAP reference source from the University Of Michigan. | |
| January 1998 | Netscape ships the first commercial LDAPv3 directory server. | |
| March 1998 | Innosoft acquires Mark Walh’s Critical Angle company, relesases LDAP directory server product 4.1 one month later. | |
| July 1998 | Sun Microsystems ships Sun Directory Server 3.1, implementing LDAPv3 standards |
3 |
| July 1998 | Estimated number of Internet hosts exceeds 36 million. | |
| 1999 | AOL acquires Netscape and forms the iPlanet Alliance with Sun Microsystems. | |
| March 1999 | Innosoft team, led by Mark Wahl, releases Innosoft Distributed Directory Server 5.0 |
3 |
| March 2000 | Sun Microsystems acquires Innosoft, merges Innosoft directory code with iPlanet. This forms the foundation for the iPlanet Directory Access Router. |
3 |
| October 2001 | The iPlanet Alliance ends and Sun and Netscape fork the codebase. | |
| October 2004 | Apache Directory Server Top Level Project is formed after 1 year in incubation |
3 |
| December 2004 | RedHat Purchases Netscape Server products | |
| 2005 | Sun Microsystems initiates the OpenDS project. An open source directory server based on the Java platform. | |
| June 2005 | RedHat Releases Fedora Directory Server | |
| October 2006 | Apache Directory Server 1.0 is released |
3 |
| 2007 | UnboundID releases its directory server |
12 |
| 2008 | AOL Stops Supporting Netscape Products | |
| April 2009 | Oracle purchases Sun Microsystems | |
| May 2009 | RedHat changes the Fedora Directory Server to 389 Directory Server | |
| Feb 1, 2010 | ForgeRock is founded |
3 |
| Dec 2010 | ForgeRock releases OpenDJ | |
| July 2011 | Oracle releases Oracle Unified Directory |
Sources:
(1) Understanding and Deploying LDAP Directory Services; Second Edition; Timothy A. Howes, Ph.D., Mark C. Smith, and Gordon S. Good.
(2) 389 Directory Server; History (http://directory.fedoraproject.org/wiki/History).
(3) Email exchange with Ludovic Poitou (ForgeRock).
(4) Press Release, March 16th, 1998; “Innosoft Acquires LDAP Technology Leader Critical Angle Inc. (http://www.pmdf.process.com/press/critical-angle-acquire.html).
(5) OpenLDAP; Wikipedia (http://en.wikipedia.org/wiki/OpenLDAP).
(6) iPlanet; Wikipedia (http://en.wikipedia.org/wiki/IPlanet).
(7) OpenDS; Wikipedia (http://en.wikipedia.org/wiki/OpenDS).
(8) Netscape; Wikipedia (http://en.wikipedia.org/wiki/Netscape).
(9) Press Release, April 20th, 2000; “Oracle Buys Sun” (http://www.oracle.com/us/corporate/press/018363).
(10) 389 Directory Server; 389 Change FAQ (http://directory.fedoraproject.org/wiki/389_Change_FAQ).
(11) OpenDJ; Wikipedia (http://en.wikipedia.org/wiki/OpenDJ).
(12) Email exchange with Nick Crown (UnboundID).
(13) Press Release, July 20th, 2011; “Oracle Announces Oracle Unified Directory 11g” (http://www.oracle.com/us/corporate/press/434211).
Directory Servers vs Relational Databases
An interesting question was posed on LinkedIn that asked, “If you were the architect of LinkedIn, MySpace, Facebook or other social networking sites and wanted to model the relationships amongst users and had to use LDAP, what would the schema look like?”
You can find the original post and responses here.
After reading the responses from other LinkedIn members, I felt compelled to add my proverbial $.02.
Directory Servers are simply special purpose data repositories. They are great for some applications and not so great for others. You can extend the schema and create a tree structure to model just about any kind of data for any type of application. But just because you “can” do something does not mean that you “should” do it.
The question becomes “Should you used a directory server or should you use a relational database?” For some applications a directory server would be a definite WRONG choice, for others it is clearly the RIGHT one, for yet others, the choice is not so clear. So, how do you decide?
Here are some simply rules of thumb that I have found work for me:
1) How often does your data change?
Keep in mind that directory servers are optimized for reads — this oftentimes comes at the expense of write operations. The reason is that directory servers typically implement extensive indexes that are tied to schema attributes (which by the way are tied to the application fields). So the question becomes, how often do these attributes change? If they do so often, then a directory server may not be the best choice (as you would be constantly rebuilding the indexes). If, however, they are relatively static, then a directory server would be a great choice.
2) What type of data are you trying to model?
If your data can be described in an attribute: value pair (i.e., name:Bill Nelson), then a directory server would be a good choice. If, however, your data is not so discrete, then a directory server should not be used. For instance, uploads to YouTube should NOT be kept in a directory server. User profiles in LinkedIn, however, would be.
3) Can your data be modeled in a hierarchical (tree-like) structure?
Directory servers implement a hierarchical structure for data modeling (similar to a file system layout). A benefit of a directory server is the ability to apply access control at a particular point in the tree and have that apply to all child elements in the tree structure. Additionally, you can start searching at a lower (child element) and increase your search performance times (much like selecting the proper starting point for the Unix “find” command). Relational databases cannot do this. You have to search all entries in the table. If your data lends to a hierarchical structure then a directory server might be a good choice.
I am a big fan on directory servers and have architected/implemented projects that sit 100% on top of a directory, 100% on top of relational databases, and a hybrid of both. Directory servers are extremely fast, flexible, scalable, and are able to handle the type of traffic you see on the Internet very well. Their ability to implement chaining, referrals, web services, and a flexible data modeling structure make them a very nice choice to use as a data repository to many applications, but I would not always lead with a directory server for every application.
So how do you decide which is best? It all comes down to the application, itself, and the way you want to access your data.
A site like LinkedIn might actually be modeled pretty well with a directory server as quite a bit of the content is actually static, lends well to an attribute:value pair, and can easily be modeled in a heirarchical structure. The user profiles for a site like facebook or YouTube could easily be modeled in a directory server, but I would NOT attempt to reference the YouTube or facebook uploads or the “what are you working on now” status with a directory server as it is constantly changing.
If you do decide to use a directory server, here are the general steps you should consider for development (your mileage may vary, but probably not too much):
- Evaluate the data fields that you want to access from your application
- Map the fields to existing directory server schema (extend if necessary).
- Build a heirarchical structure to model your data as appropriate (this is called the directory information tree, or DIT)
- Architect a directory solution based on where your applications reside thorughout the world (do you need one, two, or multiple directories?) and then determine how you want your data to flow through the system (chaining, referrals, replication)
- Implement the appropriate access control for attributes or the DIT in general
- Implement an effective indexing strategy to increase performance
- Test, test, test
 |
