OpenIDM 3.1: A Wake Up Call for Other Identity Vendors
Having implemented Sun, Novell, and Oracle provisioning solutions in the past, the one thing that I found to be lacking in ForgeRock’s OpenIDM solution was an easy to use administrative interface for connecting to and configuring target resources.
Sure, you could configure JSON objects at the file level, but who wants to do that when “point and click” and “drag and drop” is the way to go.
With OpenIDM 3.1 my main objection has been eliminated as the the new resource configuration interfaces have arrived – and boy have they arrived!
 See the OpenIDM Integrator’s Guide for more information.
The latest release now places OpenIDM directly in line as a viable alternative to the big boys and will make our deployments much quicker and less prone to error. Way to go ForgeRock, thanks for listening (and responding).
Taking Time to Give Thanks
With Halloween in the rear view mirror and Christmas right around the corner, it is easy for Thanksgiving to get lost in the shuffle. Bordered by two holidays where much of our society is focused on gifts of candy and presents, Thanksgiving is sort of an “odd man out” and like many of the other holidays, much of its meaning is oftentimes overlooked.

While not the official start of the Thanksgiving holiday that we celebrate today, it was George Washington who in 1789 declared Thursday, Nov. 26, a day of “thanksgiving.” This was a one time occurrence and its intent was to devote a day to “public thanksgiving and prayer” in gratitude to “the service of that great and glorious Being who is the beneficent Author of all the good that was, that is, or that will be.”

Washington’s Thanksgiving Proclamation
(Read the full proclamation here)
It wasn’t until 1863 that Abraham Lincoln set aside the fourth Thursday in November as our official Thanksgiving holiday, but it is the day that George Washington set aside that gives this holiday special meaning to me. The meaning of the word “thanks” is associated with an “expression of gratitude”; and to give thanks is to express that gratitude to others.
(Read the full proclamation here)
In both cases, George Washington and Abraham Lincoln were expressing gratitude to the Almighty God for the wonderful gifts He had bestowed on a fledgling nation. While we can join in these expressions, each of us has something unique to be grateful for. Maybe it’s your health, or your family or friends. Maybe its your finances or the fact that you have achieved long sought after goals in your life, or simply that you have a roof over your head – each of us has something to be thankful for on this Thanksgiving Day.
So, on one of the most important holidays of the year, one that focuses on giving thanks for the blessings that we have received in the past year, let’s stop and take the time to thank the God Almighty, respective spouses, family members, friends, or whomever deserves that expression of gratitude.
After all, isn’t giving thanks what Thanksgiving is all about?

OpenDJ Attribute Uniqueness (and the Effects on OpenAM)
In real life we tend to value those traits that make us unique from others; but in an identity management deployment uniqueness is essential to the authentication process and should not be taken for granted.

Case in point, attributes in OpenDJ may share values that you may or may not want (or need) to be unique. For instance the following two (different) entries are both configured with the same value for the email address:
dn: uid=bnelson,ou=people,dc=example,dc=com
uid: bnelson
mail: bill.nelson@identityfusion.com
[LDIF Stuff Snipped]
dn: uid=scarter,ou=people,dc=example,dc=com
uid: scarter
mail: bill.nelson@identityfusion.com
[LDIF Stuff Snipped]
In some cases this may be fine, but in others this may not be the desired effect as you may need to enforce uniqueness for attributes such as uid, guid, email address, or simply credit cards. To ensure that attribute values are unique across directory server entries you need to configure attribute uniqueness.
UID Uniqueness Plug-In
OpenDJ has an existing plug-in that can be used to configure unique values for the uid attribute, but this plug-in is disabled by default. You can find this entry in OpenDJ’s main configuration file (config.ldif) or by searching the cn=config tree in OpenDJ (assuming you have the correct permissions to do so).
dn: cn=UID Unique Attribute,cn=Plugins,cn=config
objectClass: ds-cfg-unique-attribute-plugin
objectClass: ds-cfg-plugin
objectClass: top
ds-cfg-enabled: false
ds-cfg-java-class: org.opends.server.plugins.UniqueAttributePlugin
ds-cfg-plugin-type: preOperationAdd
ds-cfg-plugin-type: preOperationModify
ds-cfg-plugin-type: preOperationModifyDN
ds-cfg-plugin-type: postOperationAdd
ds-cfg-plugin-type: postOperationModify
ds-cfg-plugin-type: postOperationModifyDN
ds-cfg-plugin-type: postSynchronizationAdd
ds-cfg-plugin-type: postSynchronizationModify
ds-cfg-plugin-type: postSynchronizationModifyDN
ds-cfg-invoke-for-internal-operations: true
ds-cfg-type: uid
cn: UID Unique Attribute
Leaving this plug-in disabled can cause problems with OpenAM, however, if OpenAM has been configured to authenticate using the uid attribute (and you ‘accidentally’ create entries with the same uid value). In such cases you will see an authentication error during the login process as OpenAM cannot determine which account you are trying to use for authentication.
Configuring Uniqueness
To fix this problem in OpenAM, you can use the OpenDJ dsconfig command to enable the UID Unique Attribute plug-in as follows:
./dsconfig set-plugin-prop --hostname localhost --port 4444  \
--bindDN "cn=Directory Manager" --bindPassword password \
--plugin-name "UID Unique Attribute" \
--set base-dn:ou=people,dc=example,dc=com --set enabled:true \
--trustAll --no-prompt
This will prevent entries from being added to OpenDJ where the value of any existing uids conflicts with the incoming entry’s uid. This will address the situation where you are using the uid attribute for authentication in OpenAM, but what if you want to use a different attribute (such as mail) to authenticate? In such cases, you need to create your own uniqueness plug-in as follows:
./dsconfig create-plugin --hostname localhost --port 4444  \
--bindDN "cn=Directory Manager" --bindPassword password \
--plugin-name "Unique Email Address Plugin" \
--type unique-attribute --set type:mail --set enabled:true \
--set base-dn:ou=people,dc=example,dc=com --trustAll \
--no-prompt
In both cases the base-dn parameter defines the scope where the the uniqueness applies. This is useful in multitenant environments where you may want to define uniqueness within a particular subtree but not necessarily across the entire server.
Prerequisites
The uniqueness plug-in requires that you have an existing equality index configured for the attribute where you would like to enforce uniqueness. The index is necessary so that OpenDJ can search for other entries (within the scope of the base-dn) where the attribute may already have a particular value set.
The following dscconfig command can be used to create an equality index for the mail attribute:
./dsconfig  create-local-db-index  --hostname localhost --port 4444  \
--bindDN "cn=Directory Manager" --bindPassword password --backend-name userRoot  \
--index-name mail  --set index-type:equality --trustAll --no-prompt
Summary
OpenAM’s default settings (Data Store, LDAP authentication module, etc) uses the uid attribute to authenticate and uniquely identify a user. OpenDJ typically uses uid as the unique naming attribute in a user’s distinguished name. When combined together, it is almost assumed that you will be using the uid attribute in this manner, but that is not always the case. You can easily run into issues when you start coloring outside of the lines and begin using other attributes (i.e. mail) for this purpose. Armed with the information contained in this post, however, you should easily be able to configure OpenDJ to enforce uniqueness for any attribute.
Understanding OpenAM and OpenDJ Account Lockout Behaviors
The OpenAM Authentication Service can be configured to lock a user’s account after a defined number of log in attempts has failed. Account Lockout is disabled by default, but when configured properly, this feature can be useful in fending off brute force attacks against OpenAM login screens.
If your OpenAM environment includes an LDAP server (such as OpenDJ) as an authentication database, then you have options on how (and where) you can configure Account Lockout settings. This can be performed in either OpenAM (as mentioned above) or in the LDAP server, itself. But the behavior is different based on where this is configured. There are benefits and drawbacks towards configuring Account Lockout in either product and knowing the difference is essential.
Note: Configuring Account Lockout simultaneously in both products can lead to confusing results and should be avoided unless you have a firm understanding of how each product works. See the scenario at the end of this article for a deeper dive on Account Lockout from an attribute perspective.
The OpenAM Approach
You can configure Account Lockout in OpenAM either globally or for a particular realm. To access the Account Lockout settings for the global configuration,
- Log in to OpenAM Console
- Navigate to: Configuration > Authentication > Core
- Scroll down to Account Lockout section
To access Account Lockout settings for a particular realm,
- Log in to OpenAM Console
- Navigate to: Access Control > realm > Authentication > All Core Settings
- Scroll down to Account Lockout section
In either location you will see various parameters for controlling Account Lockout as follows:

Configuring Account Lockout in OpenAM
Account Lockout is disabled by default; you need to select the “Login Failure Lockout Mode” checkbox to enable this feature. Once it is enabled, you configure the number of attempts before an account is locked and even if a warning message is displayed to the user before their account is locked. You can configure how long the account is locked and even the duration between successive lockouts (which can increase if you set the duration multiplier). You can configure the attributes to use to store the account lockout information in addition to the default attributes configured in the Data Store.
Enabling Account Lockout affects the following Data Store attributes: inetUserStatus and sunAMAuthInvalidAttemptsData. By default, the value of the inetUserStatus attribute is either Active or Inactive, but this can be configured to use another attribute and another attribute value. This can be configured in the User Configuration section of the Data Store configuration as follows:

Data Store Account Lockout Attributes
These attributes are updated in the Data Store configuration for the realm. A benefit of implementing Account Lockout in OpenAM is that you can use any LDAPv3 directory, Active Directory, or even a relational database – but you do need to have a Data Store configured to provide OpenAM with somewhere to write these values. An additional benefit is that OpenAM is already configured with error messages that can be easily displayed when a user’s account is about to be locked or has become locked. Configuring Account Lockout within OpenAM, however, may not provide the level of granularity that you might need and as such, you may need to configure it in the authentication database (such as OpenDJ).
The OpenDJ Approach
OpenDJ can be configured to lock accounts as well. This is defined in a password policy and can be configured globally (the entire OpenDJ instance) or it may be applied to a subentry (a group of users or a specific user). Similar to OpenAM, a user’s account can be locked after a number of invalid authentication attempts have been made. And similar to OpenAM, you have several additional settings that can be configured to control the lockout period, whether warnings should be sent, and even who to notify when the account has been locked.
But while configuring Account Lockout in OpenAM may recognize invalid password attempts in your SSO environment, configuring it in OpenDJ will recognize invalid attempts for any application that is using OpenDJ as an authentication database. This is more of a centralized approach and can recognize attacks from several vectors.
Configuring Account Lockout in OpenDJ affects the following OpenDJ attributes: pwdFailureTime (a multivalued attribute consisting of the timestamp of each invalid password attempt) and pwdAccountLockedTime (a timestamp indicating when the account was locked).
Another benefit of implementing Account Lockout in OpenDJ is the ability to configure Account Lockout for different types of users. This is helpful when you want to have different password policies for users, administrators, or even service accounts. This is accomplished by assigning different password polices directly to those users or indirectly through groups or virtual attributes. A drawback to this approach, however, is that OpenAM doesn’t necessarily recognize the circumstances behind error messages returned from OpenDJ when a user is unable to log in. A scrambled password in OpenDJ, for instance, simply displays as an Authentication failed error message in the OpenAM login screen.
By default, all users in OpenDJ are automatically assigned a generic (rather lenient) password policy that is aptly named: Default Password Policy. The definition of this policy can be seen as follows:
dn: cn=Default Password Policy,cn=Password Policies,cn=config
objectClass: ds-cfg-password-policy
objectClass: top
objectClass: ds-cfg-authentication-policy
ds-cfg-skip-validation-for-administrators: false
ds-cfg-force-change-on-add: false
ds-cfg-state-update-failure-policy: reactive
ds-cfg-password-history-count: 0
ds-cfg-password-history-duration: 0 seconds
ds-cfg-allow-multiple-password-values: false
ds-cfg-lockout-failure-expiration-interval: 0 seconds
ds-cfg-lockout-failure-count: 0
ds-cfg-max-password-reset-age: 0 seconds
ds-cfg-max-password-age: 0 seconds
ds-cfg-idle-lockout-interval: 0 seconds
ds-cfg-java-class: org.opends.server.core.PasswordPolicyFactory
ds-cfg-lockout-duration: 0 seconds
ds-cfg-grace-login-count: 0
ds-cfg-force-change-on-reset: false
ds-cfg-default-password-storage-scheme: cn=Salted SHA-1,cn=Password Storage
  Schemes,cn=config
ds-cfg-allow-user-password-changes: true
ds-cfg-allow-pre-encoded-passwords: false
ds-cfg-require-secure-password-changes: false
cn: Default Password Policy
ds-cfg-require-secure-authentication: false
ds-cfg-expire-passwords-without-warning: false
ds-cfg-password-change-requires-current-password: false
ds-cfg-password-generator: cn=Random Password Generator,cn=Password Generators,
  cn=config
ds-cfg-password-expiration-warning-interval: 5 days
ds-cfg-allow-expired-password-changes: false
ds-cfg-password-attribute: userPassword
ds-cfg-min-password-age: 0 seconds
The value of the ds-cfg-lockout-failure-count attribute is 0; which means that user accounts are not locked by default – no matter how many incorrect attempts are made. This is one of the many security settings that you can configure in a password policy and while many of these mimic what is available in OpenAM, others go quite deeper.
You can use the OpenDJ dsconfig command to change the Default Password Policy as follows:
dsconfig set-password-policy-prop --policy-name "Default Password Policy" --set
lockout-failure-count:3 --hostname localhost --port 4444 --trustAll --bindDN
"cn=Directory Manager" --bindPassword ****** --no-prompt
Rather than modifying the Default Password Policy, a preferred method is to create a new password policy and apply your own specific settings to the new policy. This policy can then be applied to a specific set of users.
The syntax for using the OpenDJ dsconfig command to create a new password policy can be seen below.
dsconfig create-password-policy --set default-password-storage-scheme:"Salted
  SHA-1" --set password-attribute:userpassword --set lockout-failure-count:3
  --type password-policy --policy-name "Example Corp User Password Policy"
  --hostname localhost --port 4444 --trustAll --bindDN cn="Directory Manager"
  --bindPassword ****** --no-prompt
Note: This example contains a minimum number of settings (default-password-storage-scheme, password-attribute, and lockout-failure-count). Consider adding additional settings to customize your password policy as desired.
You can now assign the password policy to an individual user by adding the following attribute as a subentry to the user’s object:
ds-pwp-password-policy-dn:  cn=Example Corp User Password Policy,cn=Password
  Policies, cn=config
This can be performed using any LDAP client where you have write permissions to a user’s entry. The following example uses the ldapmodify command in an interactive mode to perform this operation:
$ ldapmodify -D "cn=Directory Manager" -w ****** <ENTER>
dn: uid=bnelson,ou=People,dc=example,dc=com <ENTER>
changetype: modify <ENTER>
replace: ds-pwp-password-policy-dn <ENTER>
ds-pwp-password-policy-dn: cn=Example Corp User Password Policy,
  cn=Password Policies,cn=config <ENTER>
<ENTER>
Another method of setting this password policy is through the use of a dynamically created virtual attribute (i.e. one that is not persisted in the OpenDJ database backend). The following definition automatically assigns this new password policy to all users that exist beneath the ou=people container (the scope of the virtual attribute).
dn: cn=Example Corp User Password Policy Assignment,cn=Virtual
  Attributes,cn=config
objectClass: ds-cfg-virtual-attribute
objectClass: ds-cfg-user-defined-virtual-attribute
objectClass: top
ds-cfg-base-dn: ou=people,dc=example,dc=com
cn: Example Corp User Password Policy Assignment
ds-cfg-attribute-type: ds-pwp-password-policy-dn
ds-cfg-enabled: true
ds-cfg-java-class:
  org.opends.server.extensions.UserDefinedVirtualAttributeProvider
ds-cfg-filter: (objectclass=sbacperson)
ds-cfg-value: cn=Example Corp User Password Policy,cn=Password
  Policies,cn=config
Note: You can also use filters to create very granular results on how password polices are applied.
Configuring Account Lockout in OpenDJ has more flexibility and as such may be considered to be more powerful than OpenAM in this area. The potential confusion, however, comes when attempting to unlock a user’s account when they have been locked out of both OpenAM and OpenDJ. This is described in the following example.
A Deeper Dive into Account Lockout
Consider an environment where OpenAM is configured with the LDAP authentication module and that module has been configured to use an OpenDJ instance as the authentication database.

OpenDJ Configured as AuthN Database
OpenAM and OpenDJ have both been configured to lock a user’s account after 3 invalid password attempts. What kind of behavior can you expect? Let’s walk through each step of an Account Lockout process and observe the behavior on Account Lockout specific attributes.
Step 1: Query Account Lockout Specific Attributes for the Test User
$ ldapsearch -D "cn=Directory Manager" -w ****** uid=testuser1 inetuserstatus \
  sunAMAuthInvalidAttemptsData pwdFailureTime pwdAccountLockedTime

dn: uid=testuser1,ou=test,dc=example,dc=com
inetuserstatus: Active
The user is currently active and Account Lockout specific attributes are empty.
Step 2: Open the OpenAM Console and access the login screen for the realm where Account Lockout has been configured.

OpenAM Login Page
Step 3: Enter an invalid password for this user

OpenAM Authentication Failure Message
Step 4: Query Account Lockout Specific Attributes for the Test User
$ ldapsearch -D "cn=Directory Manager" -w ****** uid=testuser1 inetuserstatus \
  sunAMAuthInvalidAttemptsData pwdFailureTime pwdAccountLockedTime

dn: uid=testuser1,ou=test,dc=example,dc=com
sunAMAuthInvalidAttemptsData:: PEludmFsaWRQYXNzd29yZD48SW52YWxpZENvdW50PjE8L0
  ludmFsaWRDb3VudD48TGFzdEludmFsaWRBdD4xMzk4MTcxNTAwMDE4PC9MYXN0SW52YWxpZEF0P
  jxMb2NrZWRvdXRBdD4wPC9Mb2NrZWRvdXRBdD48QWN0dWFsTG9ja291dER1cmF0aW9uPjA8L0Fj
  dHVhbExvY2tvdXREdXJhdGlvbj48L0ludmFsaWRQYXNzd29yZD4=
inetuserstatus: Active
pwdFailureTime: 20140422125819.918Z
You now see that there is a value for the pwdFailureTime. This is the timestamp of when the first password failure occurred. This attribute was populated by OpenDJ.
The sunAMAuthInvalidAttemptsData attribute is populated by OpenAM. This is a base64 encoded value that contains valuable information regarding the invalid password attempt. Run this through a base64 decoder and you will see that this attribute contains the following information:
<InvalidPassword><InvalidCount>1</InvalidCount><LastInvalidAt>1398171500018
  </LastInvalidAt><LockedoutAt>0</LockedoutAt><ActualLockoutDuration>0
  </ActualLockoutDuration></InvalidPassword>
Step 5: Repeat Steps 2 and 3. (This is the second password failure.)
Step 6: Query Account Lockout Specific Attributes for the Test User
$ ldapsearch -D "cn=Directory Manager" -w ****** uid=testuser1 inetuserstatus \
  sunAMAuthInvalidAttemptsData pwdFailureTime pwdAccountLockedTime

dn: uid=testuser1,ou=test,dc=example,dc=com
sunAMAuthInvalidAttemptsData:: PEludmFsaWRQYXNzd29yZD48SW52YWxpZENvdW50PjI8L0
  ludmFsaWRDb3VudD48TGFzdEludmFsaWRBdD4xMzk4MTcxNTUzMzUwPC9MYXN0SW52YWxpZEF0P
  jxMb2NrZWRvdXRBdD4wPC9Mb2NrZWRvdXRBdD48QWN0dWFsTG9ja291dER1cmF0aW9uPjA8L0Fj
  dHVhbExvY2tvdXREdXJhdGlvbj48L0ludmFsaWRQYXNzd29yZD4=
inetuserstatus: Active
pwdFailureTime: 20140422125819.918Z
pwdFailureTime: 20140422125913.151Z
There are now two values for the pwdFailureTime attribute – one for each password failure. The sunAMAuthInvalidAttemptsData attribute has been updated as follows:
<InvalidPassword><InvalidCount>2</InvalidCount><LastInvalidAt>1398171553350
  </LastInvalidAt><LockedoutAt>0</LockedoutAt><ActualLockoutDuration>0
  </ActualLockoutDuration></InvalidPassword>
Step 7: Repeat Steps 2 and 3. (This is the third and final password failure.)

OpenAM Inactive User Page
OpenAM displays an error message indicating that the user’s account is not active. This is OpenAM’s way of acknowledging that the user’s account has been locked.
Step 8: Query Account Lockout Specific Attributes for the Test User
$ ldapsearch -D "cn=Directory Manager" -w ****** uid=testuser1 inetuserstatus \
  sunAMAuthInvalidAttemptsData pwdFailureTime pwdAccountLockedTime

dn: uid=testuser1,ou=test,dc=example,dc=com
sunAMAuthInvalidAttemptsData:: PEludmFsaWRQYXNzd29yZD48SW52YWxpZENvdW50PjA8L0
  ludmFsaWRDb3VudD48TGFzdEludmFsaWRBdD4wPC9MYXN0SW52YWxpZEF0PjxMb2NrZWRvdXRBd
  D4wPC9Mb2NrZWRvdXRBdD48QWN0dWFsTG9ja291dER1cmF0aW9uPjA8L0FjdHVhbExvY2tvdXRE
  dXJhdGlvbj48L0ludmFsaWRQYXNzd29yZD4=
inetuserstatus: Inactive
pwdFailureTime: 20140422125819.918Z
pwdFailureTime: 20140422125913.151Z
pwdFailureTime: 20140422125944.771Z
pwdAccountLockedTime: 20140422125944.771Z
There are now three values for the pwdFailureTime attribute – one for each password failure. The sunAMAuthInvalidAttemptsData attribute has been updated as follows:
<InvalidPassword><InvalidCount>0</InvalidCount><LastInvalidAt>0</LastInvalidAt>
  <LockedoutAt>0</LockedoutAt><ActualLockoutDuration>0</ActualLockoutDuration>
  </InvalidPassword>
You will note that the counters have all been reset to zero. That is because the user’s account has been inactivated by OpenAM by setting the value of the inetuserstatus attribute to Inactive. Additionally, the third invalid password caused OpenDJ to lock the account by setting the value of the pwdAccountLockedTime attribute to the value of the last password failure.
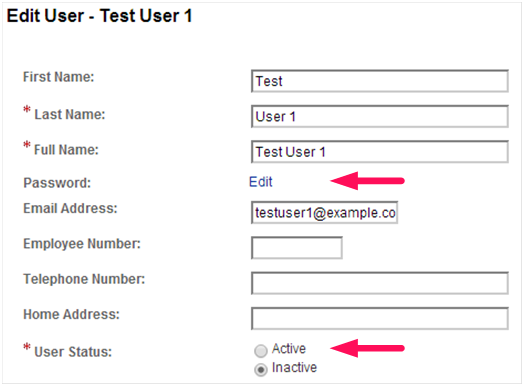
Now that the account is locked out, how do you unlock it? The natural thing for an OpenAM administrator to do is to reset the value of the inetuserstatus attribute and they would most likely use the OpenAM Console to do this as follows:

OpenAM Edit User Page (Change User Status)
The problem with this approach is that while the user’s status in OpenAM is now made active, the status in OpenDJ remains locked.
$ ldapsearch -D "cn=Directory Manager" -w ****** uid=testuser1 inetuserstatus \
  sunAMAuthInvalidAttemptsData pwdFailureTime pwdAccountLockedTime

dn: uid=testuser1,ou=test,dc=example,dc=com
sunAMAuthInvalidAttemptsData:: PEludmFsaWRQYXNzd29yZD48SW52YWxpZENvdW50PjA8L0
  ludmFsaWRDb3VudD48TGFzdEludmFsaWRBdD4wPC9MYXN0SW52YWxpZEF0PjxMb2NrZWRvdXRBd
  D4wPC9Mb2NrZWRvdXRBdD48QWN0dWFsTG9ja291dER1cmF0aW9uPjA8L0FjdHVhbExvY2tvdXRE
  dXJhdGlvbj48L0ludmFsaWRQYXNzd29yZD4=
inetuserstatus: Active
pwdFailureTime: 20140422125819.918Z
pwdFailureTime: 20140422125913.151Z
pwdFailureTime: 20140422125944.771Z
pwdAccountLockedTime: 20140422125944.771Z
Attempting to log in to OpenAM with this user’s account yields an authentication error that would make most OpenAM administrators scratch their head; especially after just resetting the user’s status.

OpenAM Authentication Failure Message
The trick to fixing this is to clear the pwdAccountLockedTime and pwdFailureTime attributes and the way to do this is by modifying the user’s password. Once again, the ldapmodify command can be used as follows:
$ ldapmodify -D "cn=Directory Manager" -w ****** <ENTER>
dn: uid=testuser1,ou=test,dc=example,dc=com <ENTER>
changetype: modify <ENTER>
replace: userPassword <ENTER>
userPassword: newpassword <ENTER>
<ENTER>
$ ldapsearch -D "cn=Directory Manager" -w ****** uid=testuser1 inetuserstatus \
  sunAMAuthInvalidAttemptsData pwdFailureTime pwdAccountLockedTime

dn: uid=testuser1,ou=test,dc=example,dc=com
sunAMAuthInvalidAttemptsData:: PEludmFsaWRQYXNzd29yZD48SW52YWxpZENvdW50PjA8L0
  ludmFsaWRDb3VudD48TGFzdEludmFsaWRBdD4wPC9MYXN0SW52YWxpZEF0PjxMb2NrZWRvdXRBd
  D4wPC9Mb2NrZWRvdXRBdD48QWN0dWFsTG9ja291dER1cmF0aW9uPjA8L0FjdHVhbExvY2tvdXRE
  dXJhdGlvbj48L0ludmFsaWRQYXNzd29yZD4=
inetuserstatus: Active
pwdChangedTime: 20140422172242.676Z
This, however, requires two different interfaces for managing the user’s account. An easier method is to combine the changes into one interface. You can modify the inetuserstatus attribute using ldapmodify or if you are using the OpenAM Console, simply change the password while you are updating the user’s status.
OpenAM Edit User Page (Change Password)
There are other ways to update one attribute by simply modifying the other. This can range in complexity from a simple virtual attribute to a more complex yet powerful custom OpenDJ plugin. But in the words of Voltaire, “With great power comes great responsibility.”
So go forth and wield your new found power; but do it in a responsible manner.
It’s OK to Get Stressed Out with OpenAM
In fact, it’s HIGHLY recommended….
Performance testing and stress testing are closely related and are essential tasks in any OpenAM deployment.

When conducting performance testing, you are trying to determine how well your system performs when subjected to a particular load. A primary goal of performance testing is to determine whether the system that you just built can support your client base (as defined by your performance requirements). Oftentimes you must tweak things (memory, configuration settings, hardware) in order to meet your performance requirements, but without executing performance tests, you will never know if you can support your clients until you are actually under fire (and by then, it may be too late).
Performance testing is an iterative process as shown in the following diagram:

Each of the states may be described as follows:
- Test – throw a load at your server
- Measure – take note of the results
- Compare – compare your results to those desired
- Tweak – modify the system to help achieve your performance results
During performance testing you may continue in this loop until such time that you meet your performance requirements – or until you find that your requirements were unrealistic in the first place.
Stress testing (aka “torture testing”) goes beyond normal performance testing in that the load you place on the system intentionally exceeds the anticipated capacity. The goal of stress testing is to determine the breaking point of the system and observe the behavior when the system fails.

Stress testing allows you to create contingency plans for those ‘worse case scenarios’ that will eventually occur (thanks to Mr. Murphy).
Before placing OpenAM into production you should test to see if your implementation meets your current performance requirements (concurrent sessions, authentications per second, etc.) and have a pretty good idea of where your limitations are. The problem is that an OpenAM deployment is comprised of multiple servers – each that may need to be tested (and tuned) separately. So how do you know where to start?
When executing performance and stress tests in OpenAM, there are three areas where I like to place my focus: 1) the protected application, 2) the OpenAM server, and 3) the data store(s). Testing the system as a whole may not provide enough information to determine where problems may lie and so I prefer to take an incremental approach that tests each component in sequence. I start with the data stores (authentication and user profile databases) and work my way back towards the protected application – with each iteration adding a new component.

Note: It should go without saying that the testing environment should mimic your production environment as closely as possible. Any deviation may cause your test results to be skewed and provide inaccurate data.
Data Store(s)
An OpenAM deployment may consist of multiple data stores – those that are used for authentication (Active Directory, OpenDJ, Radius Server, etc.) and those that are used to build a user’s profile (LDAP and RDBMS). Both of these are core to an OpenAM deployment and while they are typically the easiest to test, a misconfiguration here may have a pretty big impact on overall performance. As such, I start my testing at the database layer and focus only on that component.

Performance of an authentication database can be measured by the average number of authentications that occur over a particular period of time (seconds, minutes, hours) and the easiest way to test these types of databases is to simply perform authentication operations against them.
You can write your own scripts to accomplish this, but there are many freely available tools that can be used as well. One tool that I have used in the past is the SLAMD Distributed Load Generation Engine. SLAMD was designed to test directory server performance, but it can be used to test web applications as well. Unfortunately, SLAMD is no longer being actively developed, but you can still download a copy from http://dl.thezonemanager.com/slamd/.
A tool that I have started using to test authentications against an LDAP server is authrate, which is included in ForgeRock’s OpenDJ LDAP Toolkit. Authrate allows you to stress the server and display some really nice statistics while doing so. The authrate command line tool measures bind throughput and response times and is perfect for testing all sorts of LDAP authentication databases.
Performance of a user profile database is typically measured in search performance against that database. If your user profile database can be searched using LDAP (i.e. Active Directory or any LDAPv3 server), then you can use searchrate – also included in the OpenDJ LDAP Toolkit. searchrate is a command line tool that measures search throughput and response time.
The following is sample output from the searchrate command:
-------------------------------------------------------------------------------
     Throughput                            Response Time
   (ops/second)                           (milliseconds)
recent  average  recent  average  99.9%  99.99%  99.999%  err/sec  Entries/Srch
-------------------------------------------------------------------------------
 188.7    188.7   3.214    3.214  306.364 306.364  306.364    0.0           0.0
 223.1    205.9   2.508    2.831  27.805  306.364  306.364    0.0           0.0
 245.7    219.2   2.273    2.622  20.374  306.364  306.364    0.0           0.0
 238.7    224.1   2.144    2.495  27.805  306.364  306.364    0.0           0.0
 287.9    236.8   1.972    2.368  32.656  306.364  306.364    0.0           0.0
 335.0    253.4   1.657    2.208  32.656  306.364  306.364    0.0           0.0
 358.7    268.4   1.532    2.080  30.827  306.364  306.364    0.0           0.0
The first two columns represent the throughput (number of operations per second) observed in the server. The first column contains the most recent value and the second column contains the average throughput since the test was initiated (i.e. the average of all values contained in column one).
The remaining columns represent response times with the third column being the most recent response time and the fourth column containing the average response time since the test was initiated. Columns five, six, and seven (represented by percentile headers) demonstrate how many operations fell within that range.
For instance, by the time we are at the 7th row, 99.9% of the operations are completed in 30.827 ms (5th column, 7th row), 99.99% are completed in 306.364 ms (6th column, 7th row), and 99.999% of them are completed within 306.364 ms (7th column, 7th row). The percentile rankings provide a good indication of the real system performance and can be interpreted as follows:
- 1 out of 1,000 search requests is exceeding 30 ms
- 1 one out of 100,000 requests is exceeding 306 ms
Note: The values contained in this search were performed on an untuned, limited resource test system. Results will vary depending on the amount of JVM memory, the system CPU(s), and the data contained in the directory. Generally, OpenDJ systems can achieve much better performance that the values shown above.
There are several factors that may need to be considered when tuning authentication and user profile databases. For instance, if you are using OpenDJ for your database you may need to modify your database cache, the number of worker threads, or even how indexing is configured in the server. If your constraint is operating system based, you may need to increase the size of the JVM or the number of file descriptors. If the hardware is the limiting factor, you may need to increase RAM, use high speed disks, or even faster network interfaces. No matter what the constraint, you should optimize the databases (and database servers) before moving up the stack to the OpenAM instance.
OpenAM Instance + Data Store(s)
Once you have optimized any data store(s) you can now begin testing directly against OpenAM as it is configured against those data store(s). Previous testing established a performance baseline and any degradation introduced at this point will be due to OpenAM or the environment (operating system, Java container) where it has been configured.

But how can you test an OpenAM instance without introducing the application that it is protecting? One way is to generate a series of authentications and authorizations using direct interfaces such as the OpenAM API or REST calls. I prefer to use REST calls as this is the easiest to implement.
There are browser based applications such as Postman that are great for functional testing, but these are not easily scriptable. As such, I lean towards a shell or Perl script containing a loop of cURL commands.
Note: You should use the same authentication and search operations in your cURL commands to be sure that you are making a fair comparison between the standalone database testing and the introduction of OpenAM.
You should expect some decrease in performance when the OpenAM server is introduced, but it should not be too drastic. If you find that it falls outside of your requirements, however, then you should consider updating OpenAM in one of the following areas:
- LDAP Configuration Settings (i.e. connections to the Configuration Server)
- Session Settings (if you are hitting limitations)
- JVM Settings (pay particular attention to garbage collection)
- Cache Settings (size and time to live)
Details behind each of these areas can be found in the OpenAM Administration Guide.
You may also find that OpenAM’s interaction with the database(s) introduces searches (or other operations) that you did not previously test for. This may require you to update your database(s) to account for this and restart your performance testing.
Note: Another tool I have started playing with is the Java Application Monitor (aka JAMon). While this tool is typically used to monitor a Java application, it provides some useful information to help determine bottlenecks working with databases, file IO, and garbage collection.
Application + OpenAM Instance + Data Store(s)
Once you feel comfortable with the performance delivered by OpenAM and its associated data store(s), it is time to introduce the final component – the protected application, itself.
This will differ quite a bit based on how you are protecting your application (for instance, policy agents will behave differently from OAuth2/OpenID Connect or SAML2) but this does provide you with the information you need to determine if you can meet your performance requirements in a production deployment.
If you have optimized everything up to this point, then the combination of all three components will provide a full end to end test of the entire system. In this case, then an impact due to network latency will be the most likely factor in performance testing.
To perform a full end to end test of all components, I prefer to use Apache JMeter. You configure JMeter to use a predefined set of credentials, authenticate to the protected resource, and look for specific responses from the server. Once you see those responses, JMeter will act according to how you have preconfigured it to act. This tool allows you to generate a load against OpenAM from login to logout and anything in between.
Other Considerations
Keep in mind that any time that you introduce a monitoring tool into a testing environment, the tool (itself) can impact performance. So while the numbers you receive are useful, they are not altogether acurate. There may be some slight performance degradation (due to the introduction of the tool) that your users will never see.
You should also be aware that the client machine (where the load generation tools are installed) may become a bottleneck if you are not careful. You should consider distributing your performance testing tools across multiple client machines to minimize this effect. This is another way of ensuring that the client environment does not become the limiting factor.
Summary
Like many other areas in our field, performance testing an OpenAM deployment may be considered as much of an art as it is a science. There may be as many methods for testing as there are consultants and each varies based on the tools they use. The information contained here is just one approach performance testing – one that I have used successfully in our deployments.
What methods have you used? Feel free to share in the comments, below.
Understanding the iPlanetDirectoryPro Cookie
So you have run into problems with OpenAM and you are now looking at the interaction between the Browser and the OpenAM server. To assist you in your efforts you are using a plug-in like LiveHttpHeaders, SAML Tracer, or Fiddler and while you are intently studying “the dance” (as I like to call it), you come across a cookie called iPlanetDirectoryPro that contains a value that looks like something your two year old child randomly typed on the keyboard.
AQIC5wM2LY4Sfcy954IRN6Ixz7ZMwVdJkGlqr9urGirFNMQ.*AAJTSQACMDMAAlNLAAoxODIyMjQ4MDI0AAJTMQACMDI.*;
So what is this cookie and what do its contents actually mean?
I’m glad that you asked. Allow me to explain.
OpenAM Sessions
When a user successfully authenticates against an OpenAM server, a session is generated on that server. The session is nothing more than an object stored in the memory of the OpenAM server where it was created. The session contains information about the interaction between the client and the server. In addition to other things, the session will contain a session identifier, session times, the method used by the user to authenticate, and the user’s identity. The following is a snippet of the information contained in a user’s OpenAM session.
sessionID: AQIC5wM…
maxSessionTime: 120
maxIdleTime: 30
timeLeft: 6500
userID: bnelson
authLevel: 1
loginURL:/auth/UI/Login
service: ldapService
locale: en_US
Sessions are identified using a unique token called SSOTokenID. This token contains the information necessary to locate the session on the server where it is currently being maintained. The entire value of the iPlanetDirectoryPro cookie is the SSOTokenID.
SSOTokenID = AQIC5wM2LY4Sfcy954IRN6Ixz7ZMwVdJkGlqr9urGirFNMQ.*AAJTSQACMDMAAlNLAAoxODIyMjQ4MDI0AAJTMQACMDI.*;
While this may look like gibberish, it actually has meaning (and is actually quite useful).
The period (.) in the middle of the SSOTokenID is a delimiter that separates the SSOToken from the Session Key.
![]()
The SSOToken is a C66Encoded string that points to the session in memory. The Session Key is a Base64 Encoded string that identifies the location of the site and server where the session is being maintained. Additionally, the Session Key contains the storage key of the session should you need to identify it in a persistent storage location (such as the amsessiondb [OpenAM v10.0 or lower] or the OpenDJ CTS Store [OpenAM v10.1 or higher]).
So separating the SSOTokenID into its two components you will find the following:
SSOToken: AQIC5wM2LY4Sfcy954IRN6Ixz7ZMwVdJkGlqr9urGirFNMQ
Session Key: *AAJTSQACMDMAAlNLAAoxODIyMjQ4MDI0AAJTMQACMDI.*;
As previously indicated, the Session Key is a Base64 Encoded value. That means that you can decode the Session Key into meaningful information using Base64 Decoders.
| Note: A useful site for this is http://www.base64decode.org/. |
Running the Session Key listed above through a Base64 decoder yields the following
SI03SK1822248024S102
And can be broken down as follows:
Site: SI03
Server: S102
Storage Key: SK1822248024
| Note: The session key is a Base64 encoded Java DataInputStream. As such, the decoded data includes a combination of both discernible and non-discernible data. The output of running the session key through a Base64 decoder is similar to performing a UNIX ‘strings’ command on a binary database. The good thing is that the key bits of data are discernible (as shown above). |
This information tells you that the session identified by the SSOToken (AQIC5wM2LY4Sfcy954IRN6Ixz7ZMwVdJkGlqr9urGirFNMQ) is being maintained on server 02 in site 03 and is being persisted to the database and may be identified by storage key 1822248024.
| IMPORTANT:The SI and S1 keys have different meanings depending on whether the server belongs to a site or not. If the server belongs to a site, then SI contains the primary site’s ID and S1 contains the server’s ID. This is shown in the example, above. If the server does not belong to a site, then SI contains the server’s ID.
Since 10.1.0-Xpress the Storage Key is always part of the session ID. |
This may be useful information for debugging, but it is essential information for OpenAM – especially in cases where a load balancer may be configured incorrectly.
Session Stickiness
Another important cookie in OpenAM is amlbcookie. This cookie defines the server where the session is being maintained (i.e. amlbcookie=02) and should be used by load balancers to maintain client stickiness with that server. When used properly, the amlbcookie allows a client to be directed to the server where the session is available. If, however, a client ends up being sent to a different server (due to an incorrectly configured load balancer or the primary server being down) then the new OpenAM server can simply look at the information contained in the Session Key to determine the session’s location and request the session from that server.
| Note: Obtaining the session from another properly working OpenAM server is referred to as “cross talk” and should be avoided if at all possible. The additional overhead placed on both the OpenAM servers and the network can reduce overall performance and can be avoided by simply configuring the load balancer properly. |
Cross Talk Example
If Server 02 in Site 03 is maintaining the session and the client is sent to Server 01, then Server 01 can query Server 02 and ask for the session identified by the SSOToken value. Server 02 would send the session information to Server 01 where the request can now be serviced. If Server 01 needs to update any session information , then it does so by updating the session stored on Server 02. As long as Server 02 remains available, the session is maintained on that server and as such, the communication between Server 01 and Server 02 can become quite “chatty”.
Session Failover Example
If Server 02 in Site 03 is maintaining the session and the client is sent to Server 01, then Server 01 can query Server 02 and ask for the session identified by the SSOToken value. If Server 02 is offline (or doesn’t respond), then Server 01 can obtain the session from the session store (amsessiondb or OpenDJ CTS) using the Storage Key value.
| Note: Session persistence is not enabled by default. |
So now you know and you can stop blaming your two year old child.
How to Configure OpenAM Signing Keys
The exchange of SAML assertions between an Identity Provider (IdP) and a Service Provider (SP) uses Public-key Cryptography to validate the identity of the IdP and the integrity of the assertion.
Securing SAML Assertions
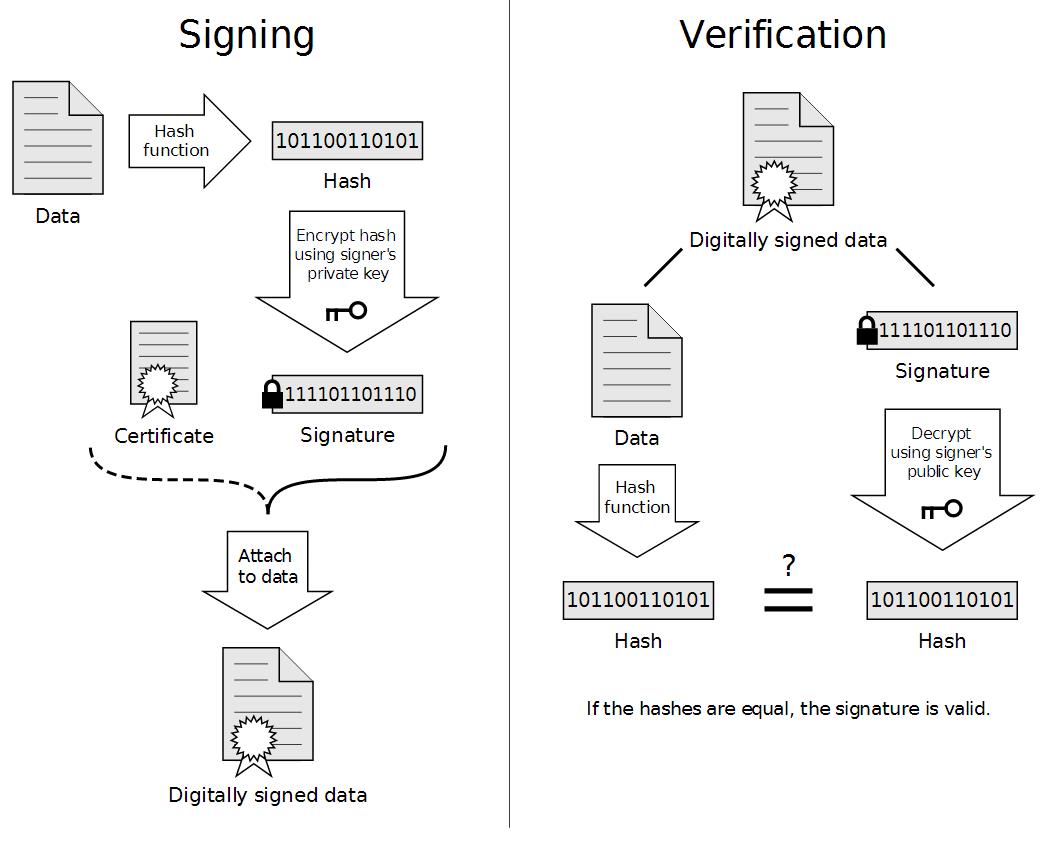
SAML assertions passed over the public Internet will include a digital signature signed by an Identity Provider’s private key. Additionally, the assertion will include the IdP’s public key contained in the body of a digital certificate. Service Providers receiving the assertion can be assured that it has not been tampered with by comparing the unencrypted (hashed) message obtained from the digital signature with a hashed version of the message created by the Service Provider using the same hashing algorithm.
The process can be demonstrated by the following diagram where the Signing process is performed by the IdP and the Verification process is performed by the SP. The “Data” referred to in the diagram is the assertion and the “Hash function” is the hashing algorithm used by both the Identity Provider and the Service Provider.
In order for an Identity Provider to sign the assertion, they must first have a digital certificate.
OpenAM includes a default certificate that can use for testing purposes. This certificate is common to all installations and while convenient, should not be used for production deployments. Instead, you should either use a certificate obtained from a trusted certificate authority (such as Thawte or Entrust) or generate your own self-signed certificate.
Note: For the purposes of this article, $CONFIG refers to the location of the configuration folder specified during the installation process. $URI refers to the URI of the OpenAM application; also specified during the installation process (i.e. /openam).
OpenAM’s Default Signing Key
OpenAM stores its certificates in a Java Keystore file located in the $CONFIG/$URI folder by default. This can be found in the OpenAM Console as follows:
- Log in to the OpenAM Console as the administrative user.
- Select the Configuration tab.
- Select the Servers and Sites subtab.
- In the Servers panel, select the link for the appropriate server instance.
- Select the Security tab.
- Select the Key Store link at the top of the page.
You will see that the default location for the Java Keystore file, all passwords, and the alias of the default test certificate as follows:

Viewing the Contents of OpenAM’s Default Certificate
You can view the contents of this file as follows:
- Change to the $CONFIG/$URI folder.
- Use the Java keytool utility to view the contents of the file. (Note: The contents of the file are password protected. The default password is: changeit)
# keytool –list –keystore keystore.jks
Enter keystore password: changeit
Keystore type: JKS
Keystore provider: SUN
Your keystore contains 1 entry
Alias name: test
Creation date: Jul 16, 2008
Entry type: PrivateKeyEntry
Certificate chain length: 1
Certificate[1]:
Owner: CN=test, OU=OpenSSO, O=Sun, L=Santa Clara, ST=California, C=US
Issuer: CN=test, OU=OpenSSO, O=Sun, L=Santa Clara, ST=California, C=US
Serial number: 478d074b
Valid from: Tue Jan 15 19:19:39 UTC 2008 until: Fri Jan 12 19:19:39 UTC 2018
Certificate fingerprints:
MD5: 8D:89:26:BA:5C:04:D8:CC:D0:1B:85:50:2E:38:14:EF
SHA1: DE:F1:8D:BE:D5:47:CD:F3:D5:2B:62:7F:41:63:7C:44:30:45:FE:33
SHA256: 39:DD:8A:4B:0F:47:4A:15:CD:EF:7A:41:C5:98:A2:10:FA:90:5F:4B:8F:F4:08:04:CE:A5:52:9F:47:E7:CF:29
Signature algorithm name: MD5withRSA
Version: 1
*******************************************
*******************************************
Replacing OpenAM’s Default Keystore
You should replace this file with a Java Keystore file containing your own key pair and certificate. This will be used as the key for digitally signing assertions as OpenAM plays the role of a Hosted Identity Provider. The process for performing this includes five basic steps:
- Generate a new Java Keystore file containing a new key pair consisting of the public and private keys.
- Export the digital certificate from the file and make it trusted by your Java installation.
- Generate encrypted password files that permit OpenAM to read the keys from the Java Keystore.
- Replace OpenAM’s default Java Keystore and password files with your newly created files.
- Restart OpenAM.
The following provides the detailed steps for replacing the default Java Keystore.
1. Generate a New Java Keystore Containing the Key Pair
a) Change to a temporary folder where you will generate your files.
# cd /tmp
b) Use the Java keytool utility to generate a new key pair that will be used as the signing key for your Hosted Identity Provider.
# keytool -genkeypair -alias idfsigningkey -keyalg RSA -keysize 1024 -validity 730 -storetype JKS -keystore keystore.jks
Enter keystore password: cangetin
Re-enter new password: cangetin
What is your first and last name?
[Unknown]: idp.identityfusion.com
What is the name of your organizational unit?
[Unknown]: Security
What is the name of your organization?
[Unknown]: Identity Fusion
What is the name of your City or Locality?
[Unknown]: Tampa
What is the name of your State or Province?
[Unknown]: FL
What is the two-letter country code for this unit?
[Unknown]: US
Is CN=idp.identityfusion.com, OU=Security, O=Identity Fusion, L=Tampa, ST=FL, C=US correct?
[no]: yes
Enter key password for <signingKey>
(RETURN if same as keystore password): cangetin
Re-enter new password: cangetin
You have now generated a self-signed certificate but since it has been signed by you, it is not automatically trusted by other applications. In order to trust the new certificate, you need to export it from your keystore file, and import it into the cacerts file for your Java installation. To accomplish this, perform the following steps:
2. Make the Certificate Trusted
a) Export the self-signed certificate as follows:
# keytool -exportcert -alias idfsigningkey -file idfSelfSignedCert.crt -keystore keystore.jks
Enter keystore password: cangetin
Certificate stored in file <idfSelfSignedCert.crt>
b) Import the certificate into the Java trust store as follows:
# keytool -importcert -alias idfsigningkey -file idfSelfSignedCert.crt -trustcacerts -keystore /usr/lib/jvm/java-7-oracle/jre/lib/security/cacerts
Enter keystore password: changeit
Owner: CN=idp.identityfusion.com, OU=Security, O=Identity Fusion, L=Tampa, ST=FL, C=US
Issuer: CN=idp.identityfusion.com, OU=Security, O=Identity Fusion, L=Tampa, ST=FL, C=US
Serial number: 34113557
Valid from: Thu Jan 30 04:25:51 UTC 2014 until: Sat Jan 30 04:25:51 UTC 2016
Certificate fingerprints:
MD5: AA:F3:60:D1:BA:1D:C6:64:61:7A:CC:16:5E:1C:12:1E
SHA1: 4A:C3:7D:0E:4C:D6:4C:0F:0B:6B:EC:15:5A:5B:5E:EE:BB:6A:A5:08
SHA256: A8:22:BE:79:72:52:02:6C:30:6E:86:35:DA:FD:E0:45:6A:85:2C:FE:AA:FB:69:EA:87:30:65:AF:2E:65:FB:EB
Signature algorithm name: SHA256withRSA
Version: 3
Extensions:
#1: ObjectId: 2.5.29.14 Criticality=false
SubjectKeyIdentifier [
KeyIdentifier [
0000: 12 3B 83 BE 46 D6 D5 17 0F 49 37 E4 61 CC 89 BE .;..F….I7.a…
0010: 6D B0 5B F5 m.[.
]
]
Trust this certificate? [no]: yes
OpenAM needs to be able to open the truststore (keystore.jks) and read the key created in step 1. The private key and truststore database have both been locked with a password that you entered while configuring the truststore and signing key, however. For OpenAM to be able to read this information you need to place these passwords in files on the file system.
3. Generate Encrypted Password Files
Note: The passwords will start out as clear text at first, but will be encrypted to provide secure access.
a) Create the password file for the trust store as follows:
# echo “cangetin” > storepass.cleartext
b) Create the password file for the signing key as follows:
# echo “cangetin” > keypass.cleartext
c) Prepare encrypted versions of these passwords by using the OpenAM ampassword utility (which is part of the OpenAM administration tools).
# ampassword –encrypt keypass.cleartext > .keypass
# ampassword –encrypt storepass.cleartext > .storepass
Note: Use these file names as you will be replacing the default files of the same name.
4. Replace the Default OpenAM Files With Your New Files
a) Make a backup copy of your existing keystore and password files.
# cp $CONFIG/$URI/.keypass $CONFIG/$URI/.keypass.save
# cp $CONFIG/$URI/.storepass $CONFIG/$URI/.storepass.save
# cp $CONFIG/$URI/keystore.jks $CONFIG/$URI/keystore.jks.save
b) Overwrite the existing keystore and password files as follows:
# cp .keypass $CONFIG/$URI/.keypass
# cp .storepass $CONFIG/$URI/.storepass
# cp keystore.jks $CONFIG/$URI/keystore.jks
5. Restart the container where OpenAM is currently running.
This will allow OpenAM to use the new keystore and read the new password files.
Verifying Your Changes
You can use the keytool utility to view the contents of your Keystore as previously mentioned in this article. Alternately, you can log in to the OpenAM Console and see that OpenAM is using the new signing key as follows:
- Log in to OpenAM Console.
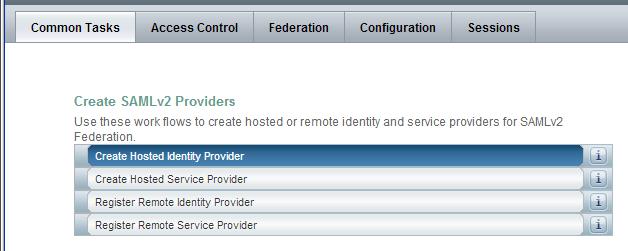
- Select the Common Tasks tab.
- Select the Create Hosted Identity Provider option beneath the Create SAMLv2 Providers section.
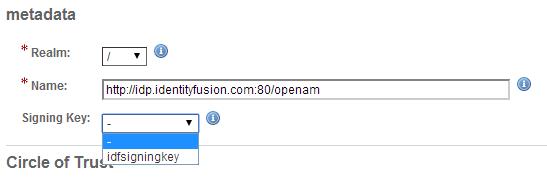
Verify that you now see your new signing key appear beneath the Signing Key option as follows:
You have now successfully replaced the default OpenAM Java Keystore with your own custom version.
OpenDJ Indexes Explained
Suppose that you have an OpenDJ directory server with 300,000 entries. And further suppose that the space consumed on your disk for said directory is 1.2 GB and made up of 114 database (*.jdb) files. Suppose that you didn’t plan correctly and you are now running out of space on your hard drive. What should you do? Run to your local System Administrator and beg for him to increase the size of your partition? Before promising to buy him lunch for the next year or offering your first born child to mow his lawn, look to see if you actually need that much space in the first place.
In general, the size of your database is based on three things:
- The number of entries in your database
- The size of an average entry
- Your indexing strategy
The first two items are relatively straight forward as you probably have a good idea of your data profile, but an improper indexing strategy can take you by surprise and may actually cause more harm than good. Indexes are used to increase search performance based on application search filters. Lack of necessary indexes can impact performance, increase aggravation, and lead to calls in the middle of the night. But maintaining indexes that are never used can unnecessarily increase disk space and impact the performance of write operations.
Default Indexes
OpenDJ comes with the following default indexes:
|
Attribute |
Presence |
Equality |
Substring |
Order |
|
| aci |
x |
operational | |||
| cn |
x |
x |
standard | ||
| ds-sync-conflict |
x |
operational | |||
| ds-sync-hist |
x |
operational | |||
| entryUUID |
x |
operational | |||
| givenName |
x |
x |
standard | ||
|
x |
x |
standard | |||
| member |
x |
standard | |||
| objectclass |
x |
standard | |||
| sn |
x |
x |
standard | ||
| telephonenumber |
x |
x |
standard | ||
| uid |
x |
standard | |||
| uniquemember |
x |
standard |
Indexes on operational attributes are necessary to make OpenDJ run efficiently. You should never modify these unless instructed to do so by ForgeRock support. Standard attributes, however, are used to increase external application search performance and should reflect the types of searches being performed by your own applications. Default attributes (and index types) are based on ForgeRock’s observations of what most of its customers use, but you may not be like most of their customers and while maintaining some index types can be relatively benign, others (like SUBSTRING) may have a more dramatic effect.
Using Indexes to Increase Search Performance
From a high level perspective, indexes are used to identify likely candidates that might be found as a result of an application’s search filter. Assume, for instance, that you have a simple phone book application that allows you to search for phone numbers based on first name and last name. A filter to locate all entries that have a first name (givenname) of “Bill” would be:
(givenname=Bill)
But not every entry in your OpenDJ server has a givenname attribute with a value of “Bill” so looking at every entry to see if it matches may take a lot of time. But how can you avoid looking at every entry? The answer is simple; you create an index for the givenname attribute to narrow down your search. Simply add an EQUALITY index for the givenname attribute and OpenDJ will associate all entries in its database with those that have a particular value. The following is a conceptual representation of how OpenDJ will make this association:
givenname=Bill:      1,3,9,22

givenname=Ralph:     2,11

givenname=Wally:     4,5,6,7,8,10

givenname=Wild Bill: 12

givenname=Billy:     13,15,21

givenname=Silly:     14

….
This demonstrates that the givenname value for entries 1, 3, 9, and 22 are all “Bill”. When OpenDJ receives a search for all entries that have a first name of “Bill”, it immediately knows that a match is found in records 1, 3, 9 and 22. It doesn’t even look at the other entries. In a database that contains hundreds of thousands of entries, this can drastically increase search performance.
This is all well and fine, but how can indexes actually impact us?
How Unnecessary Indexes Can Hurt You
Imagine that you met a coworker at a party last night and you didn’t quite get his name. You seem to remember his name was Bill, but you heard people call him Bill, Billy, Wild Bill, and even Bill-O-Rama. You want to look him up, but you can’t because you really aren’t sure about his first name. Hopefully your same phone book application allows you to search for all entries that contain the string, “Bill”. If so, an EQUALITY index would not work as you really don’t know the specifics of what you are looking for. In this case you would create a SUBSTRING index for the givenname attribute. In so doing, OpenDJ will associate substrings with entries as follows:
givenname=*Bill:  1,3,9,12,13,15,21,22

givenname=*illy:  13,14,15,21

givenname=*Wild:  12

givenname=*ild :  12

givenname=*ld B:  12

givenname=*d Bi:  12

givenname=*Ralp:  2,11

givenname=*alph:  2,11

givenname=*ally:  4,5,6,7,8,10

….
| Note: OpenDJ created entries for substrings consisting of four or more characters. These include the beginning of string (^) and end of string ($) characters; the shorter the string, the fewer entries that are created. Imagine how many entries would be generated if the attribute contained a value of ‘supercalifragilisticexpialidocious’! |
There are times when maintaining indexes may actually be more costly than if you were to perform an unindexed search (i.e. evaluate every entry in the directory server). To prevent this, OpenDJ provides the ds-cfg-index-entry-limit configuration parameter that allows you to define an upper limit on the number of indexes maintained for an attribute. There is a global (default) value of 4000 for this parameter, but it may also be configured on a per indexed attribute basis. A value of 4000 means that OpenDJ will stop generating index values once it reaches 4000 index entries. A minor problem is that you can maintain up to 4000 index entries for attributes that are never included in a search filter. A bigger problem, however, is that each time a write operation is performed that includes the indexed attribute, the indexes for that attribute are rebuilt. If your OpenDJ server is subject to extensive write operations, then you may be constantly writing and rewriting your database files which may impact write performance and ultimately overall server performance. (See “Unlocking the Mystery behind the OpenDJ User Database” for more information on how, when, and why the database files are rewritten on change operations.)
Determining Whether an Index is Necessary or Not
A recommendation is to maintain only those indexes for attributes that are included in your application search filters. The types of indexes selected should reflect the manner of searches being performed by your application. To determine this, you can review your LDAP-enabled applications and attempt to ascertain the types of filters it may be producing; but this may not be so obvious.
A more realistic approach is to come up with a “best guess” and then monitor your server to see if your guess was accurate or not. You can then add, delete, or modify attribute indexes based on your findings.
When to Add Indexes
You should monitor your access logs for searches that take a long time and consider adding indexes for search times that you find unacceptable. This can be seen in the etime (or elapsed time) value which is displayed in milliseconds (by default). This is subject to your own SLAs, but etimes greater than 5 milliseconds may be considered unacceptable. If you see etimes in the order of seconds (as shown below) then you definitely need to investigate further.
[31/Dec/2013:18:07:21 +0000] SEARCH RES conn=2231288 op=6 msgID=502 result=0 nentries=1 unindexed etime=5836
This access log entry indicates that the search took 5.8 seconds to complete. One reason why it took so long was that it was an unindexed search (as noted by the “unindexed” tag in the entry). To determine the filter associated with this search, you need to search backwards in the access log and find the corresponding SEARCH REQ for this connection (conn=2231288) and this operation (op=6).
[31/Dec/2013:18:07:15 +0000] SEARCH REQ conn=2231288 op=6 msgID=502 base="ou=people,dc=example,dc=com" scope=wholeSubtree filter="(&(&(exampleGUID=88291000818)(objectclass=inetorgperson)))" attrs="*"
This access log entry indicates that the filter used to perform the search is
(&(&(exampleGUID=88291000818)(objectclass=inetorgperson)))
OpenDJ contains a default EQUALITY index for objectclass so assuming that you have not modified the default indexes, then the unindexed attribute causing the problem is exampleGUID. Now that you have identified the culprit, should you run right out and create an EQUALITY index for this attribute? Not necessarily. It really depends on how often you see searches of this type appear in the access logs and what their impact might be. You don’t want to maintain exampleGUID indexes if your application only searches on this attribute once in a blue moon. If, however, you see this type of search on a consistent basis, you might want to consider adding an index.
When to Remove Unnecessary Indexes
It is relatively straightforward to determine when to add indexes, but how do you know when you are maintaining unnecessary indexes? Unfortunately, OpenDJ does not include utilities to tell you this, but it is possible to determine unused indexes by once again, reviewing the search filters in the access logs. One approach to accomplishing this would be to perform the following:
- Determine attribute names included in the search filter.
- Determine type of search being performed (EQUALITY, SUBSTRING, PRESENCE, etc.)
- Determine the frequency of the searches.
- Compare the searches to the already configured indexes.
- Remove unnecessary indexes (if desired).
It is pretty easy to write a script to perform these steps and fortunately one has already been written by Chris Ridd to perform steps 1 through 4. His topfilters script can be found here. Once armed with the information from his script you would simply compare it to what you already have configured for OpenDJ.
How to Determine Current Indexes and Index Types
Current indexes are reflected beneath the cn=config suffix of your OpenDJ server. You can either query this suffix as the rootDN user or you can simply view the contents of the config.ldif file to see what indexes have been configured.
dn: ds-cfg-attribute=givenName,cn=Index,ds-cfg-backend-id=userRoot,cn=Backends,cn=config

objectClass: top

objectClass: ds-cfg-local-db-index

ds-cfg-index-type: equality

ds-cfg-index-type: substring

ds-cfg-attribute: givenName
Another method is to use the dbtest command to obtain a more detailed analysis on each index. The dbtest command can be found in the bin directory of your OpenDJ installation. An example execution of this command might be:
/opt/opendj/bin/dbtest list-index-status -b "dc=example,dc=com" -n userRoot
Execution of this command will return each index, its type, the database it is associated with, whether the index is valid or not, and the number of records associated with the index. It will also detail the undefined index keys that are not maintained due to the ds-cfg-index-entry-limit being reached for that attribute.
You can take the data returned from Chris’ script, compare it with the data found for those indexes you are currently maintaining and make an intelligent decision as to whether you want to modify your indexes in any way.
Should you delete any indexes that you believe are not being used? Again, not necessarily. Your access logs only reflect a point in time and may not provide a comprehensive listing of application search filters. You should always carefully consider removing existing indexes, but if you find that you have made a mistake, you can always monitor the access log for searches that are taking an unacceptably long time – or wait for that 3:00 am phone call to let you know.
Configuring Indexes
If you do decide it is necessary to update your indexes, then the best approach is to do so using the OpenDJ Control Panel or the dsconfig command line tool. You should never update the config.ldif file directly.
The following provides an overview of how to add a new index for the exampleGUID attribute. The index type is set to EQUALITY.
/opt/opendj/bin/dsconfig create-local-db-index --port 4444 --hostname ldap1.example.com --bindDN "cn=Directory Manager" --bindPassword password
--backend-name userRoot  --index-name exampleGUID  --set index-type:equality

--trustAll
The following provides an overview of how to remove an existing EQUALITY index type from an existing mail index.
/opt/opendj/bin/dsconfig  set-local-db-index-prop --port 4444  --hostname ldap1.example.com  --bindDN "cn=Directory Manager" --bindPassword password

--backend-name userRoot  --index-name mail  --remove index-type:equality

--trustAll
If you would rather remove the entire mail index, use the following command, instead.
/opt/opendj/bin/dsconfig  delete-local-db-index  --port 4444  --hostname ldap1.example.com  --bindDN "cn=Directory Manager" --bindPassword password

--backend-name userRoot  --index-name mail  --trustAll
Rebuilding Indexes
OpenDJ automatically updates indexes on LDAP operations that update the database. Adding or deleting an index or an index value is a configuration change, however, and does not affect index values already in the database. If you delete an index type, existing index values will remain in the database until you rebuild the index. The same is true if you add a new index or index type. Indexes will not be added for existing database entries until you rebuild the index.
As such, any configuration changes to indexes should be followed by a rebuilding of the appropriate index. The following provides an overview of how to rebuild the mail index once its configuration has changed.
/opt/opendj/bin/rebuild-index -p 4444 -D "cn=Directory Manager" -w password -b "dc=example,dc=com" --index mail --start 0 --trustAll
| Note: It is not necessary to stop the OpenDJ instance before performing this task. It has been my experience, however, that if you are able to stop the server you might want to consider doing so. If so, then you do not need to specify a start time, bind credentials, or the trust acceptance. These are not necessary as you will be initiating the connection immediately and directly to the database. |
Debugging Index Problems
There are times when you may see performance problems that indicate that you are performing an unindexed search, but when you look at the indexes, you find that the appropriate index has been configured.
| Note: This problem typically occurs when you do not rebuild the index after you have configured it. Essentially, there is already data in the database when the indexes were applied. In such cases, OpenDJ will not attempt to update the index until an initial rebuild-index has been performed. |
One method of debugging this problem is to use the debugsearchindex capability in OpenDJ.
If you perform your search and request that the debugsearchindex attribute be returned as follows:
/opt/opendj/bin/ldapsearch -D "cn=Directory Manager" -w cangetin -b "ou=people,dc=example,dc=com" -s sub "(&(&( exampleGUID=88291000818)(objectclass=inetorgperson)))" debugsearchindex
OpenDJ will emulate the search, but will not actually perform it against the database. Instead, it will tell you how the search is to be performed and whether or not the values are indexed or not as follows:
dn: cn=debugsearch

debugsearchindex: filter=(&(&( exampleGUID=88291000818)[NOT-INDEXED](object

Class=inetorgperson)[INDEX:objectClass.equality][LIMIT-EXCEEDED])[NOT-INDEXED])

[NOT-INDEXED] scope=wholeSubtree[LIMIT-EXCEEDED:30] final=[NOT-INDEXED]
If you see something like this but your configuration tells you that the indexes have been configured, then it is time to send your LDAP administrator to training.
Summary
As with most middleware products knowing when and how to configure indexes can be as much of an art as it is a science. You should follow best practices where possible, but as with other products you should monitor your server to see if those practices apply to you and react where appropriate.
Living a Passionate Life

You may (or may not) have noticed that I have been visibly absent from posting over the past few months. The long and the short of it is that quite a few things have happened in my life which have led me to focus on, well…, my life.
The biggest impact was the loss of my mother to lung cancer back in October. For those of you privileged to know her, she was quite the lady and she kept her wit and humor intact to the very end. For the most part, her passing was relatively quick and heaven truly gained an angel that day. She was a profound influence in my life and I will miss her deeply. I kept this event pretty much to myself, but for those of you who were aware and comforted me during this troubling time, thank you. My mom always kept things to herself (including her health issues); maybe I am more like her than I originally thought.

Not long after her passing I had to travel out of the country for business. My journey took me to the island of New Caledonia – a French territory northeast of Australia. That was roughly a 22 hour trip and during that time, I was able to think about my life, where I currently was, and where I wanted to be.
What I realized during that time is that in many areas of my life I was simply going through the motions. I was reminded of the following quote from Steve Jobs,
“The only way to do great work is to love what you do. If you haven’t found it yet, keep looking. Don’t settle. As with all matters of the heart, you’ll know when you find it.”

Our time on earth is too short to live without passion but that is exactly what I was doing – and exactly what I promised myself I would never do. I came to the realization that I was settling in way too many areas of my life and it was time for a change.
pas·sion
noun \ˈpa-shən\
: a strong feeling of enthusiasm or excitement for something or about doing something
They say that you should never make big decisions right after a life changing event, but I have never been one to listen to advice when my heart tells me otherwise. As such, I resigned from my job at Continuum Labs to return to the pursuit of my dreams. Continuum is a great company and I truly believe in their products and services; I just didn’t feel like my contributions were enough to warrant my being there. And those that I was making were not aligned with my passions; it was time for me to reboot my career. I will always be their biggest fan and can only hope that in some small way my tenure has made a positive impact. I will no longer work with my close Continuum friends on a daily basis, but something tells me that we will work together again some day; I look forward to that day. (BTW, if you haven’t had a chance to check out their latest app, CareSync, I HIGHLY recommend it. You will never look at your healthcare the same way again.)
So what am I doing now? My LinkedIn profile says that I am an independent consultant with a company called ForgeRock. What that essentially means is that I am refocusing my career on those areas that make me want to jump out of bed each morning: privacy, identity, trust, and making the Internet a safer place to be. I am continuing to work on the security projects that helped make me Platinum with both Marriott and Delta this year, but I am using my downtime to work on my own security-focused applications and services. While they might not be as sexy as CareSync, I believe there is a definite need for what I am envisioning; but only time will tell. In the meantime, stay tuned.

An unexpected benefit behind all of this is that I am now working at home and am spending more time with my wife and kids. We talk more. I drink morning coffee with my wife, and I am actually there when my kids have a problem. I now see things around the house that need my attention (and what my family has been putting up with as I travel to work each day). Rather than making excuses that I am too tired, I now have the time to fix those things that need fixing. I have the time to make a healthy lunch (or gorge on the box of Oreos if I so desire). I also have time to reboot my exercise life and have the flexibility to take walks with my family as well. Simply put, I have time.
So does this now mean that I will spend this time on blogging, tweeting, and participation in online activities? Maybe. But as with any precious asset, time must be invested properly and spent wisely. With the passing of my mother, I have been reminded that one of the wisest investments you can make is in spending time with others and investing in friendships is never a bad investment.
So who knows where I will devote my time the only thing guaranteed is that it will involve others.
Again, stay tuned.
The Case of the Mysteriously Creeping Database

While teaching a recent ForgeRock OpenDJ class, a student of mine observed an interesting behavior that at first seemed quite odd. While rebuilding his attribute indexes, the student found that the overall database size seemed to grow each time he performed a reindex operation. What seems obvious to me now sure made me scratch my head as I scrambled for an answer. I am sharing my findings here in the hopes that others will either a) find this information useful or b) find comic relief as to my misfortune.
| Note: If you are unclear about the information contained in OpenDJ’s database files, then I highly recommend that you read my posting entitled, Unlocking the Mystery behind the OpenDJ User Database. In that article I describe the overall structure of the Berkeley DB Java Edition database used by OpenDJ and how both entries (and indexes) are maintained in the same database. |
In OpenDJ, the rebuild-index command is used to update any attribute indexes contained in the OpenDJ database. This is necessary after you make a configuration change that affects indexes (such as modifying the index entry limit). Indexes are database specific and you can elect to rebuild a single attribute index or rebuild all attribute indexes for a particular database.
The following syntax is used to rebuild ALL indexes associated with the dc=example,dc=com suffix and its use is what caused the frantic head-scratching to occur:
$ rebuild-index -h ldap.example.com -p 4444 -D "cn=Directory Manager" -w password -b dc=example,dc=com --rebuildAll
Mystery
The student observed (and questioned) that every time he rebuilt the indexes, the aggregated size of the *.jdb files actually increased by some factor. In the case of a rebuild-all, it was about 18 MB each time he ran the command; in the case of rebuilding a single index, it was only about 3 MB each time. But the increase was consistent each time he rebuilt the index(es). This continued to occur until it reached a certain size at which time the consumption fell back to its original size (in our observations this occurred at roughly 200 MB when using the rebuild-all option).
The following details the output of the du -sh command on the userRoot database each time the rebuild-index command was run:
- 124 MB
- 142 MB (+ 18MB)
- 160 MB (+ 18MB)
- 178 MB (+ 18MB)
- 200 MB (+ 22MB)
- 123 MB (- 77MB)
This trend was consistent over several iterations.
We continued testing and observed that in addition to the increasing size, the database files on the file system (*.jdb) were changing as well. What was once 000000001.jdb and 000000002.jdb now became 000000002.jdb file and 000000003.jdb and later became 000000003.jdb file and 000000004.jdb. This occurred at the same time that we dropped back down to the 123 MB size and was the clue that unlocked the mystery.
Solution
Unlike the Berkeley Sleepycat database used in OpenDJ’s forefathers, when data is modified in the OpenDJ database, it is not immediately removed from the database. Instead it is marked for removal and the record essentially becomes inactive. Updated records are then appended to the end of the database in a log file fashion.

This process continues until OpenDJ cleaner threads detect that a database file contains less than 50% active records. Once that occurs, the cleaner threads migrate all active records from the file and append them to the end of the last file in the OpenDJ database (a new file is created if necessary). Once migrated, the cleaner threads delete the database file containing the stale entries.
During the rebuild process, old index values in each of the *.jdb files are marked as inactive and new indexes are added to the database. Simply marking these indexes as inactive does not eliminate their existence in the database and they continue to consume disk space. This process continues until the point where the cleaner threads detect that old indexes account for > 50% of the database entries. At this point, the migration process occurs, new *.jdb files are created to store the new indexes, old stale *.jdb files are deleted (hence the *.jdb file name changes), and the disk space is returned.
Word from ForgeRock’s OpenDJ Product Manager, Ludo Poitou confirmed my suspicions in the following response:
When an index is rebuilt, the whole btree is marked as deleted. But since it actually represents specific records of the database files, they will only be collected when the file itself reaches the threshold that triggers recollection.
With small databases, you will see the behavior you’re describing. With larger databases, this will be less noticeable as the amount of index records will be larger and cleanup point may be reached faster.
So there you go, mystery solved!
 |
